Sunday, September 11, 2011
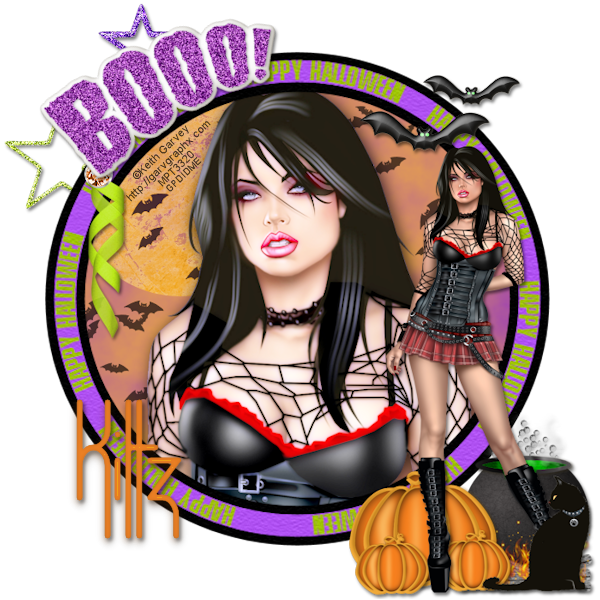
 Garv Halloween 3 pc set
Supplies:
Tube of Choice. I used the beautiful work of Keith Garvey available at his store
FTU Kit Halloween by Kittz Kreations available on her blog.
Font of choice. I used Verticalization.
Plug Ins: Xero-Porcelain, Eye Candy 5- Glass, Richard Rosenman- Solid Borders.
Animation Shop or other animation program.
Lets Get Started:
Open a new 700 x 700 image.
Paste Frame 3. Image> Resize to 115%.
Paste Paper 4. Move with Pick Tool so that it is off centered to where the moon is visible. Select frame layer and click inside of the frame using your Magic Wand. Selections> Modify> Expand by 5. Selections> Invert, Select your paper layer and then hit the delete key on your keyboard. Selections> None
Paste close up of tube of choice resize to 95%.
Effects> PlugIns> Xero> Porcelain: Softness 50, Strength 128, Brightness 128, Red Channel 0, Green Channel 0, Blue Channel 255.
Duplicate the tube and change the Blend Mode of the top one to Screen. Merge the two back together.
Effects> 3D Effects> Drop Shadow: Vertical 3, Horizontal 3, Opacity 74, Blur 26, color black.
Select frame layer and click inside of the frame using your Magic Wand. Selections> Modify> Expand by 5. Selections> Invert, Select your tube layer and then hit the delete key on your keyboard. Selections> None.
Pastee Bats and position to the top right. Add drop shadow changing the settings to vertical 3, horizontal 2, opacity 53, blur 5 color black.
Paste full body tube of choice. Position tube to right of frame making sure it is the top layer. Drop Shadow to same settings as bats.
Paste Booword. Use Pick tool to to slightly rotate to the left and then place at top left of frame. Add drop shadow.
Paste Diamond Curl Ribbon. Drag under Booword layer and position to where it is slightly sticking out under the bottom corner of the letter B. Add drop shadow.
Paste Halloween Stars and drag layer to the bottom. Position to where it is at the top left and viewable behind the frame and wordart.
Adjust> Add/Remove Noise> Add Noise: Gaussian 100 Monochrome checked.
Drop shadow same settings as before.
Paste Pumpkin 2 and resize to 50%. Drag layer to where it is under the full body tube layer and duplicate. Resize to 50%. Position to the bottom right of the original pumpkin layer. Duplicate and place next to it. Drop Shadow all 3 pumpkins.
Paste Witches Cauldron and resize to 65%. Drag layer behind big pumpkin layer and position at the bottom and off to the right. Drop shadow.
Merge Visible.
Resize to 600x600.
Add copyright.
Add Name. I used the font Verticalization size 100, bold selected, Stroke 3, color for both #f68626.
Effects> PlugIns> EyeCandy5-Impact> Glass: Bevel Width 82.77, Bevel Smoothness 0, Rounded Selection Corners 0, Bevel Placement Inside, Glass Color same as font, Opacity 100, Tinting 0, Refration 50, Inner Shadow Opacity 75, Drop Shadow Opacity 40, Shadow Offset 11.16, Shadow Glow 20, Direction 78, Inclination 84, Highlight Brightness 50, Highlight Size 62, Highlight Color #f6c10a, Reflection Map None.
Drop Shadow Vertical 3, Horizontal 2, Opacity 53, Blur 5, Color Black
Merge Visible.
Save as PNG.
Forum Tag:
Open a new 700w x 250h image.
Paste Paper 4. Use Pick Tool to stretch and place as desired.
Paste tube close up and position as desired. I placed mine to the left of the image.
Effects> PlugIns> Xero> Porcelain: Softness 50, Strength 128, Brightness 128, Red Channel 0, Green Channel 0, Blue Channel 255.
Duplicate and change blend mode to Soft Light. Merge the two back together.
Effects> 3D Effects> Drop Shadow vertical 3, horizontal 2, opacity 74, blur 26, color black.
Paste Cauldron and resize to 65% and position to the right of the image.
On the witches cauldron image that you opened from the kit there are three bubbles that you need for the animation part of the tag. Use your freehand tool to draw a circle around the top bubble, the one on the right that sticks out slightly, and the one on the left that sticks out silightly as well. Edit> Copy.
Paste them into your tag and place the layer behind the cauldron layer. Position so that they are slightly above the cauldron and viewable. Use erase tool if desired to remove the white fog around them.
Duplicate and move up slightly. Repeat until the bubbles disappear off the tag at the top. I ended up with 8 total bubble layers.
Hide all bubble layers.
Merge Visible.
Effects> PlugIns> Richard Rosenman> Solid Borders 8 color #f68226.
Use wand to select border. Selections> Promote Selections to Layer.
Effects> PlugIns> EyeCandy5-Impact> Glass: Bevel Width 82.77, Bevel Smoothness 0, Rounded Selection Corners 0, Bevel Placement Inside, Glass Color same as font, Opacity 100, Tinting 0, Refration 50, Inner Shadow Opacity 75, Drop Shadow Opacity 40, Shadow Offset 11.16, Shadow Glow 20, Direction 78, Inclination 84, Highlight Brightness 50, Highlight Size 62, Highlight Color #f6c10a, Reflection Map None.
Adjust> Add/Remove Noise> Add Noise: Gaussian 100 Monochrome checked.
Effects> 3D Effects> Drop Shadow Vertical 3, Horizontal 2, Opacity 74, Blur 5, color Black.
Repeat changong vertical to -3, and horizontal to -2
Add Copyright.
Add Name. I used the font Verticalization size 100, bold selected, Stroke 3, color for both #f68626.
Effects> PlugIns> EyeCandy5-Impact> Glass: Bevel Width 82.77, Bevel Smoothness 0, Rounded Selection Corners 0, Bevel Placement Inside, Glass Color same as font, Opacity 100, Tinting 0, Refration 50, Inner Shadow Opacity 75, Drop Shadow Opacity 40, Shadow Offset 11.16, Shadow Glow 20, Direction 78, Inclination 84, Highlight Brightness 50, Highlight Size 62, Highlight Color #f6c10a, Reflection Map None.
Drop Shadow Vertical 3, Horizontal 2, Opacity 53, Blur 5, Color Black
Transfer to AS3 (or your prefered program) however is easiest for you. I make each bubble layer visible separately then merge all flatten and copy to AS3. I mad sure to make one of the frames with the original cauldron without the added bubbles.
In AS3 once all are pasted over select all frames and change the frame properties to 15. You can find Frame Properties under Animation.
Resize to 600 with aspect ratio locked and it will adjust the height.
Save as GIF to whatever settings look best to you.
Avatar:
Open a new 200x200 image.
Paste Paper 4 and position as desired.
Paste tube close up and resize to 65% then position as desired.
Effects> PlugIns> Xero> Porcelain: Softness 50, Strength 128, Brightness 128, Red Channel 0, Green Channel 0, Blue Channel 255.
Duplicate and change blend mode to Soft Light. Merge the two back together.
Effects> 3D Effects> Drop Shadow vertical 3, horizontal 2, opacity 74, blur 26, color black.
Merge Visible.
Effects> PlugIns> Richard Rosenman> Solid Borders 8 color #f68226.
Use wand to select border. Selections> Promote Selections to Layer.
Effects> PlugIns> EyeCandy5-Impact> Glass: Bevel Width 82.77, Bevel Smoothness 0, Rounded Selection Corners 0, Bevel Placement Inside, Glass Color same as font, Opacity 100, Tinting 0, Refration 50, Inner Shadow Opacity 75, Drop Shadow Opacity 40, Shadow Offset 11.16, Shadow Glow 20, Direction 78, Inclination 84, Highlight Brightness 50, Highlight Size 62, Highlight Color #f6c10a, Reflection Map None.
Adjust> Add/Remove Noise> Add Noise: Gaussian 100 Monochrome checked.
Effects> 3D Effects> Drop Shadow Vertical 3, Horizontal 2, Opacity 74, Blur 5, color Black.
Repeat changong vertical to -3, and horizontal to -2.
Merge Visible.
Image> Resize to 150x150
Add copyright
Add name or initial. I added an initial and use the same steps as in the forum and tag.
Merge Visible and save as PNG
Thank you for trying my tutorial. If you have any questions please email me and ask and I will try to help you with them.

Subscribe to:
Post Comments (Atom)
TWI

Sunshine Daze Topsite
Vote Please

Fan Of


About Me

- SuthrnPrincess
- I am a mom of 5 rambunctious and audacious kids. 1 girl and 4 boys. I started out tagging and fell in love with my PSP. I am with the most wonderful man in my world, George. If you make something with a mask or template I would love to see it. Please feel free to email me at georges_princess@yahoo.com. If you make a tutorial please link back to my blog for supplies do not include my materials nor link to my file share site. I would love to put your tutorial link on my blog so please feel free to email me :).
My Blinkies


CT For


1 comments:
You have an award on my blog girl :D
http://scrappinkrazydesigns.blogspot.com
Post a Comment