Friday, January 11, 2013
 Summer PTU
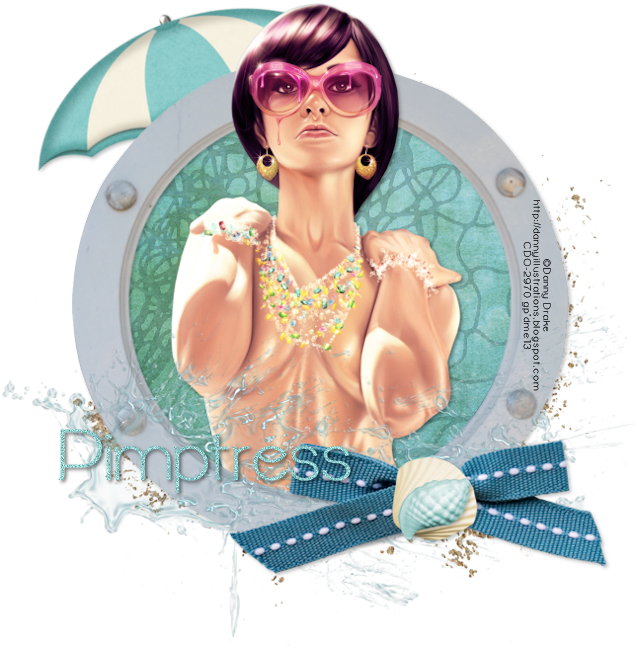
Supplies:
PTU kit AB Series 06 by Pimp'd Designz available at Pimp My Tags With Scraps.
Tube of choice. I used Danny Drake available at Creative Design Outlet.
Font of choice. I used Alighty Nesia.
Let's Get Started:
Open a new 700 by 700 image.
Paste frame-01.
Paste pp-04. Image> resize to 75%. Select the frame. Click inside of the frame with the wand tool. Selections> Modify> Expand by 10. Selections> Invert. Select the paper layer and hit the delete key on the keyboard. Selections> Select None.
Paste tube close-up. Position in the frame.
Effects> 3D Effects> Drop Shadow: vertical 2, horizontal 2, opacity 25, blur 5, color black.
Duplicate tube. Drag above the frame. Erase the bottom of the top layer.
Select the frame.
Drop shadow same settings.
Paste sand. Drag to the bottom. Position off center to the bottom right.
Paste net. Drag above the paper layer. Position in the frame as desired. Select the paper. Selections> Select All. Selections> Float. Selections> Defloat. Selections> Invert. Select the net layer and hit the delete key on the keyboard. Selections> Select None.
Change the blend mode to Luminance.
Drop shadow changing the opacity to 24.
Merge down.
Paste umbrella. Image> Resize to 65%. Drag behind the paper.
Image> Free Rotate> to the left 20 degrees.
Position to the top left.
Drop shadow same settings.
Paste water. Drag to the top layer. Position at the bottom.
Paste shell-04. Image>Resize to 25%. Position at the bottom right.
Drop shadow same settings.
Paste shell-03. Image>Resize to 40%. Drag behind shell 04 layer. Position behind shell 04.
Drop shadow same settings.
Paste ribbon-02. Image>Resize to 85%. Drag below shell 03. Position behind shell 03.
Drop shadow same settings.
Merge visible.
Image> Canvas Size: 645 width by 658 height.
Recenter with pick tool.
Image> Resize to 637 width by 650 height.
Add copyright.
Add name with font of choice. I used Alighty Nesia size 72 Bold color #90cecd.
Adjust> Add/Remove Noise> Add Noise: Gaussian 30.
Drop shadow changing opacity to 55.
Merge visible.
Save as PNG.

Sexy Cook PTU

Supplies:
PTU Kit AB Series 05 by Pimp'd Designz available at Pimp My Tags With Scraps.
Tube of choice I used Arthur Crowe available at his store.
Font of choice. I used Bedtime Stories.
Let's Get Started:
Open a new 700 by 700 image.
Paste frame-02. Image>Resize to 85%.
Paste pp-01. Image> Resize to 75%. Drag below the frame. Select the frame. Click inside of the frame with the wand tool. Selections> Modify> Expand by 10. Selections> Invert. Select the paper layer and hit the delete key on the keyboard. Selections> Select None.
Paste pp-02. Image> Resize to 75%. Select paper 1. Selections> Select All. Selections> Float. Selections> Defloat. Selections> Invert. Select the paper 2 layer and hit the delete key on the keyboard. Selections> Select None.
Change the blend mode to Luminance.
Merge down.
Paste tube. Image> Resize to 75%. Position in the frame as desired.
Effects> 3D Effects> Drop Shadow: vertical 2, horizontal 2, opacity 25, blur 5, color black.
Duplicate. Drag duplicate above frame.
Erase the part of the top tube that is over the bottom of the frame and below the frame.
Select the bottom tube and erase the bottom part of the tube that is viewable under the frame.
Select the frame.
Drop shadow same settings.
Paste cupcake-wrapper. Drag to the bottom layer. Position top left. Duplicate. Image> Mirror. Image> Flip.
Lower opacity of both to 50.
Paste ribbon-01. Image> Resize to 30%. Drag to the top layer. Position at the bottom.
Drop shadow changing opacity to 30.
Paste wooden-spoon. Drag below the paper. Position to the right.
Drop shadow same settings.
Paste ribbon-03. Drag below spoon layer. Position at the bottom.
Paste flower-01. Image>Resize to 35%. Drag below the ribbon-03 layer. Position behind the ribbon.
Drop shadow changing opacity to 40.
Merge visible.
Image> Canvas Size: 605 width by 700 height.
Recenter with pick tool.
Image> Resize to 562 width by 650 height.
Add copyright.
Add name with font of choice. I used bedtime stories size 72 color #d13372.
Drop shadow changing opacity to 50 and blur to 3.
Merge visible.
Wednesday, January 09, 2013
Christmas PTU

Supplies:
PTU kit AB Series 04 by Pimp'd Designz available at Pimp My Tags With Scraps.
Tube of choice. I used Arthur Crowe available in his store.
Font of choice. I used Wedding Script.
Let's Get Started:
Open a new 700 by 700 image.
Paste frame-01. Image>Resize to 90%.
Paste pp-06. Image>Resize to 75%. Drag below the frame.
Select the frame. Click inside of the frame with the wand tool. Selections> Modify> Expand by 10. Selections> Invert. Select the paper layer and hit the delete key on the keyboard. Selections> Select None.
Paste tube. Image>Resize to 75%. Position in the frame.
Effects> 3D Effects> Drop Shadow: vertical 2, horizontal 2, opacity 25, blur 5, color black.
Duplicate. Drag above the frame layer.
Erase the bottom of the tube that is over the frame.
Erase the bottom of the tube that is visible under the frame on the bottom tube layer.
Select the frame.
Drop shadow same settings.
Paste ribbon-03. Image>Resize to 85%. Drag to the bottom layer. Position at the bottom of the frame.
Drop shadow changing opacity to 35.
Paste ribbon-02. Drag behind the top tube layer. Position at the top left.
Drop shadow changing opacity to 20.
Paste snowflake. Image>Resize to 85%. Drag to the top layer. Position at the bottom right.
Drop shadow same settings.
Paste candy-cane. Image>Resize to 60%. Position over the snowflake.
Drop shadow same settings.
Paste flower-01. Image>Resize to 25%. Drag above the frame layer. Position at the bottom left. Duplicate. Image> Mirror.
Drop shadow both changing opacity to 30.
Paste holly-01. Drag to the bottom layer. Position to the right.
Erase the bottom.
Drop shadow changing opacity to 40.
Paste holly-02. Image>Resize to 65%. Position to the left. Duplicate. Image> Mirror.
Drop shadow same settings.
Paste ornament. Image>Resize to 85%. Drag to the top layer. Position at the bottom and to the right some.
Drop shadow changing opacity to 20.
Paste glitter. Drag to the bottom. Position towards the top. Duplicate. Image> Flip. Duplicate. Image> Mirror. Duplicate. Image> Flip.
Merge visible.
Image> Resize to 650 by 650.
Add copyright.
Add name. I used Wedding Script size 42 color white.
Change the blend mode to Soft Light.
Drop shadow and change the opacity to 100.
Merge visible.
Save as PNG.
Dreamer PTU
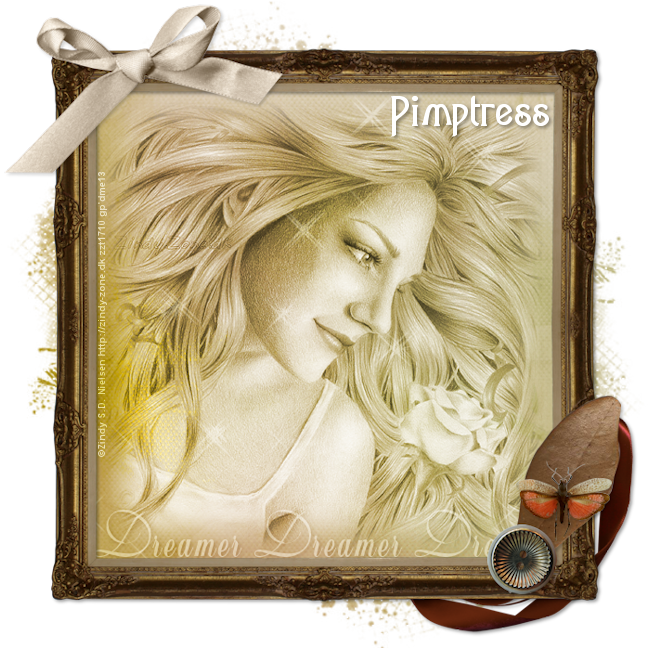
Supplies:
PTU Kit AB Series 03 by Pimp'd Designz available at Pimp My Tags With Scraps.
Mask of choice. I used Grunge 2 by Sue on the Creative Misfits Blog (posted 5-19-12).
Tube of choice. I used Zindy S.D. Nielsen avialable in her store.
Font of choice. I used Agatha.
Let's Get Started:
Open a new 700 by 700 image.
Paste frame-01.
Paste pp-01. Image>Resize to 75%. Drag below the frame.
Select the frame. Click inside of the frame with the wand tool. Selections> Modify> Expand by 10. Selections> Invert. Select the paper layer and hit the delete key on the keyboard. Selections> Select None.
Paste tube of choice.
Change the blend mode to Luminance.
Paste ribbon-04. Image>Resize to 75%. Drag to the top layer. Position to the top left.
Effects> 3D Effects> Drop Shadow: vertical 2, horizontal 2, opacity 20, blur 5, color black.
Paste sparkle. Drag below the frame.
Change the blend mode to Soft Light.
Paste ribbon-01. Image>Resize to 50%. Drag to the bottom layer. Position at the top right.
Drop shadow changing opacity to 40.
Paste leaf. Image>Resize to 50%. Drag above the frame. Position at the bottom right.
Drop shadow changing opacity to 25.
Paste button-01. Image>Resize to 50%. Position at the bottom of the leaf.
Drop shadow same settings.
Paste butterfly. Image>Resize to 25%. Position over the leaf.
Drop shadow same settings.
Create wording of choice with font of choice. I used Weddings Script size 70 color white.
Type the word repeatedly so that it fits the entire width of the frame.
Drag behind the frame
Change the blend mode to Soft Light.
Position at the bottom of the frame.
Drop shadow changing opacity to 90.
Paste pp-01. Drag to the bottom.
Open the mask in psp.
Select the tag you are working on again.
Layers> New Mask Layer> From Image: Select Grunge 2 in Source Window, Select Source Luminance, Deselect Invert Mask Data.
Stretch the mask to fit as desired behind the frame.
Merge group.
Select the frame.
Drop shadow opacity 40.
Merge visible.
Image>Resize to 650 width by 650 height.
Add copyright.
Add name with font of choice. I used Agatha size 48 Bold color white.
Drop shadow same settings.
Merge visible.
Save as PNG.
Beauty PTU

Supplies:
PTU AB Series 02 by Pimp'd Designz available at Pimp My Tags With Scraps.
Tube of choice. I used Zindy S. D. Nielsen available in her shop.
PlugIn- Xero: Porcelain.
Font of choice. I used Black Swan BF.
Let's Get Started:
Open a new 700 by 700 image.
Paste frame-02.
Paste pp-05. Image>Resize to 65%. Drag under the frame layer. Select the frame layer. Click inside with wand tool. Selections> Modify> Expand by 10. Selections> Invert. Select the paper layer and hit the delete key on the keyboard. Selections> Select None.
Paste tube. Position in the frame as desired. Select the paper. Selections> Select All. Selections> Float. Selections> Defloat. Selections> Invert. Select the tube layer and hit the delete key on the keyboard. Selections> Select None.
Effects> PlugIns> Xero> Porcelain: Softness 50, Strength 128, Brightness 128, Red Channel 0, Green Channel 0, Blue Channel 255.
Duplicate.
Change the blend mode of the top tube to Soft Light.
Merge down.
Effects> 3D Effects> Drop Shadow: vertical 2, horizontal 2, opacity 45, blur 2, color black.
Select the frame.
Drop shadow opacity 30.
Paste petals. Position at the bottom of the frame.
Drop shadow opacity 25.
Paste moon. Image>Resize to 65%. Drag to the bottom layer. Position to the left.
Paste butterfly. Image>Resize to 40%. Drag to the top layer. Position at the bottom left.
Drop shadow.
Paste feather.Image>Resize to 50%. Drag to the bottom layer. Position at the bottom right.
Duplicate.
Image> Mirror.
Drop shadow both same settings.
Merge visible.
Image> Canvas Size: 440 width by 633 height.
Recenter with pick tool.
Add copyright.
Add name with font of choice. I used Black Swan BF size 48 Bold color white.
Drop shadow changing opacity to 100 and blur to 5.
Merge visible.
Save as PNG.
Monday, January 07, 2013
Denim Girl PTU
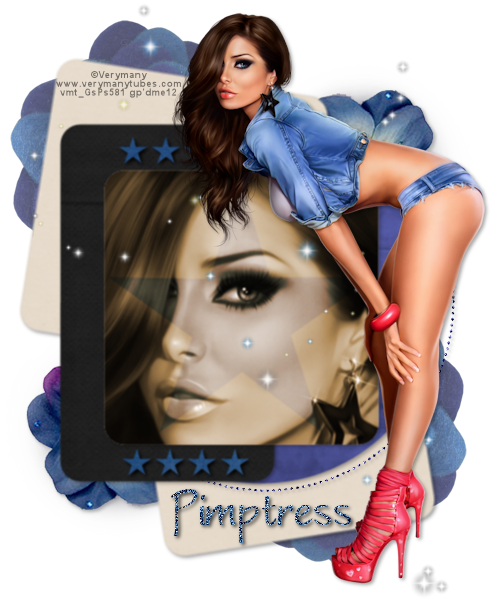
Supplies:
PTU kit AB Series 01 by Pimp'd Designz available at Pimp My Tags With Scraps.
Temp130 by Millie available on her blog.
Tube of choice. I used Verymany available in the Verymany Tube store!
Font of choice. I used WorstveldSling.
Let's Get Started:
Open template.
Shift + D.
Close the original template.
Delete the cr, background and 10 layer.
Merge 9 and 8 together.
Merge 2 and 1 together.
Paste pp-03. Image>Resize to 65%. Drag above 4. Duplicate. Select 4. Selections> All. Selections> Float. Selections> Defloat. Selections> Invert. Select the paper and hit the delete key on the keyboard. Selections> Select None.
Drag duplicate above 3. Select 3. Selections> All. Selections> Float. Selections> Defloat. Selections> Invert. Select the paper and hit the delete key on the keyboard. Selections> Select None.
Delete 3 and 4.
Select Dotted Circle.
Adjust> Add/Remove Noise> Add Noise: Gaussian 100 monochrome checked.
Paste pp-02. Image>Resize to 70%. Drag above 5. Select 5. Selections> All. Selections> Float. Selections> Defloat. Selections> Invert. Select the paper and hit the delete key on the keyboard. Selections> Select None.
Delete 5.
Paste pp-04. Image>Resize to 70%. Drag above 7. Duplicate. Drag above 8. Select 8. Selections> All. Selections> Float. Selections> Defloat. Selections> Invert. Select the paper and hit the delete key on the keyboard. Selections> Select None.
Select 7. Selections> All. Selections> Float. Selections> Defloat. Selections> Invert. Select the paper and hit the delete key on the keyboard. Selections> Select None.
Delete 7 and 8.
Paste pp-06. Image> Resize to 75%. Drag above 6. Duplicate. Drag above 1. Select 1. Selections> All. Selections> Float. Selections> Defloat. Selections> Invert. Select the paper and hit the delete key on the keyboard. Selections> Select None.
Select 6. Selections> All. Selections> Float. Selections> Defloat. Selections> Invert. Select the paper and hit the delete key on the keyboard. Selections> Select None.
Delete 1 and 6.
Paste tube close-up. Drag under large star layer. Position in the rounded square layer. Select rounded square layer. Selections> All. Selections> Float. Selections> Defloat. Selections> Invert. Select the paper and hit the delete key on the keyboard. Selections> Select None.
Change the tube blend mode to Luminance.
Merge down.
Select the star layer.
Change the blend mode to overlay.
Lower layer opacity to 50.
Merge down.
Paste Tube (full body). Image> Resize to 50%. Position to the right. Drag to the top layer.
Effects> 3D Effects> Drop Shadow: vertical 2, horizontal 2, opacity 35, blur 5, color black.
Paste flower-01. Drag to the bottom. Position to the top left. Duplicate. Image> Mirror. Image> Flip. Position at the bottom right.
Lower opacity of both to 75.
Paste sparkle-01. Image>Resize to 95%. Drag below the star line. Position to the left.
Paste flower-02. Drag above the top flower-01. Position at the bottom left. Duplicate. Image> Mirror. Image> Flip. Position top right.
Drop shadow same settings.
Select rounded square/tube layer.
Adjust> Softness> Soften.
Drop shadow opacity 27.
Select the next layer down.
Drop shadow opacity 30.
Select the next layer down.
Adjust> Softness> Soften.
Drop shadow same settings.
Select the next layer down.
Drop shadow same settings.
Select the next layer down.
Adjust> Softness> Soften More.
Drop shadow opacity 40.
Select the star line.
Adjust> Softness> Soften.
Drop shadow 100.
Merge visible.
Image> Canvas Size: 500 widh by 600 height.
Recenter with pick tool.
Add copyright.
Add name with font of choice. I used WorstveldSling size 65 Bold color #335c87.
Add Noise 100.
Drop shadow same settings.
Merge visible.
Save as PNG.
Sunday, January 06, 2013
Happy New Year PTU
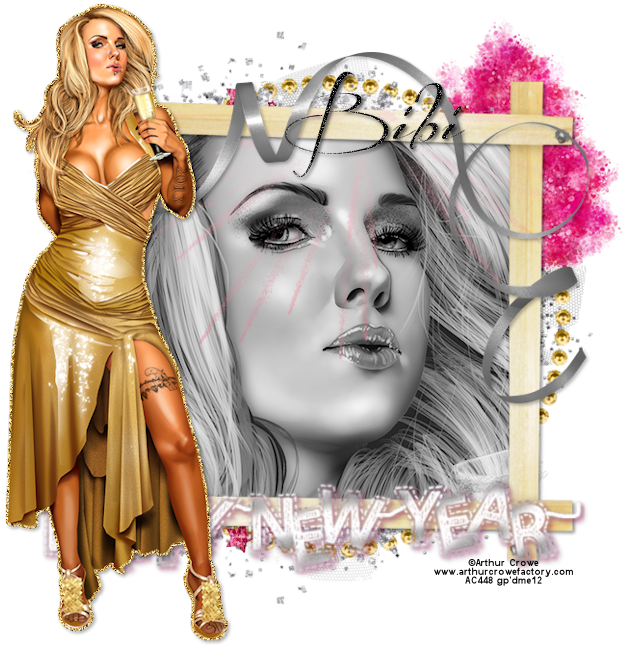
Supplies:
PTU kit New Year!!! by Bibi Collections available at Scraps & the City.
Tube of choice. I used Arthur Crowe available in his store.
PlugIns- Xero: Porcelain.
Font Before the Rain.
Let's Get Started:
Open new 700 by 700 image.
Paste Elements(95). Image> Resize to 95%.
Paste Elements(84). Image>Resize to 85%. Drag to the bottom.
Paste Papers(2). Image>Resize to 85%. Select the frame. Click inside of the frame with the wand tool. Selections> Modify> Expand by 10. Selections> Invert. Select the paper and hit the delete key on the keyboard. Selections> Select None.
Paste tube close-up. Position in the frame as desired. Select the paper. Selections> Select All. Selections> Float. Selections> Defloat. Selections> Invert. Select the tube layer and hit the delete key on the keyboard. Selections> Select None.
Effects> PlugIns> Xero- Porcelain: Softness 50, Strength 128, Brightness 128, Red Channel 0, Green Channel 0, Blue Channel 255.
Change the tube blend mode to Luminance(L).
Merge down.
Select the frame.
Effects> 3D Effects> Drop Shadow: vertical 2, horizontal 2, opacity 50, blur 5, color black.
Paste full tube. Image> Resize to 80%. Position to the left.
Selections> Select All. Selections> Float. Selections> Defloat. Selections> Modify> Expand by 3. Create New Raster Layer. Flood Fill with color #d9ad59. Selections> Select None.
Adjust> Add/Remove Noise> Add Noise: Gaussian 100 monochrome checked.
Merge tube and glitter layer.
Drop shadow opacity 35%.
Paste Elements(48). Drag behind the tube layer. Position at the bottom of the frame.
Drop shadow opacity to 40%.
Paste Elements(18). Drag to the bottom layer.
Paste Elements(94). Drag behind the tube. Position at the top of the frame.
Lower layer opacity to 40.
Paste Elements(80). Drag to the bottom.
Paste Elements(70). Drag behind the tube layer. Position at the top of the frame.
Drop shadow changing opacity to 30.
Paste Elements(99). Image>Resize to 65%. Drag below the paper layer. Position at the top right.
Paste Elements(2). Position at the bottom. Duplicate. Image> Flip.
Merge visible.
Image> Canvas Size 655 width by 675 height.
Recenter with pick tool.
Image> Resize to 631 width by 650 height.
Add copyright.
Add name with font of choice. I used Before the Rain size 48 Bold color black.
Add Noise same settings.
Drop shadow changing opacity to 70.
Merge visible.
Save as PNG.
Late Christmas FTU
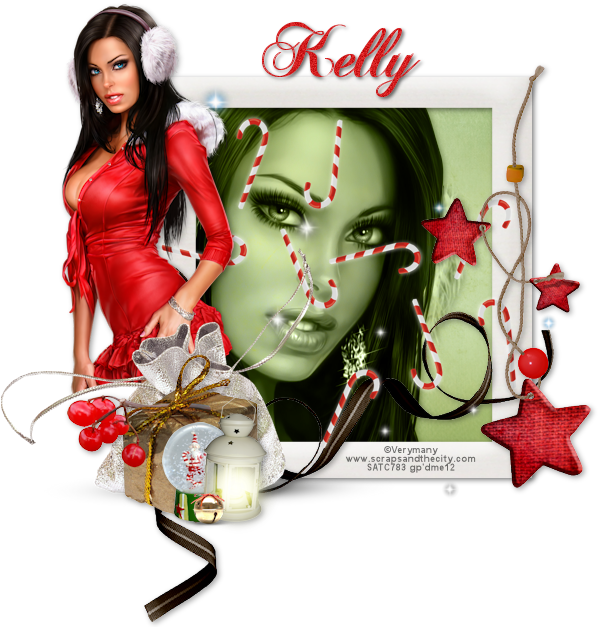
Supplies:
FTU Late Christmas Kit by Stefs Scrap Kits.
Tube of choice. I used Verymany available at Scraps & the City.
Font of choice. I used Chopin Script.
Let's Get Started:
Open a new 700 by 700 image.
Paste ele12.
Paste pap02. Image>Resize to 65%. Select the frame layer. Click inside of the frame with the wand tool. Selections> Modify> Expand by 20. Selections> Invert. Select the paper layer and hit the delete key on the keyboard. Selections> Select None.
Select the frame layer.
Effects> 3D Effects> Drop Shadow: vertical 2, horizontal 2, opacity 50, blur 8, color black.
Paste ele63. Image> Resize to 65%. Position to the left.
Drop shadow changing the opacity to 35.
Paste ele55. Image>Resize to 35%. Position at the bottom left.
Drop shadow same settings.
Paste ele52. Image> Resize to 35%. Position next to the package.
Drop shadow same settings.
Paste ele40. Drag behind the package. Position at the bottom left.
Paste ele35. Drag above the frame.
Paste ele19. Image>Resize to 75%. Drag above the frame layer. Position at the bottom.
Drop shadow same settings.
Paste ele65. Image>Resize to 25%. Drag above the package. Position at the bottom.
Drop shadow same settings.
Paste ele36. Image>Resize to 10%. Drag to the top layer. Position at the bottom left.
Paste Tube close-up. Image>Mirror. Drag behind the frame layer. Position to the left. Select the paper layer. Selections> Select All. Selections> Float. Selections> Defloat. Selections> Invert. Select the tube layer and hit the delete key. Selections> Select None.
Drop shadow same settings.
Change tube layer blend mode to Luminance(L).
Merge down.
Paste tube. Image> Resize to 40%. Drag above the candy cane scatter. Position to the left.
Drop shadow same settings.
Erase the bottom of the tube.
Merge visible.
Image> Canvas Size: 600 width b 630 height.
Recenter with pick tool.
Add copyright.
Add name with font of choice. I used Chopin Script size 72 Bold color #d21d1e.
Adjust> Add/Remove Noise> Add Noise: Gaussian 15 monochrome checked.
Drop shadow changing opacity to 60 and blur to 5.
Merge visible.
Save as PNG.
Thursday, January 03, 2013
Meet Me In Paris PTU
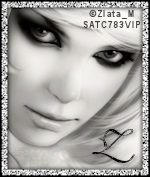


Supplies:
PTU Kit Yolanthe by SkyScraps available at Scraps & the City.
Tube of choice I used Zlata_M available at Scraps & the City.
Xero- Porcelain
EyeCandy 5: Impact- Bevel, Glass, Gradient Glow
MuRa's Meister- Copies
Fonts of choice. I used: Vivaldi, Wedding Script 2, Treasury, and Tw Cen MT Condensed Extra Bold.
Let's Get Started:
Tag:
Open a new 700 by 700 image.
Paste E25. Image> Resize to 80%.
Paste pp4. Image> Resize to 75%. Drag to the bottom. Select the frame. Click inside of the frame with the wand tool. Selections> Modify> Expand by 10. Selections> Invert. Select the paper layer and hit the delete key on the keyboard. Selections> Select None.
Paste tube close-up. Position in the frame.
Effects> PlugIns> Porcelain- Softness 50, Strength 128, Brightness 128, Red Channel 0, Green Channel 0, Blue Channel 255.
Duplicate.
Change top tube blend mode to Soft Light.
Merge down.
Effects> 3D Effects> Drop Shadow: vertical 2, horizontal 2, opacity 30, blur 5, color black.
Select the paper layer. Selections> Select All. Selections> Float. Selections> Defloat. Selectons> Invert. Select the tube layer and hit the delete key on the keyboard. Selections> Select None.
Change the tube layer blend mode to Luminance(L).
Mege down.
Select the frame.
Drop shadow same settings.
Paste full tube. Image> Resize to 65%. Image> Mirror. Position to the right of the fame.
Porcelain with the same settings.
Drop shadow changing opacity to 35.
Paste E81. Image>Resize to 65%. Drag under the tube layer. Position to the right. Erase left end of the string.
Drop shadow changing opacity to 30.
Paste E80. Drag to the bottom layer.
Lower layer opacity to 75.
Paste E54. Position at the bottom left.
Paste E27. Drag above the frame layer. Position at the bottom.
Drop shadow same settings.
Paste E23. Image> Resize to 65%. Drag above the frame layer. Position to the left. Duplicate. Drag above the ribbon. Erase the bottom of the right left of the tower.
Select the bottom tower.
Drop shadow same settings.
Paste E29. Drag behind the paper. Position at the top right.
Using font of choice create your wordart. I wrote "Meet Me in Paris" using Vivaldi size 85 Bold color black.
Adjust> Add/Remove Noise> Add Noise: Gaussian 100 monochrome checked.
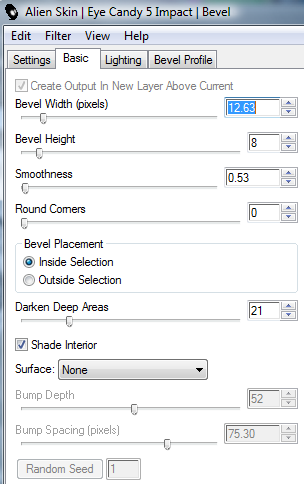
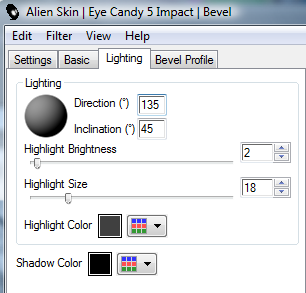
Effects> PlugIns> AlienSkin EyeCandy 5: Impact- Bevel
Effects> PlugIns> AlienSkin EyeCandy 5: Impact- Gradient Glow
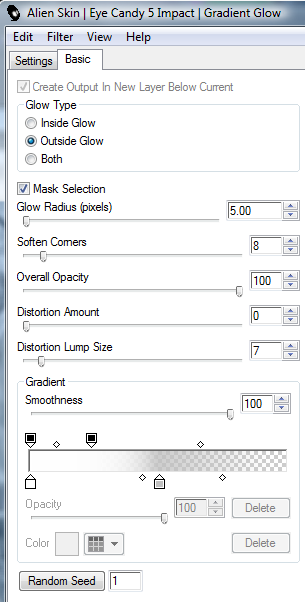
Drop shadow changing opacity to 50.
Merge visible.
Image> Canvas Size 690 width by 660 height.
Recenter with pick tool.
Image> Resize to 650 width by 622 height.
Add copyright.
Add name. I used Wedding Script 2 size 85 color black.
Add Noise changing to 50.
Drop shadow same settings.
Merge visible.
Save as PNG.
Banner:
Open a new 700 by 250 image.
Create wordart of choice using font of choice. I use Treasury size 185 Bold color black.
Right click on the wordart> Align Objects> Center In Canvas.
Convert to Raster.
Paste tube close up. Position wih the face visible in the canvas. Duplicate. Select the bottom tube.
Effects> PlugIns> MuRa's Meister- Copies
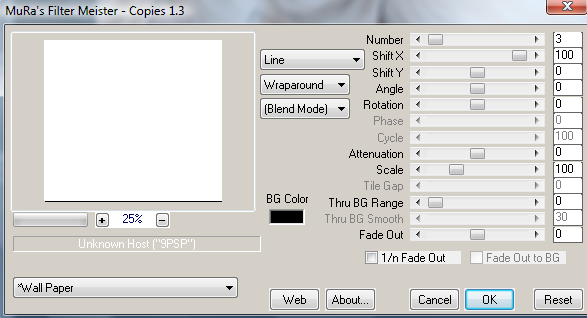
Position bottom tube to where it covers the wordart completely.
Merge tubes together.
Porcelain to the same settings as the tag.
Select the wordart layer. Selections> All. Selections> Float. Selections> Defloat. Selections> Invert. Select the tube layer and hit the delete key on the keyboard. Selectins> Modify> Expand by 3. Create a New Raster layer. Flood Flill black. Selections> Select None. Drag to bottom layer.
Noise 100.
Select the tube layer.
Effects> PlugIns> AlienSkin EyeCandy 5: Impact- Glass
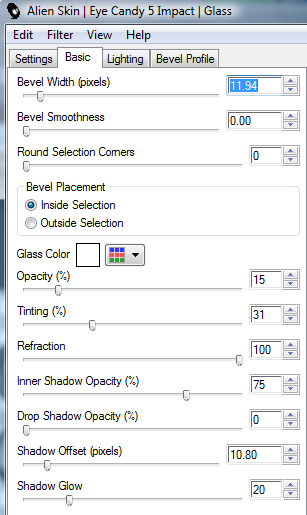
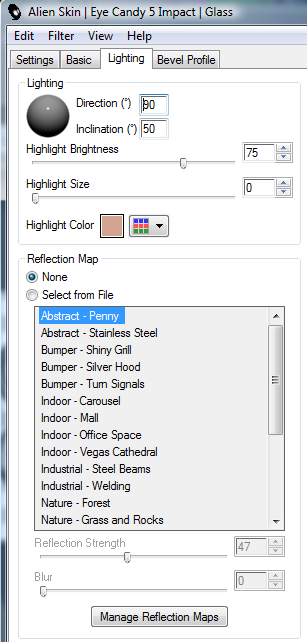
Change the blend mode to Luminance.
Merge visible.
Gradient Glow same settings as tag.
Drop shadow same settings.
Paste E81. Image>Resize to 35%. Drag to the bottom layer. Position to the right.
Drop shadow changing opacity to 65.
Paste E80. Image>Resize to 45%.
Lower opacity to 75.
Paste E54. Image>Resize to 50%. Position at the bottom left.
Drop shadow same settings.
Merge visible.
Image>Resize to 650 width by 232 height.
Add wordart "In Paris" using font Tw Cen MT Condensed Extra Bold size 30 color black.
Add noise 50.
Drop shadow changing opacity to 60.
Merge visible.
Add copyright.
Add name same settings as tag.
Drop shadow opacity 100 and blur 7.
Merge visible.
Save as PNG.
Avatar:
Open a new 150 width by 180 height.
Paste pp4. Image> Resize to 25%.
Paste tube. Position as desired.
Porcelain same settings.
Duplicate.
Change top tube blend mode to Soft Light.
Merge down.
Drop shadow opacity 40, blur 5.
Change the blend mode to Luminance (L).
Merge visible.
Image>Add Borders> size in pixels 6 symmetric selected color white.
Select the border with the wand tool.
Selections> Promote to Layer.
Add noise 100. Repeat for a total of 5 times.
Drop shadow changing opacity to 50.
Drop shadow again changing vertical and horizontal to -2.
Merge visible.
Add Borders again changing to 2 and black.
Image> Resize to 150 width by 177 height.
Add copyright.
Add name same as banner (size 36).
Add noise 50.
Drop shadow changing vertical and horizontal back to 2.
Merge visible.
Save as PNG.


Subscribe to:
Posts (Atom)
TWI

Sunshine Daze Topsite

Vote Please

Fan Of


About Me

- SuthrnPrincess
- I am a mom of 5 rambunctious and audacious kids. 1 girl and 4 boys. I started out tagging and fell in love with my PSP. I am with the most wonderful man in my world, George. If you make something with a mask or template I would love to see it. Please feel free to email me at georges_princess@yahoo.com. If you make a tutorial please link back to my blog for supplies do not include my materials nor link to my file share site. I would love to put your tutorial link on my blog so please feel free to email me :).
My Blinkies


CT For


