Wednesday, February 13, 2013
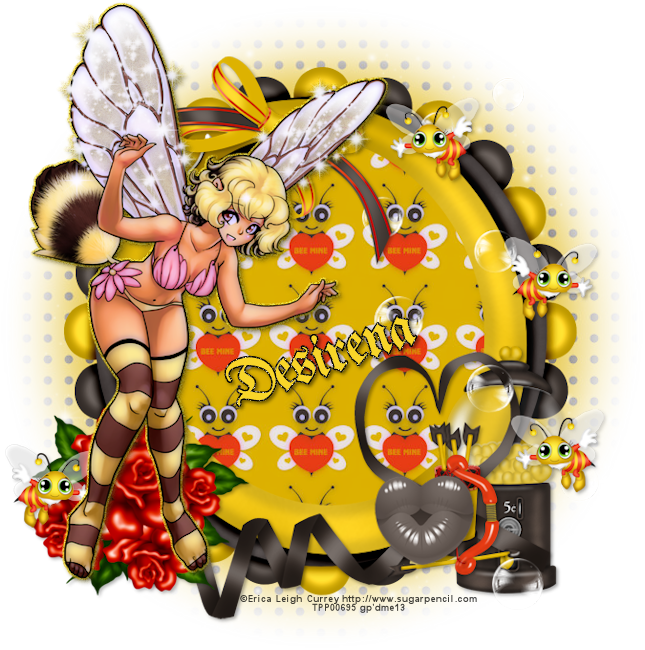
 Bee Mine PTU
11:47 PM | Posted by
SuthrnPrincess |
Edit Post
Supplies:
Tube of choice. I used Erica Leigh Currey available at The PSP Project.
PTU Kit Bee Mine by Desirena Designs available at The PSP Project.
Mask02 by Designs by Vays and available on her blog.
PlugIns: Xero- Porcelain.
Font of choice. I used Breitkopf Fraktur.
Let's Get Started:
Open a new 700 by 700 image.
Paste Frame2.
Paste P7. Image>Resize to 85%. Drag behind the frame layer. Select the frame. Click inside of the frame with the wand tool. Selections> Modify> Expand by 10. Selections> Invert. Select the paper layer and hit the delete key on the keyboard. Selections> Select None.
Effects> PlugIns> Xero- Porcelain: Softness 50, Strength 128, Brightness 128, Red 0, Green 0, Blue 255.
Paste tube. Drag above the frame layer. Position in the top left.
Porcelain the same settings.
Effects> 3D Effects> Drop Shadow: vertical 2, horizontal 2, opacity 35, blur 5, color black.
Paste Lips. Image> Resize to 65%. Position at the bottom right.
Drop shadow changing the opacity to 30.
Paste Heart Ribbon 2. Drag under the tube layer. Position at the bottom of the frame.
Drop shadow changing the opacity to 35.
Paste Gumball Machine. Image>Resize to 50%. Drag behind the ribbon layer. Position to the right bottom.
Drop shadow same settings.
Paste Cupid Bow And Arrow. Image>Resize to 35%. Drag above the ribbon layer. Position to the right of the lips.
Drop shadow changing the opacity to 30.
Paste Roses. Image> Resize to 65%. Position at the bottom left.
Drop shadow same settings.
Paste Bee3. Image> Resize to 25%. Position at the top right. Duplicate. Position at the bottom right. Duplicate. Image> Mirror. Position at the bottom left. Duplicate. Position on the right in the middle.
Drop shadow all 4 bees the same settings.
Paste Bow. Image>Resize to 65%. Position at the top left.
Drop shadow same settings.
Paste Bubbles. Image>Resize to 95%. Drag above the roses layer. Position to the right.
Select the tube layer. Selections> Select All. Selections> Float. Selections> Defloat. Selections> Modify> Expand by 2. Create a New Raster Layer.
Flood fill the selected area on the new raster layer with color #f8d529. Selections> Select None.
Drag the flood fill layer under the tube layer.
Drop shadow same settings.
Paste P1. Drag to the bottom layer.
Open mask in psp and reselect the tag you are working on.
Layers> New Mask Layer> From Image- Select the mask name in the source window drop down, Source Luminance selected, Invert mask data deselected.
Merge group.
Position as desired.
Lower opacity to 75%.
Merge visible.
Image> Canvas Size: 675 width by 680 height.
Recenter with pick tool.
Image> Resize to 645 width by 650 height.
Add copyright.
Add name with font of choice. I used Breitkopf Fraktur size 72 color #f8d529.
Duplicate.
Convert the top text layer to Raster.
Select the bottom text layer. Open up the text tool again with the name selected and change the stroke to 2 and the Foreground color to black.
Adjust> Add/Remove Noise> Add Noise: Gaussian 50 monochrome checked.
Drop shadow changing the opacity to 50.
Merge the 2 font layers together.
Image> Free Rotate to the left 30 degrees.
Merge visible.
Save as PNG.
Labels:
PTU kit tut
Subscribe to:
Post Comments (Atom)
About Me

- SuthrnPrincess
- I am a mom of 5 rambunctious and audacious kids. 1 girl and 4 boys. I started out tagging and fell in love with my PSP. I am with the most wonderful man in my world, George. If you make something with a mask or template I would love to see it. Please feel free to email me at georges_princess@yahoo.com. If you make a tutorial please link back to my blog for supplies do not include my materials nor link to my file share site. I would love to put your tutorial link on my blog so please feel free to email me :).
Followers
Labels
- 2 pc set (2)
- 3 pc set (5)
- animated (1)
- Announcement (4)
- Awards (1)
- FTU Kit Tut (41)
- No Scrap Tut (5)
- No tube (1)
- Previews (2)
- PTU kit tut (239)
- Snags (1)


0 comments:
Post a Comment