Sunday, September 25, 2011
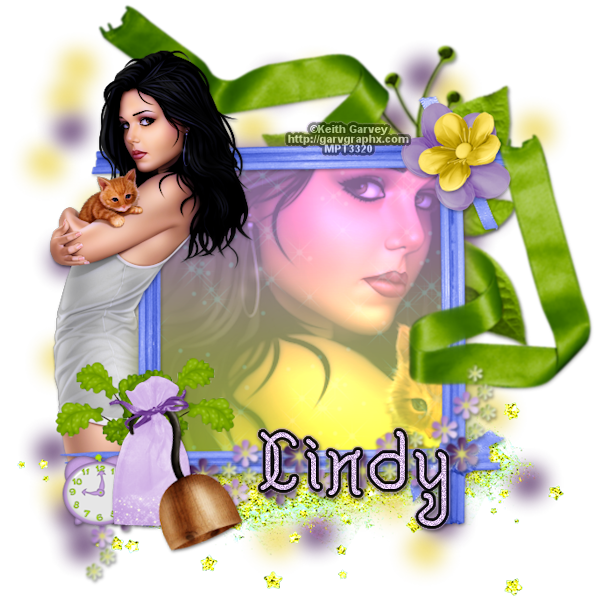
 Elias Halloween
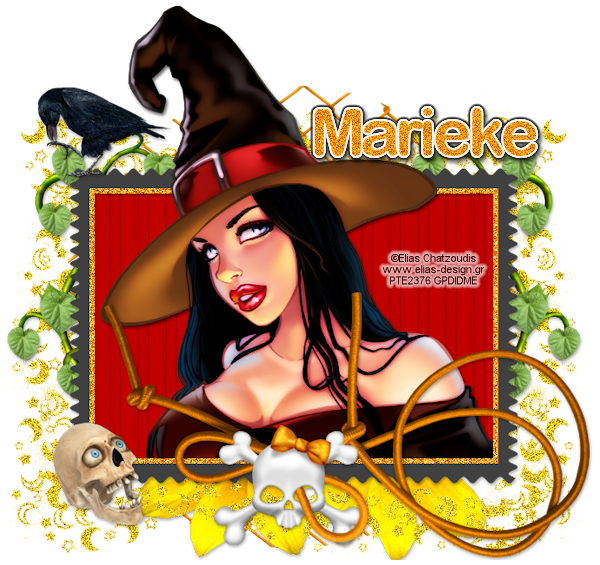
Supplies:
Tube of choice. I used the breathtaking work of Elias Chatzoudis available at his store.
FTU Kit Halloween by Justine that can be found on her blog Made by Justine
Let's Get Started:
Open a new 700x700 image.
Paste Frame. Image> Free Rotate Left 90 degrees.
Use the selection tool to select the orange portion of the frame. Selection> Promote Selection to Layer.
Adjust> Add/Remove Noise> Add Noise: Gaussian 100 Merge together.
Paste tube close up (if the tubre you are using has one, if not then make sure to position the full body as desired). Drag layer behind frame.
Effects> PlugIns> Xero> Porcelain: 50, 128, 128, 182, 0, 173.
Duplicate tube layer and change the top tube layer blend mode to Hard Light.
Merge the duplicate down and then duplicate again. Drag top tube above frame and erase the bottom part of the tube that is over the frame.
Select the bottom tube. Effects> 3D Effects> Drop Shadow: Vertical 3, Horizontal 2, Opacity 65, Blur 5, Color black.
Paste Paper 7. Adjust> Color> Red/Green/Blue: Red -42, Green -100, Blue -62.
Duplicate and change blend mode to Hard Light. Duplicate 2 more times. Merge each duplicate to the original separately starting with the bottom duplicate.
Image> Resize to 70%.
Select frame layer and use wand to click inside. Selections> Expand by 4, Selections> Invert, select the paper layer and then hit the delete key on your keyboard.
Paste String. Image> Mirror, Image> Flip, Image> Resize to 85%. Position in bottom corner.
Paste Vine 2 and place to left. Duplicate and mirror. Erase the bottom of both.
Paste Skully and resize to 50% and then to 85%. Place over string and duplicate. Erase the top part so that the string appears to come out of the skulls eye.
Paste Skull, mirror, Resize to 35%. Place at bottom left.
Paste Glitterborder and position at bottom of frame. Drag to bottom layer. Duplicate and flip. Duplicate again Image> Free Rotate Right 90 degrees. Duplicate and mirror. Use the eraser to remove the parts of the glitter border that stick up too high.
Paste Flower and Rotate left 90 degrees. Drag to bottom layer and position at bottom of frame.
Paste Fence, drage to bottom layer and position centered behind the frame.
Add drop shadow to all elements. Effects> 3D Effects> Drop Shadow: Vertical 2, Horizontal 1, Opacity 35, Blur 5, Color Black.
Merge Visible.
Image> Canvas Size: 690x650.
Image> Resize: 600x565
Add copyright.
Add name with font of choice. I used Arial Rounded MT Bold Size 65 color #f49209
Adjust> Add/Remove Noise> Add Noise Gaussian 44.
Gradient Glow name to liking.
Shadow Vertical 3, Horizontal 2. opacity 60, Blur 5, Color black.
Merge Visible
Save as PNG
Thanks for trying this tutorial I hope you like the end result you achieved.

Test Me I Dare You
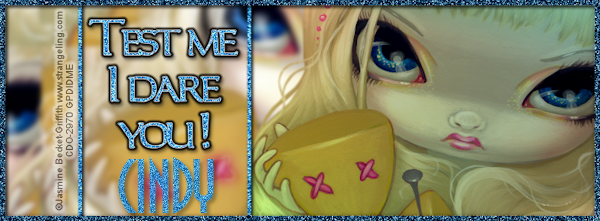
Supplies:
Tube of Choice. I used the gorgeous work of Jasmine Becket-Griffith available at CDO.
Plug Ins: MuRa's Meister Copies and Eye Candy 5 Gradient Glow.
Fonts of choice. I used Carleton and Anastasia.
Let's Get Started:
Open a new 700x250 image.
Paste the tube you chose. Duplicate the tube and hide the top layer.
Plug Ins> MuRa's Meister> Copies: Wallpaper, Random, 20, 100, 100, 0, 0, 100, 133, 0, 0
Adjust> Blur> Gaussian Blur 3
Unhide top tube and position to the right of the tag.
Effects> Illumination Effects> Lights> (This one is hard to explain) The first light angle should be at the top left 4 squares down from the top and four squares in from the left. Darkness 50, On checked, Color #ff0000, Intensity 40, Direction 135, Horizontal -70, Vertical -70, Scale 10, Smoothness 28, Cone Size 30, Asymmetry 500. The second light angle should be at the bottom left 5 squares from the bottom and 5 squares in from the left. Darkness 50, On Checked, Color #00ff00, Intensity 40, Direction 45, Horizontal -70, Vertical 61, Scale 10, Smoothness 28, Cone Size 30, Asymmetry 500. Third light angle should be placed at the bottom left of tube OFF canvas: Darkness 50, On Checked, Color #f982c8, Intensity 0, Direction 35, Horizontal -15, Vertical 121, Scale 67, Smoothness 76, Cone Size 35, Asymmetry 287. Fourth light angle should be in the bottom right corner Darkness 50, On Checked, Color #d2987f, Intensity 15, Direction 314, Horizontal 103, Vertical 99, Scale 10, Smoothness 28, Cone Size 46, Asymmetry 210. Fifth light angle should be above the tube and to the right of the top corner and off aways. Darkness 50, On Checked, Color #309ae9, Intensity 40, Direction 222, Horizontal 117, Vertical -126, Scale 10, Smoothness 28, Cone Size 30, Asymmetry 274. Hit Okay.
Use Soften Brush to soften the left side of the tube a little so that the edge does not stand out as much.
Under the Preset Tool select the Rectangle tool and draw a rectangle on the left side of the canvas (see example) Color #309ae9. Use Wand to click inside Rectangle. Select the Copied tube layer and Selections> Promote Selection to Layer
Adjust> Blur> Gaussian Blur 5. Do it Twice and change blend mode to Color.
Select the rectangle layer. Adjust> Add/Remove Noise> Add Noise: Gaussian 100.
Effects> 3D Effects> Drop Shadow Vertical 3, Horizontal 2, Opacity 100, Blur 5, Color Black.
Add phrase with font of choice. I used Carleton size 55 Bold using the same color as the rectangle. Noise the same as the rectangle.
I added a slight white and black Gradient Glow. I did not right the numbers down because it is so slight I thought it would be better for you to make the decision on the settings that look right for your tag.
Drop Shadow with same settings except change opacity to 50.
Merge Visible.
Image> Add Borders> Symmetric 6, Color #01395e
Drop Shadow: Vertical 3, Horizontal 3, Opacity 60, Blur 5, Color black.
Shadow again changing vertical and horizontal to -3.
Merge Visible.
Image> Resize 600x221
Add Copyright.
Add name with font of choice. I used Anastasia size 72 same color as the phrase.
Shadow the name making sure to select on separate layer
Noise 60 on name layer and chane the opacity to 85.
Change shadow opacity to 50.
Merge Visible.
Save as PNG.
Thanks for trying the tutorial I hope you did not have any problems and found it well explained. If not I am so sorry please let me know.
Fight Like A Girl

Supplies:
Tube of choice. I used the beautiful work of Ismael Rac. It can be purchsed at his store.
PTU Kit Fight Like A Girl by Kaci st Scrappin Krazy Design
Optional: PlugIns: Eye Candy 5: Impact
Font of choice. I used Bullpen.
Let's Get Started:
Open a new 700x700 image. (Will refer to it as your canvas from time to time)
Paste Frame 1. Image> Resize to 85%
Paste Filmstrip. Image> Free Rotate> Left 35 degrees. Drag under frame layer.
Paste P09 (paper) Resize to 75%.
Select Frame layer and use wand to click inside frame. Selections> Modify> Expand by 5, Selections> Invert, select paper layer and hit the delete key on your keyboard.
Paste P08 (paper) and drag under filmstrip layer. Select filmstrip and use wand to click inside each frame of the filmstrip. Selections> Modify> Expand by 5. Selections> Invert, select paper layer and hit delete.
Paste the tube close up (if available, if not simply follow with regular sized tube). Position in frame. Duplicate. Drag tube layers to where one is above and one is below the frame. Select the top tube layer and use the erase tool to remove any part of the tube that is hanging over the bottom of the frame. It gives it a pop out of the frame look.
Paste full body tube and position in bottom filmstrip frame. Select Filmstrip layer and use wand to select inside filmstrip. Selections> Modify> Expand by 5. Selections> Invert. Select tube layer and hit the delete key.
Repeat step with other filmstrip frames.
Add shadow to all tube layers. Effects> 3D Effects> Drop Shadow> Vertical: 3, Horizontal: 2, Opacity: 50, Blur: 5, Color: Black.
Paste Aware Ribbon 1 and resize to 50%. Position at the bottom left of the frame. Duplicate, mirror and position with pick tool at the right bottom where frame and filmstrip cross.
Paste Bling Trail and drag under frame paper. Free Rotate left 35 degrees and position at the bottom of filstrip and duplicate. Then move to top.
Paste Bubbles and place at the bottom of frame and drag under bottom awareness ribbon.
Paste Butterfly 1 and drag to bottom layer. Position at top right, mirror. Image> Flip.
Paste Discoball and drag to bottom layer. Position to top left then duplicate, mirror, and flip.
Paste Doodle and drag layer above discoball. Position to top right, duplicate, mirror, and flip.
Paste Flag text 1 amd position at bottom.
Paste Flower 2 and position at bottom left under filmstrip layer. Duplicate and move to top of filmstrip. Duplicate, mirror, and flip both.
Paste Flower 1 and position to top right of the bottom aware ribbon, duplicate, mirror, flip, and place above doodle.
Paste Diamond and resize to 20 percent. Position to top left of frame and duplicate. Position at top right.
Paste Glittersplash and position at top left, drag to bottom layer, duplicate, mirror, and flip.
Paste Ribbon 1and position at the top left. Duplicate and position at the bottom right.
Paste Sparkle 3, drag above paper for frame and change blend mode to Screen with opacity of 75. Select the paper layer. Selections> Float, Selections> DeFloat, Selections> Invert. Select Sparkle layer and hit delete. Selections> None.
Add Drop Shadow to all elements except the Glittersplash with the settings vertical 3, horizontal 2, opacity 50, blur 5, color black.
Merge visible.
Image> Resize 600x600.
Add Copyright.
Add Name. I used Bullpen size 48 with the color #e4369c.
Adjust> Add/Remove Noise> Add Noise Gaussian 30.
Effects> Plug Ins> Eye Candy 5: Impact> Gradient Glow: Glow type Outside, Glow Radius 3, Soften Corners 8, Overall Opacity 100, Distortion Amount 0, Distortion Lump Size 7, Gradient Smoothness 100, Color white and #f96ec0
Shadow same as before.
Merge Visible.
Save as PNG.
Thank you for trying my tutorial. I hope it was easy to follow. Thank you Kaci for allowing me use of your fabby kit.
Tuesday, September 20, 2011
Spooky Girl
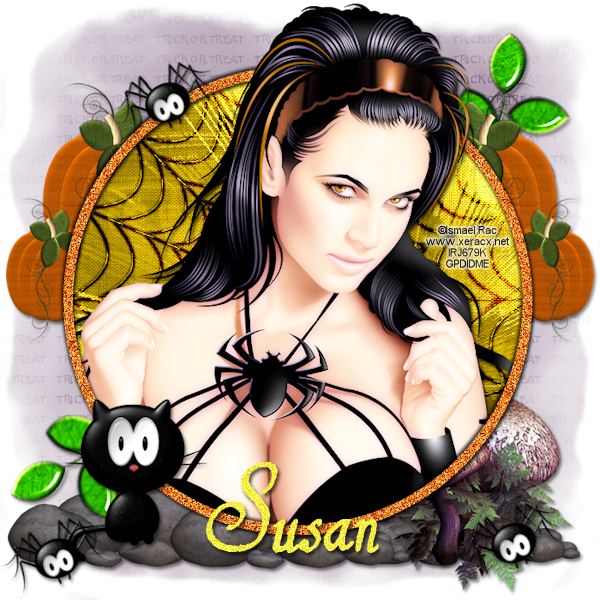
Supplies:
Tube of choice. I used the gorgeous work of Ismael Rac available in his store.
PTU Kit Mischievious Spooks by TootyPup
Mask of choice. I used a mask available at Creative Misfits Creations made by Jenny (posted 10/14/10).
PlugIns: Xero, EyeCandy5
Font: 1610_Cancellaresca
Let's get started:
Open a new 700x700 image. (Sometimes I refer to this as your canvas.)
Select the EllipseTool under the Preset Tools. Hide the background and fill properties. Put the Foreground and stroke properties to color #f57005 and draw a circle. I drew mine with the settings Radius X 268, Radius Y 268, Center X 347.50, Center Y 350.50, and width 12. I also checked antialias. Once you are happy with your circle (this will be your frame) Convert the layer to raster.
Image> Add/Remove Noise> Add Noise Gaussian 100 Monochrome checked.
Paste Paper 11 and drag layer behind circle. Adjust> Brightness/Contrast> Brightness 50, Contrast 50.
Select the frame layer and magic wand. Click inside of frame. Selections> Modify> Expand by 5. Selections> Invert. Choose the paper layer in the layer palette and then hit the delete key on your keyboard.
Selections> Select None.
Paste your tube to canvas and position. Effects> Plug Ins> Xero> Porcelain: 50, 128, 128, 110, 0, 255. Duplicate the tube layer and change the blend mode to Screen. Merge the two together and then duplicate again.
Effects> 3D Effects> Drop Shadow Vertical 3, Horizontal 2, Opacity 50, Blur 5, Color black. Add shadow to both tube layers.
Hide the top tube layer.
Select the paper layer in the layer palette. Selections> Float, Selections> Defloat, Selections> Invert. Select the bottom tube layer (the one visible) and hit the delete key.
Selections> Select None.
Drag the top tube layer above the frame and make visible again. Use the erase tool to remove bottom of the top tube that is over the frame. This makes the tube look like it is coming out of the frame.
Select the frame layer. Effects> 3D Effects> Drop Shadow: Vertical 3, Horizontal 2, Opacity 75, Blur 5, Color black. Then drop shadow again using Vertical -3, Horizontal -2 and the same settings for Opacity, blur and color as before.
Paste Black Cat 1. Image> Resize to 35% and place at the bottom left of the frame.
Paste Leaves 1 Use pick tool to free rotate to right. Drag the leaves behind the paper layer.
Adjust Brightness and Contrast to the same settings as before. Repeat again.
Paste Mushroom 4, Image> Mirror, Image> Resize to 50%. Drag to the bottom layer and place off to the right.
Paste Pumpkin 4 and resize to 35%. Drag behind paper layer and place to the left. Duplicate, Image> Mirror.
Paste Rocks 1 and drag to bottom layer. Place at bottom.
Paste Spider 1 and resize to 25%. Place at the top left of the frame. Using Pick Tool rotate slightly left. Duplicate and place at the bottom left on rocks. Duplicate again and place on the other side of the rocks.
Paste Web 1 and place over paper layer. Select the paper layer in the layer palette. Selections> Float, Selections> Defloat, Selections> Invert, Select the web layer and hit the delete key.
Selections> Select None.
Change the blend mode on the web to Soft Light and duplicate 4 times. Merge each web to the paper separately.
Shadow all of the elements that you added to the tag. Vertical 3, Horizontal 2, Opacity 50, Blur 5, Color black.
Merge Visible.
Create New Raster layer and flood fill with color #563058.
Open Mask- HalloweenMask2byJenny in your psp.
Layers> New Mask Layer> From Image. Select Mask in the drop down menu. Select Source Luminance and deselect (if it is selected) Invert Mask Data.
Merge Group.
Merge Visible.
Resize to 600x600
Add Copyright
Add Name. I used 1610_Cancellaresca size 100 Bold stroke 2 color #fbf148.
Noise Uniform, 27, Monochrome checked.
Shadow name to Vertical 3, Horizontal 2, Opacity 70, Blur 5, Color Black.
Merge Visible.
Save as PNG.
Thank you for allowing me the use of your wonderful kit Susan.
Tuesday, September 13, 2011
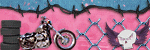
Rocker
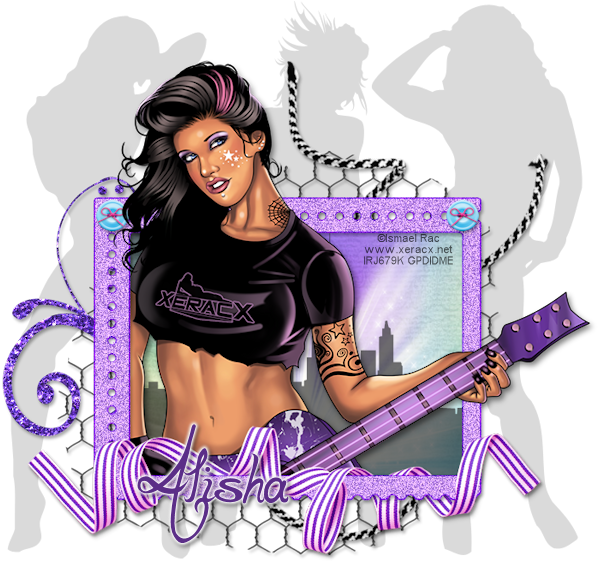
Tube of choice. I used the beautiful work of Ismael Rac. You can get it in his store.
FTU Kit My Attitude by BelVidotti
Font of choice I used LaPointe's Road 1/4
Font of choice I used LaPointe's Road 1/4
PlugIns: EyeCandy 5 (Glass & Gradient Glow)
Let's get started:
Open a new image 700x700 (from time to time I might refer to it as your canvas).
Paste E82, Image> Resize to 85%.
Adjust> Color> Red/Green/Blue: Red -47, Green -100, Blue 100
Effects> PlugIns> EyeCandy5: Impact> Glass: Bevel Width 3, Bevel Smoothness 0, Round Selection Corners 1, Bevel Placement Inside, Glass Color #8000ff, Opacity 100, Tinting 0, Refraction 50, Inner Shadow Opacity 75, Drop Shadow Opacity 0, Shadow Offset 17.37, Shadow Glow 20
Adjust> Add/Remove Noise> Add Noise: Uniform, 50, Monochrome checked
Paste your tube of choice and position. Duplicate and drag layer under frame (you should have one layer above and one layer below now).
Select top tube layer and use your erase tool to remove the portion at the bottom that is over the frame.
Select bottom tube layer.
Effects>3D Effects> Drop Shadow: Vertical 4, Horizontal 3, Opacity 50, Blur 10, Color Black
Paste P09, select frame layer. Click inside frame layer using your wand tool.
Selections> Modify> Expand by 6, Selections> Invert, select paper layer again and then hit the delete key on your keyboard.
Selections> None
Paste E104 and place over bottom of frame. Make sure this is your top layer. Duplicate and drag under frame. Select the top ribbon layer and use your eraser tool to remove portions of the ribbon to give it a wrapped around look. Look at the example if need be to see where to erase.
Paste E84 and drag behind bottom tube. Position at the bottom of the frame. Select paper layer.
Selections> Float, Selections> Defloat, Selections> Invert, Select E84 layer and hit the delete key on your keyboard. Selections> None
Use your pick tool to stretch it to where it reaches the bottom of the frame inside and change the Blend Mode to Screen (drop down area above palatte layer).
Paste E111 Image> Flip, Image> Free Rotate: Right 25 degrees
Drag layer behind paper and position.
Paste E81 and drag under layer for E111. Position to the left of the frame.
Paste E71 and position to the right side of the frame.
Paste E70 and position to the left side of the frame.
Paste E69 and position in the middle of the frame.
Merge the 3 layers together (E71, E70 and E69).
Drag them to the bottom layer and change the layer opacity to 17.
Paste E90 and Resize to 70%, Place layer in front of merged E69-71 layer.
Paste E88 and Resize to 25%. Drag to top layer. Position at far right corner of frame. Duplicate. Image> Mirror. Move over slightly to where it covers far corner hole in frame.
Paste E68 and drag layer above light layer and position at bottom of frame.
Select Paper layer. Selections> Float, Selections> Defloat, Selections> Invert. Select E68 layer and hit delete. Change layer opacity to 65. Selections> None.
Drop shadow bottom ribbon, black/white rope, doodle, fence, frame and buttons Vertical 2, Horizontal 2, Opacity 50, Blur 5, Color Black.
Merge Visible.
Image> Canvas Size: 700w by 655h.
Use pick tool to center
Image> Resize (make sure to change it to pixels and resize all layers) 600w by 561h
Add copyright.
Add name with font of choice. I used LaPointe's Road1/4 set at size 48, color #5b2e88
Effects> PlugIns> EyeCandy5: Impact> Gradient Glow: Glow Radius 5, Soften Corners 61, Overall Opacity 100, Distortion Amount 0, Distortion Lump Size 7, Gradient Smoothness 100, Color white.
Drop Shadow same as elements.
Merge Visible
Save as PNG
Thank you for trying my tutorial. I hope that you enjoyed it and got great results!
Monday, September 12, 2011
Award
I recieved my first award today from Kaci @ Scrappin Crazy Designs!! Thankies so much!

The point of this award is to recognize bloggers with minimal followers. Since I have accepted this award, I must pass it on to at least 3 but no more than 5, fellow bloggers who I feel deserve an award.
Here are the bloggers I have chosen:
1. Lost's PSP Mania
2. Gilded Tutorials
3. Designs by Staci
4. Scottish Butterfly
1. Lost's PSP Mania
2. Gilded Tutorials
3. Designs by Staci
4. Scottish Butterfly
Autumn Beauty

Image of Choice. I used the beautiful work of Jon Rattenbury available at PSPTubesEmporium.
PTU Kit Any Day Now by Sunshine Daze.
Font of choice. I used Be Safe
PlugIns: Gradient Glow.
Let's Get Started:
Open a new 700 x 700 image.
Paste Element 3, Image> Resize to 25%.
Paste your image of choice and resize to 90%.
Select frame layer. Effects> 3D Effects> Drop Shadow: Vertical 2, Horizontal 2, Opacity 50, Blur 5, color Black.
Paste Element 9 and resize to 35%. Drag to bottom layer.
Adjust> Add/Remove Noise> Add Noise: Gaussian 14 with Monochrome checked.
Paste Element 8, resize to 25%. Drag this layer behind your image layer.
Adjust> Color Balance: Move the toggle all the way to warmer. Do color balance a second time.
Use eraser tool to remove the part of element 8 that is to the upper right of the frame.
Paste Element 5 and resize to 25 % then repeat resize to 50%.
Drop Shadow to vertical 3, horizontal 2, opacity 50, blur 5, color black.
Paste Element 4 and resize to 25%. Drag this layer behind your image layer.
Drop shadow to same settings as Element 5.
Paste Element 21, resize to 50%, position it on the image in a way that is desired by you. I placed mine near the bottom where it was mainly over the water.
Select Image layer. Selections> Float, Selections> Defloat, Selections> Invert. Select Element 21 layer and hit the delete key on your keyboard.
Paste Element 20 and resize to 25%. Image> Mirror, Color Balance same settings as before. Repeat color balance a second time.
Drop shadow element 20: vertical 2, horizontal -3, opacity 50, blur 5, color black
Paste Element 18 and resize to 25% and then 30% position to the top left of the frame and add shadow
Paste Element 16 Resize to 25% and then 30%. Image> Mirror, Drag element layer behind image layer and move off to the left of the frame. Shadow.
Merge Visible
Image> Canvas Size 695 width by 605 height.
Use pick tool to recenter tag if need be.
Image> Resize 600 width by 522 height.
Add copyright
Add Name. I used font Be safe size 72 Bold selected, color #a14726.
Adjust> Add/Remove Noise> Add Noise Gaussian 30 Monochrome checked.
Effects> PlugIns> EyeCandy 5: Impact> Gradient Glow: Glow Type Outside, Mask Selection, Glow Radius 5, Soften Corners 61, Overall Opacity 100, Distortion Amount 0, Distortion Lump Size 7, Gradient Smoothness 100, Colors white and #aa4316.
Shadow vertical 2, horizontal -3, Opacity 50, blur 5, color black.
Merge Visible
Save as PNG
Thank you Dawn for allowing me to work with your beautiful kit.
Thank you for trying my tutorial.
Sunday, September 11, 2011
Garv Halloween 3 pc set
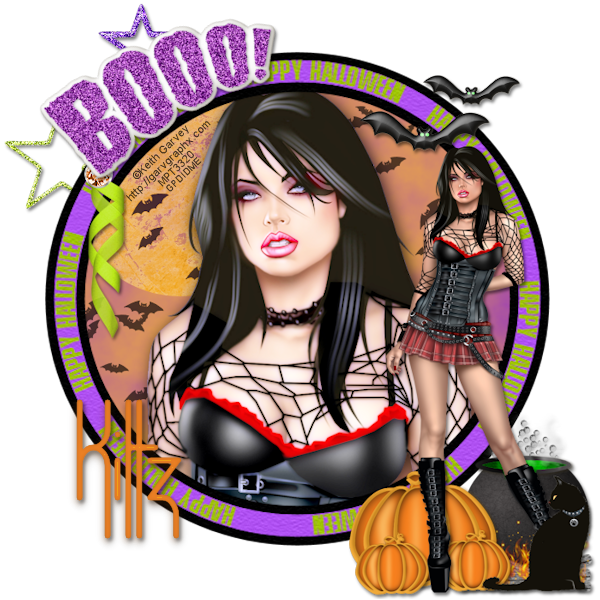
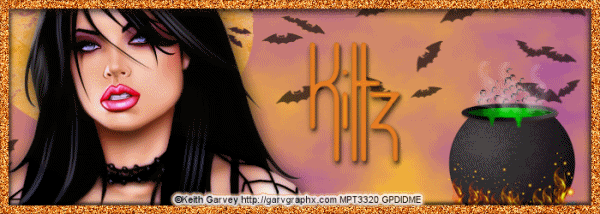
Supplies:
Tube of Choice. I used the beautiful work of Keith Garvey available at his store
FTU Kit Halloween by Kittz Kreations available on her blog.
Font of choice. I used Verticalization.
Plug Ins: Xero-Porcelain, Eye Candy 5- Glass, Richard Rosenman- Solid Borders.
Animation Shop or other animation program.
Lets Get Started:
Open a new 700 x 700 image.
Paste Frame 3. Image> Resize to 115%.
Paste Paper 4. Move with Pick Tool so that it is off centered to where the moon is visible. Select frame layer and click inside of the frame using your Magic Wand. Selections> Modify> Expand by 5. Selections> Invert, Select your paper layer and then hit the delete key on your keyboard. Selections> None
Paste close up of tube of choice resize to 95%.
Effects> PlugIns> Xero> Porcelain: Softness 50, Strength 128, Brightness 128, Red Channel 0, Green Channel 0, Blue Channel 255.
Duplicate the tube and change the Blend Mode of the top one to Screen. Merge the two back together.
Effects> 3D Effects> Drop Shadow: Vertical 3, Horizontal 3, Opacity 74, Blur 26, color black.
Select frame layer and click inside of the frame using your Magic Wand. Selections> Modify> Expand by 5. Selections> Invert, Select your tube layer and then hit the delete key on your keyboard. Selections> None.
Pastee Bats and position to the top right. Add drop shadow changing the settings to vertical 3, horizontal 2, opacity 53, blur 5 color black.
Paste full body tube of choice. Position tube to right of frame making sure it is the top layer. Drop Shadow to same settings as bats.
Paste Booword. Use Pick tool to to slightly rotate to the left and then place at top left of frame. Add drop shadow.
Paste Diamond Curl Ribbon. Drag under Booword layer and position to where it is slightly sticking out under the bottom corner of the letter B. Add drop shadow.
Paste Halloween Stars and drag layer to the bottom. Position to where it is at the top left and viewable behind the frame and wordart.
Adjust> Add/Remove Noise> Add Noise: Gaussian 100 Monochrome checked.
Drop shadow same settings as before.
Paste Pumpkin 2 and resize to 50%. Drag layer to where it is under the full body tube layer and duplicate. Resize to 50%. Position to the bottom right of the original pumpkin layer. Duplicate and place next to it. Drop Shadow all 3 pumpkins.
Paste Witches Cauldron and resize to 65%. Drag layer behind big pumpkin layer and position at the bottom and off to the right. Drop shadow.
Merge Visible.
Resize to 600x600.
Add copyright.
Add Name. I used the font Verticalization size 100, bold selected, Stroke 3, color for both #f68626.
Effects> PlugIns> EyeCandy5-Impact> Glass: Bevel Width 82.77, Bevel Smoothness 0, Rounded Selection Corners 0, Bevel Placement Inside, Glass Color same as font, Opacity 100, Tinting 0, Refration 50, Inner Shadow Opacity 75, Drop Shadow Opacity 40, Shadow Offset 11.16, Shadow Glow 20, Direction 78, Inclination 84, Highlight Brightness 50, Highlight Size 62, Highlight Color #f6c10a, Reflection Map None.
Drop Shadow Vertical 3, Horizontal 2, Opacity 53, Blur 5, Color Black
Merge Visible.
Save as PNG.
Forum Tag:
Open a new 700w x 250h image.
Paste Paper 4. Use Pick Tool to stretch and place as desired.
Paste tube close up and position as desired. I placed mine to the left of the image.
Effects> PlugIns> Xero> Porcelain: Softness 50, Strength 128, Brightness 128, Red Channel 0, Green Channel 0, Blue Channel 255.
Duplicate and change blend mode to Soft Light. Merge the two back together.
Effects> 3D Effects> Drop Shadow vertical 3, horizontal 2, opacity 74, blur 26, color black.
Paste Cauldron and resize to 65% and position to the right of the image.
On the witches cauldron image that you opened from the kit there are three bubbles that you need for the animation part of the tag. Use your freehand tool to draw a circle around the top bubble, the one on the right that sticks out slightly, and the one on the left that sticks out silightly as well. Edit> Copy.
Paste them into your tag and place the layer behind the cauldron layer. Position so that they are slightly above the cauldron and viewable. Use erase tool if desired to remove the white fog around them.
Duplicate and move up slightly. Repeat until the bubbles disappear off the tag at the top. I ended up with 8 total bubble layers.
Hide all bubble layers.
Merge Visible.
Effects> PlugIns> Richard Rosenman> Solid Borders 8 color #f68226.
Use wand to select border. Selections> Promote Selections to Layer.
Effects> PlugIns> EyeCandy5-Impact> Glass: Bevel Width 82.77, Bevel Smoothness 0, Rounded Selection Corners 0, Bevel Placement Inside, Glass Color same as font, Opacity 100, Tinting 0, Refration 50, Inner Shadow Opacity 75, Drop Shadow Opacity 40, Shadow Offset 11.16, Shadow Glow 20, Direction 78, Inclination 84, Highlight Brightness 50, Highlight Size 62, Highlight Color #f6c10a, Reflection Map None.
Adjust> Add/Remove Noise> Add Noise: Gaussian 100 Monochrome checked.
Effects> 3D Effects> Drop Shadow Vertical 3, Horizontal 2, Opacity 74, Blur 5, color Black.
Repeat changong vertical to -3, and horizontal to -2
Add Copyright.
Add Name. I used the font Verticalization size 100, bold selected, Stroke 3, color for both #f68626.
Effects> PlugIns> EyeCandy5-Impact> Glass: Bevel Width 82.77, Bevel Smoothness 0, Rounded Selection Corners 0, Bevel Placement Inside, Glass Color same as font, Opacity 100, Tinting 0, Refration 50, Inner Shadow Opacity 75, Drop Shadow Opacity 40, Shadow Offset 11.16, Shadow Glow 20, Direction 78, Inclination 84, Highlight Brightness 50, Highlight Size 62, Highlight Color #f6c10a, Reflection Map None.
Drop Shadow Vertical 3, Horizontal 2, Opacity 53, Blur 5, Color Black
Transfer to AS3 (or your prefered program) however is easiest for you. I make each bubble layer visible separately then merge all flatten and copy to AS3. I mad sure to make one of the frames with the original cauldron without the added bubbles.
In AS3 once all are pasted over select all frames and change the frame properties to 15. You can find Frame Properties under Animation.
Resize to 600 with aspect ratio locked and it will adjust the height.
Save as GIF to whatever settings look best to you.
Avatar:
Open a new 200x200 image.
Paste Paper 4 and position as desired.
Paste tube close up and resize to 65% then position as desired.
Effects> PlugIns> Xero> Porcelain: Softness 50, Strength 128, Brightness 128, Red Channel 0, Green Channel 0, Blue Channel 255.
Duplicate and change blend mode to Soft Light. Merge the two back together.
Effects> 3D Effects> Drop Shadow vertical 3, horizontal 2, opacity 74, blur 26, color black.
Merge Visible.
Effects> PlugIns> Richard Rosenman> Solid Borders 8 color #f68226.
Use wand to select border. Selections> Promote Selections to Layer.
Effects> PlugIns> EyeCandy5-Impact> Glass: Bevel Width 82.77, Bevel Smoothness 0, Rounded Selection Corners 0, Bevel Placement Inside, Glass Color same as font, Opacity 100, Tinting 0, Refration 50, Inner Shadow Opacity 75, Drop Shadow Opacity 40, Shadow Offset 11.16, Shadow Glow 20, Direction 78, Inclination 84, Highlight Brightness 50, Highlight Size 62, Highlight Color #f6c10a, Reflection Map None.
Adjust> Add/Remove Noise> Add Noise: Gaussian 100 Monochrome checked.
Effects> 3D Effects> Drop Shadow Vertical 3, Horizontal 2, Opacity 74, Blur 5, color Black.
Repeat changong vertical to -3, and horizontal to -2.
Merge Visible.
Image> Resize to 150x150
Add copyright
Add name or initial. I added an initial and use the same steps as in the forum and tag.
Merge Visible and save as PNG
Thank you for trying my tutorial. If you have any questions please email me and ask and I will try to help you with them.
Saturday, September 10, 2011
Rainbow Fling
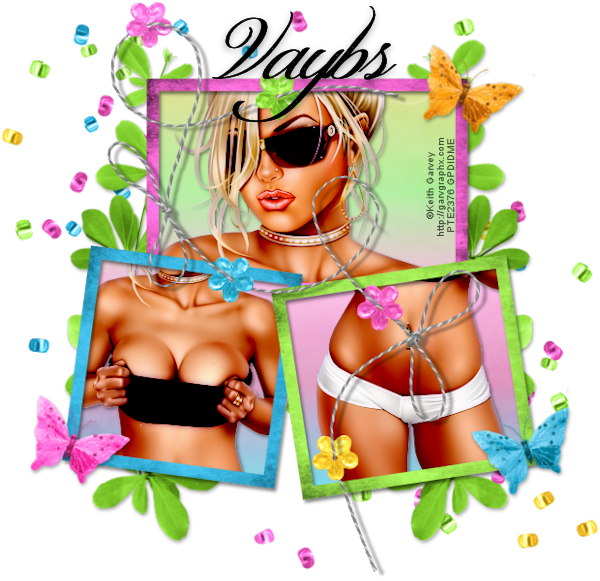

Supplies Needed:
Tube of Choice. I used Keith Garvey available at his store
FTU Kit Rainbow Fling created by Vaybs and available on her blog Designs by Vaybs.
Font of choice. I used Shit Happens
PlugIns: Xero-Porcelain, Eye Candy 5- Glass, MuRa's Meister Copies
Let's Get Started:
Tag directions:
Open a 700 x 700 image (will refer to as canvas from time to time)
Paste Frame 13.
Paste tube of choice and position in top frame as desired. Select frame layer and use your wand to select inside. Selections> Modify> Expand by 6. Selections> Invert. Select your tube layer again in the layer list and hit the delete key on your keyboard. Selections> None.
Repeat the step with both of the other frames using either different tubes or different parts of the body.
Paste Paper 15. Image> Resize to 85%.
Select frame layer and using your magic wand click inside of all 3 frames. Selections> Modify> Expand by 6. Selections> Invert. Select your paper layer again in the layer list and hit the delete key on your keyboard. Selections> None.
Select layer of tube that is in the top frame. Effects> PlugIns> Xero> Porcelain: Softness 50, Strength 128, Brightness 128, Red Channel 106, Green Channel 79, Blue Channel 182. Duplicate the tube layer and change the blend mode of the top tube to Burn. Merge the two back together.
Repeat with each of the other tube layers.
Drop Shadow all 3 tube layers. Effects> 3D Effects> Drop Shadow: Vertical 2, Horizontal 2, Opacity 45, Blur 5, Color Black.
Drop Shadow the frame changing the Vertical to 3 and Opacity to 50.
Paste Element 45. Drag it to where it is the bottom layer and Resize to 90%.
Paste Element 56 and position as desired.
Paste Element 22, Resize to 95%, position to the right top of the frame. Duplicate element, Image> Mirror.
Paste Element 7, Resize to 50%, Image> Free Rotate Right 20 degrees. Place the element toward the bottom left corner of the frame.
Paste Element 6, Resize to 50%, Free Rotate Left 20 degrees and place at the bottom right of the frame.
Paste Element 8, Repeat same steps as with Element 7 placing at the top right corner of the frame.
Shadow all of the elements that have not been shadowed yet except string & beads. Vertical 2, horizontal 1, opacity 35, blur 5, color still black.
Merge Visible.
Image> Canvas Size> resize to 620w x 600h.
Use pick tool to recenter in canvas.
Image> Resize (change to pixels and make sure to check resize all layers) 600w x 581 h
Add copyright
Add name as desired. I used Shit Happens size 125, Bold, Color Black
Effects> PlugIns> Eye Candy 5: Impact> Glass: Bevel Width 84.69, Bevel Smoothness 0, Round Selection Corners 0, Bevel Placement Inside, Glass Color Black, Opacity 100, Tinting 0, Refraction 50, Inner Shadow Opacity 75, Drop Shadow Opacity 40, Shadow Offset 11.16, Shadow Glow 20, Direction 78, Inclination 84, Highlight Brightness 32, Highlight Size 62, Highlight Color #c0c0c0, Reflection Map None
Merge Visible
Save as PNG
Avatar Directions:
open a 200x 200 image
Paste Paper 15 and resize to 35%.
Paste tube and position as desired. Effects> PlugIns> Xero> Porcelain: Softness 50, Strength 128, Brightness 128, Red Channel 106, Green Channel 79, Blue Channel 182. Duplicate the tube layer and change the blend mode of the top tube to Burn. Merge the two back together.
Drop Shadow- Effects> 3D Effects> Drop Shadow: Vertical 2, Horizontal 2, Opacity 45, Blur 5, Color Black.
Merge Visible.
Image> Add Borders> (If a pop-up occurs select Okay for AutoActions to continue). Color Black, Pixels 7, Symmetric checked.
Use wand and select border. Open Paper 16 in Psp. Return to Avatar and select flood fill tool. Open Foreground & Stroke Properties and select the pattern tab. Find Paper 16 and select is as your flood fill color and Flood Fill the border.
Selections> Promote Selection to layer, Selections> Select None.
Adjust> Add/Remove Noise> Add Noise Gaussian 60 Monochrome checked.
Drop Shadow Vertical 3, Horizontal 3, Opacity 50, Blur 5, Color Black. Then shadow again changing the vertical and horizontal to -3.
Merge Visible.
Image> Resize 150 x 150
Add Copyright.
Add Initial of choice. I used the same exact settings for the initial as I did for the name on the tag.
Merge Visible.
Save as PNG.
Forum Tag Directions:
Open a new image 700w x 250h.
Paste Paper 15 and use your Pick Tool to Shrink it to where it fits the canvas.
Paste the tube (if you have a close up now is a good time to use it). Position as desired. Effects> PlugIns> Xero> Porcelain: Softness 50, Strength 128, Brightness 128, Red Channel 106, Green Channel 79, Blue Channel 182. Duplicate the tube layer and change the blend mode of the top tube to Burn. Merge the two back together.
Drop Shadow- Effects> 3D Effects> Drop Shadow: Vertical 3, Horizontal 2, Opacity 50, Blur 5, Color Black.
Paste tube (full body if you used the close up earlier). Effects> PlugIns> MuRa's Meister Copies: Number 20, Shift X 50, Shift Y 50, Angle 0, Rotation 0, Attenuation 0, Scale 100, Thru BG Range 0, Fade Out 0, Present Menu: Wallpaper Random.
Adjust> Blur> Gaussian Blur 2. Change blend mode to overlay and duplicate. Merge the bottom one to the paper first and then the second layer.
Paste Element 56 Image> Free Rotate Right 90 and position.
Paste Element 45 Use pick tool to stretch to fit canvas width wise. Image> Flip. Position as desired and drag below string layer.
Merge Visible.
Image> Add Borders>Pixels 8, symmetric, color black. Use wand and select border, flood fill like with avatar, promote to layer and shadow like with avatar.
Merge Visible.
Image> Resize (make sure to change back to pixels and all layers) 600w x 223h
Add Copyright.
Add Name. I did it the same as the tag but made it not bold.
Merge Visible.
Save as PNG
Thank you for trying my tutorial!
Monday, September 05, 2011
Sweet Autumn

Supplies:
Tube of choice. I used the beautiful work of Elias Chatzoudis available at his store
PTU ScrapKit Sweet Sweet Love by Bello Scarto
PlugIns: EyeCandy5-Glass
Font of choice. I used Vladimir Script
Let's Get Started:
Open a new 700x700 image (I will refer to it as your canvas from time to time.
Paste Element 6
Paste Element 20 Image> Resize to 50% and use your pick tool to position at the bottom right corner of frame.
Paste Element 19 Resize to 45% place at bottom left of frame
Paste Element 16 Drag the layer in the layer palate behind Element 20 and position like in my example.
Paste Element 22 Image> Free Rotate> Right 90 degrees. Image> Resize to 95%
Paste Element 36 Drag to bottom layer in the layer palate and position like in the example.
Paste Element 34 drag to bottom layer again and position. Use your pick tool to stretch to fit the width of your canvas if desired.
Paste Element 33 drag layer above frame layer and position at bottom.
Paste Element 32. Using your pick tool resize it so it fits width wise at the top of the frame.
Paste Element 31 and resize to 75%. Drag the layer to where it is the bottom layer and then position element to where it is viewable under the frame.
Paste Element 30 and resize to 70% drag layer above frame layer and position at bottom.
Open Element 28 and use freehand tool to draw a circle around the fower to the far left. Copy and paste this flower to your canvas. Position at the top left of the frame, duplicate, Image> Mirror.
Paste Element 45 and resize to 50%. Place at the bottom of the frame. This should be your top layer.
Paste Element 48, Image> Flip, Resize to 85%. Drag layer behind frame layer and position where it is viewable under Sweet.
Paste tube and drag behind frame layer. Duplicate and drag this layer behind Sweet layer. Use erase tool on top tube layer to remove portion that covers bunny and other elements.
Select frame layer. Use wand to select inside of the frame. Selections> Modify> Expand by 10, Selections> Invert. Select bottom tube and hit the delete key on your keyboard.
Paste Paper 4 drag behind bottom tube layer and resize to 50%.
Select bottom tube layer, Effects> 3D Effects Vertical 3, Horizontal 2, Opacity 50, Blur 5, Color black
Do this to the top tube too and erase whatever shadow appears within the tube.
Shadow all elements except the bottom 2 layers.
Add Autumn in font of choice. I used Vladimir Script size 72 color #b8430d
Effects> PlugIns> EyeCandy5> Glass Bevel Width 82.77, Bevel Smoothness 0, Round Selection Corners 0, Bevel Placement Inside, Glass Color #b8430d, Opacity 100, Tinting 0, Refraction 50, Inner Shadow Opacity 75, Drop Shadow Opacity 40, Shadow Offset 11.16, Shadow Glow 20, Direction 78, Inclination 84, Highlight Brightness 50, Highlight Size 62, Highlight Color #f6c10a, Reflection Map None
Drop shadow change opacity to 100
Merge visible
Resize to 600x600
Add copyright
Add name, I used the same font, the only thing I changed was the color to #d7ba1c.
Adjust> Add/Remove Noise> Add Noise Gaussian 20
Shadow same as before.
Merge Visible
Save as PNG
Thank you for trying my tutorial and a huge thank you to Bello Scarto for allowing use of the kit! It was a pleasure to work with.
Flutterby Love
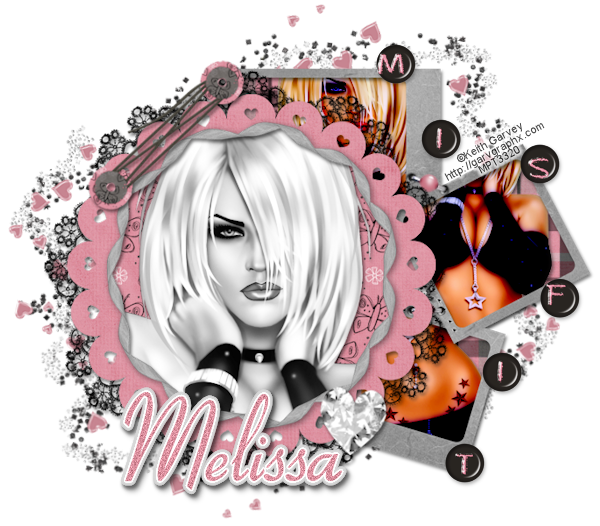
Supplies:
Tube of choice. I used the amazing work of Keith Garvey you can find him at his store
FTU Kit FlutterbyLove by Tantrum Scraps
PlugIns: Xero-Procelain and EyeCandy5-Impact
Font: Aspire
Let's Get Started:
Open a new 700x700 image (will refer to it as your canvas from time to time)
Paste Frame 4 as new layer
Paste Frame 5 as new layer and drag the layer under Frame 4 layer. Use Pick Tool to position the frames like in the example.
Paste Paper 13 then Image> Resize to 65%
Select Frame 4 layer. With Wand click inside Frame 4. Selections> Modify> Expand by 5. Selections> Invert. Select the paper layer and then hit the delete key on your keyboard. This makes the paper outside of the selected area vanish ;). Selections> None.
Paste Paper 10 and position behind frame 5. Use the same steps as before with this paper and frame.
Selections> None.
Paste Fastener. Image> Mirrow, Image> Resize to 75%.
With your pick tool rotate the fastener slightly and place it over the top left of the triple frame and across the other frame like in example.
Paste the Diamonf. Image> Resize to 50%. Position at bottom where both frames meet.
Paste Glitter Trail. Drag layer to bottoms and position where viewable at the top. Duplicate, Image> Flip and move the duplicate to where it is viewable at the bottom.
Add shadow to all layers except the Glitter Trail that we have added so far. Effects> 3D Effects> Vertical 2, Horizontal 1, Opacity 30, Blend 5, Color black
Paste tube close-up if you are using a tube that offers it and resize to 75%, if not just paste the tube. Drag the layer behind the top frame and position.
Select frame layer and use wand to click inside. Selections> modify> Expand by 11. Selections> Invert. Select the tube layer and then hit the delete key on your keyboard.
Selections> none
Effects> PlugIns> Xero> Porcelain: Softness 50, Strength 128, Brightness 128, Red Channel 0, Green Channel 0, Blue Channel 255.
Effects> Photo Effects> Black & White Film
Duplicate tube and change the blend mode of the top one to Screen and then merge the two tube layers together.
Shadow using same settings as before.
Paste the full body tube of choice and drag behind triple frame layer. Position the tube as desired in the top frame. Duplicate and hide one of the layers. Select the frame layer and use your wand to select inside the top frame. Selections> Modify> Expand by 10 Selections> Invert, select the visible tube layer and hit your delete key on the keyboard.
Repeat with the other two frames positioning the tube as desired each time.
Duplicate each tube layer separately and change the blend mode of the top tube layer of each one to Burn
Merge the duplicates back to the original layers.
Shadow each tube.
Merge Visible
Image> Canvas Size and change to 600h x 685w
Image> Resize (make sure to change the settings to pixels and select resize all layers) 600w x 526h.
Open Alpha Beads. One at a time use the freehand tool to draw a circle around the letters that you want to use. I used M, I, S, F, Tbut you can use whatever you like. Copy and paste to your canvas and then position as you like.
Hide the tag layer and then merge visible. The only thing that should have been viewable at the time was the layers of beads.
Add drop shadow same settings as before.
Add copyright
Add Name. I used Aspire size 125 color #dc919f
Adjust> Add/Remove Noise> Add Noise Gaussian 23 Monochrome checked.
Effects> 3D Effects> Drop Shadow: vertical 3, horizontal 2, opacity 50, blur 5, color black
Merge visible
Save as PNG
Thank you for trying my tutorial!!
Saturday, September 03, 2011
Tuts Coming Soon
Hey y'all I have 3 new tuts coming soon. They are all made using FTU kits from different kit designers. 2 of them are 3 piece sets and one of them is even animated!
Here are the previews for them!
FlutterbyLove


Here are the previews for them!
FlutterbyLove
Rainbow Fling
Halloween Set 2
Will get them up asap and hope someone will like them :)
Friday, September 02, 2011
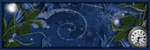
Neverland
Supplies:
Tube of choice. I am using the awesome work of Keith Garvey available at his store
PTU Kit Finding Neverland by Crys at Sinfully Creative Scraps
PlugIns: Xero-Porcelain & EyeCandy5-Impact
Font: Akashi MF
Let's Get Started:
Open a new 700x700 image (will refer to it as your canvas from time to time)
Paste Frame 1 to canvas Image> Resize 85%
Paste Paper 14 and drag it to where it is under your frame layer. Select Wand tool and your frame layer. Click inside of the frame. Selections> Modify> Expand by 10. Selections> Invert. Select the paper layer in your layer list on the right and then hit the delete key on your keyboard.
Adjust> Blur> Gaussian Blur> Radius 10. Resize by 110%.
Paste tube of choice, using a close up for this part works better but can use whatever you have available to you, drag this layer between your frame and paper layers. Resize as needed so that it covers the paper. Select Wand tool and your frame layer. Click inside of the frame. Selections> Modify> Expand by 10. Selections> Invert. Select the tube layer in your layer list on the right and then hit the delete key on your keyboard.
Still on the tube layer Effects> PlugIns> Xero> Porcelain: Softness 50, Strength 128, Brightness 128, Red Channel 0, Green Channel 0, Blue Channel 255
Change Blend Mode to suit the tube that you are using. I used Dodge and changed the Opacity to 60% (Incase you are unfamiliar with where to find the Blend Mode it is located just above the Layer Palette as a drop down box).
Hide your frame layer and then merge visible (click the eye next to your frame layer in the layer palette and then right click on another layer).
Unhide the frame layer and add drop shadow. Effects> 3D Effects> Drop Shadow: Vertical 2, Horizontal 1, Opacity 35, Blur 5, Color black
Paste Frame 4 and Resize by 90%. Duplicate the frame. Place one layer under the paper/tube merged layer and above Frame 1 layer.
Using your erase tool select the top Frame 4 layer and remove the portion of the frame and ribbon that are over frame 4.
Select the bottom frame 4 layer Adjust>Softness> Soften and then Adjust> Softness> Soften More
Drop shadow to the same settings as before. Select what is left of the top top frame 4 layer Adjust> Blur> Gaussian Blur 1
Paste Elememnt 60 and drag to bottom layer. Place at bottom of frame. Duplicate, Adjust> Color> Red/Blue/Green> Red -100, Green 30, Blue 100
Change Blend mode to saturation.
Paste Element 57 and resize to 35% Position at the bottom left of the frame. Add drop shadow.
Paste Element 62 drag to bottom Gaussian Blur 10 and Resize 110% Psotion like in example
Paste Element 63 Image> Flip, Gaussian Blur like before, Resize to 115%, and drag to bottom positioning like example.
Paste Element 54 and resize 35% and then 85%. Drag behind the purple bag layer duplicate, Image> Mirror and position like in the example or as you desire.
Paste Element 37 Resize by 30% and then 55% place behind purple bag layer to the left and add shadow.
Paste Element 36 drag behind second Frame 4 layer and place at the top right. Gaussian Blur 1 and add shadow same settings as before.
Paste Element 29 and resize to 25% drag to top layer and place at top right of frame.
Paste Element 30 and resize to 30% place under yellow flower and add drop shadow to both.
Paste full body tube. Mirror the tube, drag layer behind green leafy layers (Element 54)
Add Porcelain effect like before with same settings. Duplicate the tube and change Blend Mode to Soft Light
Merge tube layers together. Duplicate again and drag one behind the paper/tube merge layer.
Drop Shadow bottom tube layer.
Select top tube layer, Using the Eraser tool remove bottom of tube that is over frame.
Paste Element 18 Resize to 35% place at bottom left over paper bag. It should give the appearance that the hook is around the bag. Duplicate and drag one layer under the purple bag. Select teh top hook layer and use erase tool to remove the part of the hook that is over the bag.
Drop shadow bottom hook layer.
Paste Element 16 place as desired Adjust> Color> Red/Green/Blue same as before and change blend to desired. I changed mine to Sreen at 23% opacity.
Paste Element 14 and resize to 75% drag under green leafy layers Gaussian Blur 1 and add drop shadow.
Merge Visible.
Image> Canvas Resize> 685x685 adjust tag position using pick tool so that it is recentered on the canvas.
Resize tag to 600x600 making sure to change the settings to pixels and select all layers.
Add copyright
Add name. I used Akashi MF size 100 using color #d8bfe7
Convert to Raster
Adjust> Add/Remove Noise> Add Noise Uniform 37 Monochrome checked
Effects> PlugIns> EyeCandy5> Impact> Gradient Glow Glow Type Outside, Glow Radius 5, Soften Corners 8, Overall Opacity 100, Distortion Amount 0, Distortion Lump Size 7, Gradient Smoothness 100 color black with a small amount of #bb97d3
Shadow vertical 2, horizontal 1, opacity 54, blur 5 color black
Merge Visible
Save as PNG
Thank you for trying my tutorial.
Subscribe to:
Posts (Atom)
TWI

Sunshine Daze Topsite
Vote Please

Fan Of


About Me

- SuthrnPrincess
- I am a mom of 5 rambunctious and audacious kids. 1 girl and 4 boys. I started out tagging and fell in love with my PSP. I am with the most wonderful man in my world, George. If you make something with a mask or template I would love to see it. Please feel free to email me at georges_princess@yahoo.com. If you make a tutorial please link back to my blog for supplies do not include my materials nor link to my file share site. I would love to put your tutorial link on my blog so please feel free to email me :).
My Blinkies


CT For