Wednesday, August 29, 2012
 Emo Glamour PTU
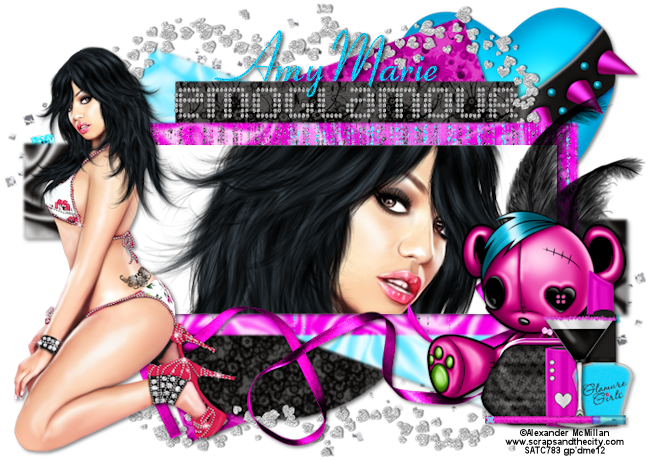
Supplies:
Template 145 by Leah at Amy& Leah's Gimptastic Tuts.
PTU kit Emo Glamour by AmyMarie available at Scraps & the City.
Tube of choice. I used Alexander McMillan available at Scraps & the City.
Font of choice. I used Aspire.
Let'sGet Started:
Open template in psp.
Shift + D.
Close the original template.
Image> Resize to 650 width by 460 height.
Image> Canvas Size> 700 width by 495 height.
Delete credits and bg layer.
Paste pp015. Image> Resize to 70%. Drag above layer 2. Select layer 2. Selections> Select All. Selections> Float. Selections> Defloat. Selections> Invert. Select the paper layer and hit the delete key on your keyboard. Selections> Select None.
Adjust> Softness> Soften Morex2.
Delete layer 2.
Merge layer 4 & 5 together.
Paste pp014. Image> Resize to 85%. Select layer 5. Selections> Select All. Selections> Float. Selections> Defloat. Selections> Invert. Select the paper layer and hit the delete key on your keyboard. Selections> Select None.
Adjust> Softness> Soften Morex2.
Delete layer 5.
Paste pp013. Image> Resize to 70%. Select layer 6. Selections> Select All. Selections> Float. Selections> Defloat. Selections> Invert. Select the paper layer and hit the delete key on your keyboard. Selections> Select None.
Adjust> Softness> Soften Morex2.
Delete layer 6.
Paste pp8. Image> Resize to 65%. Select layer 7. Selections> Select All. Selections> Float. Selections> Defloat. Selections> Invert. Select the paper layer and hit the delete key on your keyboard. Selections> Select None.
Adjust> Softness> Soften.
Delete layer 7.
Paste pp2. Image> Resize to 65%. Select layer 3. Selections> Select All. Selections> Float. Selections> Defloat. Selections> Invert. Select the paper layer and hit the delete key on your keyboard. Selections> Select None.
Delete layer 3.
Paste pp6. Image> Resize to 75%. Select layer 8. Selections> Select All. Selections> Float. Selections> Defloat. Selections> Invert. Select the paper layer and hit the delete key on your keyboard. Selections> Select None.
Delete layer 8.
Paste tube close-up. Drag to top layer. Position in top rectangle as desired. Select the top rectangle. Selections> Select All. Selections> Float. Selections> Defloat. Selections> Invert. Select the tube layer and hit the delete key on your keyboard. Selections> Select None.
Select layer 1. Adjust> Color> Channel Mixer: Output Channel Grey, Red 200%, Green 200%, Blue 200%, Constant200%.
Paste full body tube. Image> Mirror. Image> Resize to 55%. Drag to the top and position at the bottom left.
Effects> 3D Effects> Drop shadow: vertical 2, horizonal 2, opacity50, blur 5, color black.
Paste frame 3. Image> Resize to 85%. Drag below the second rectangle layer.
Paste wordart. Image> Resize to 38%. Drag below the frame 3 layer. Position over the smaller top rectangle.
Paste mdrink. Image> Resize to 35%. Drag to the top layer. Position at the bottom right.
Drop shadow same settings.
Paste lipstick. Image> Resize to 50%. Drag under the drink layer. Position behind the drink.
Drop shadow same settings.
Paste heart 3. Image> Resize to 75%. Drag to the bottom layer. Position at the top right.
Drop shadow same settings.
Paste rib1. Image> Resize to 85%. Drag behind the full tube layer. Position towards the bottom.
Drop shadow same settings.
Paste purse. Image> Resize to 35%. Position to the left of the lipstick.
Drop shadow same settings.
Paste feather. Image> Resize to 90%. Drag behind the purse layer. Position behind the drink.
Paste eyeliner. Image> Resize to 35%. Drag to thetop layer. Position at the bottom of the drink.
Drop shadow same settings.
Paste glitterstrings. Image> Resize to 85%. Drag behind the top rectangle. Position at the top of the second rectangle. Selections> Select All. Selections> Float. Selections> Defloat. Selections> Invert. Select the glitterstrings layer and hit the delete key on your keyboard. Selections> Select None.
Paste glittersplattergems. Drag to the bottom layer. Position at the bottom right. Duplicate. Image> Mirror. Image> Flip.
Pastebear1. Image> Resize to 65%. Drag behind the purse layer. Position behind the purse.
Drop shadow same settings.
Paste nailpolish. Image> Resize to 35%. Drag behind the drink layer. Position to the right of the drink.
Drop shadow same settings.
Merge visible.
Image> Resize to 650 width by 460 height.
Add copyright.
Add name. I used Aspire size 72 Bold color #00c9f8.
Adjust> Add/Remove Noise> Add Noise: Gaussian 30 monochrome checked.
Drop shadow changing opacity to 75.
Merge visible.
Save as PNG.

Tuesday, August 28, 2012
I'm A Star PTU
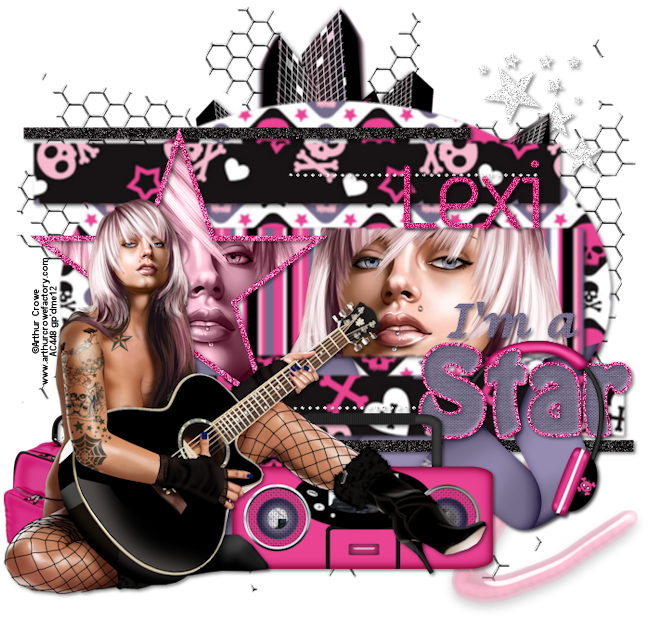
Supplies:
Template Tag 19 by Rosa Tags.
PTU Kit Hey Mister DJ by Lexi Creationz Scraps.
Tube of choice. I used Arthur Crowe available in his store.
Font of choice. I used Base 4.
Let's Get Started:
Open template in psp.
Shift + D.
Close the original.
Delete Rosa Tag Templates and Background layers.
Merge Capa 3 and 4 together.
Merge Capa 5 and 6 together.
Merge Capa 7 and 8 together.
Merge Capa 11 and 12 together.
Paste P8. Image> Resize to 85%. Drag above Capa11. Duplicate. Drag above Capa5. Select Capa11. Selections> Select All. Selections> Float. Selections> Defloat. Selections> Invert. Select the paper layer and hit the delete key on your keyboard.
Delete Capa11.
Select Capa5. Selections> Select All. Selections> Float. Selections> Defloat. Selections> Invert. Select the paper layer and hit the delete key on your keyboard.
Delete Capa5.
Select the dotted lines layer.
Adjust> Add/Remove Noise> Add Noise Gaussian 100 monochrome checked.
Select the stars layer.
Adjust> Add/Remove Noise> Add Noise Gaussian 65 monochrome checked.
Effects> 3D Effects> Drop Shadow: vertical 2, horizontal 2, opacity 50, blur 5, color black.
Paste P9. Image> Resize to 85%. Drag above Capa7. Select Capa7. Selections> Select All. Selections> Float. Selections> Defloat. Selections> Invert. Select the paper layer and hit the delete key on your keyboard.
Add Noise same settings.
Delete Capa7.
Paste P10. Image> Resize to 85%. Drag above Capa10. Duplicate. Drag above Capa13. Select Capa10. Selections> Select All. Selections> Float. Selections> Defloat. Selections> Invert. Select the paper layer and hit the delete key on your keyboard.
Add Noise Gaussian 100 monochrome checked.
Delete Capa10.
Select Capa13. Selections> Select All. Selections> Float. Selections> Defloat. Selections> Invert. Select the paper layer and hit the delete key on your keyboard.
Add Noise Gaussian 100 monochrome checked.
Delete Capa13.
Paste P11. Image> Resize to 85%. Drag above Capa14. Duplicate. Drag above Capa15. Select Capa14. Selections> Select All. Selections> Float. Selections> Defloat. Selections> Invert. Select the paper layer and hit the delete key on your keyboard.
Effects> 3D Effects> Inner Bevel:

Delete Capa14.
Merge down with the back star layer and drop shadow same settings.
Select Capa15. Selections> Select All. Selections> Float. Selections> Defloat. Selections> Invert. Select the paper layer and hit the delete key on your keyboard.
Drop shadow same settings.
Delete Capa15.
Merge the "I'm a" and "Star" layers together.
Paste P2. Image> Resize to 85%. Drag above Capa1. Select Capa1. Selections> Select All. Selections> Float. Selections> Defloat. Selections> Invert. Select the paper layer and hit the delete key on your keyboard.
Adjust> Softness> Soften More.
Drop shadow same settings.
Delete Capa1.
Paste P1. Image> Resize to 85%. Drag above Capa3. Select Capa3. Selections> Select All. Selections> Float. Selections> Defloat. Selections> Invert. Select the paper layer and hit the delete key on your keyboard.
Adjust> Softness> Soften More.
Drop shadow same settings.
Delete Capa3.
Paste P7. Image> Resize to 85%. Drag above Capa9. Select Capa9. Selections> Select All. Selections> Float. Selections> Defloat. Selections> Invert. Select the paper layer and hit the delete key on your keyboard.
Delete Capa9.
Paste P6. Image> Resize to 85%. Drag above Capa2. Select Capa2. Selections> Select All. Selections> Float. Selections> Defloat. Selections> Invert. Select the paper layer and hit the delete key on your keyboard.
Adjust> Softness> Soften More x 2.
Drop shadow same settings.
Delete Capa 2.
Paste tube close-up. Drag behind the star frame layer. Position in the star frame.
Drop shadow same settings.
Select the star paper. Selections> Select All. Selections> Float. Selections> Defloat. Selections> Invert. Select the tube layer and hit the delete key on your keyboard.
Change the blend mode Luminance (L).
Merge Down.
Paste tube close-up again. Image> Mirror. Drag above the bottom rectangle. Position in the rectangle. Select the rectangle. Selections> Select All. Selections> Float. Selections> Defloat. Selections> Invert. Select the tube layer and hit the delete key on your keyboard.
Merge down.
Paste full tube. Image> Resize to 65%. Drop shadow. Drag to top. Position at the bottom left.
Paste wire2. Image> Resize to 85%. Drag to bottom layer.
Paste Radio. Image> Resize to 50%. Drag behind the tube layer. Position to the right of the tube.
Drop shadow same settings.
Paste Ribbon1. Drag under the wordart layer. Drop shadow same settings. Position at the bottom behind the tube. Duplicate. Drag above the oval layer. Select the top ribbon. Erase the desired portion of the ribbon.
Paste Scribble. Drag above the wire layer. Position at the bottom right.
Paste CityScape. Image> Resize to 90%. Position at the top of the oval.
Select the Glitter stars layer and drag the layer behind the cityscape layer.
Paste headphones. Image> Resize to 50%. Drag above the wordart layer. Position over the wordart. Drop shadow same settings. Duplicate. Drag above the star frame layer. Select the top headphones layer. Erase the left side of the headphones.
Paste Bookbag. Image> Resize to 35%. Drag behind the tube layer. Position to the left of the tube.
Drop shadow same settings.
Drop shadow: thin glitter rectangles, star frame and dotted glitter lines.
Merge Visible.
Image> Canvas Size: 700 width by 670 height.
Recenter with pick tool.
Image> Resize 650 width by 622 height.
Add copyright.
Add name with font of choice. I used Base4 size 72 Bold color #d93583.
Adjust> Add/Remove Noise> Add Noise: Gaussian 55 monochrome checked.
Drop shadow changing the opacity to 75.
Merge visible.
Save as PNG.
Wild Wonderland PTU
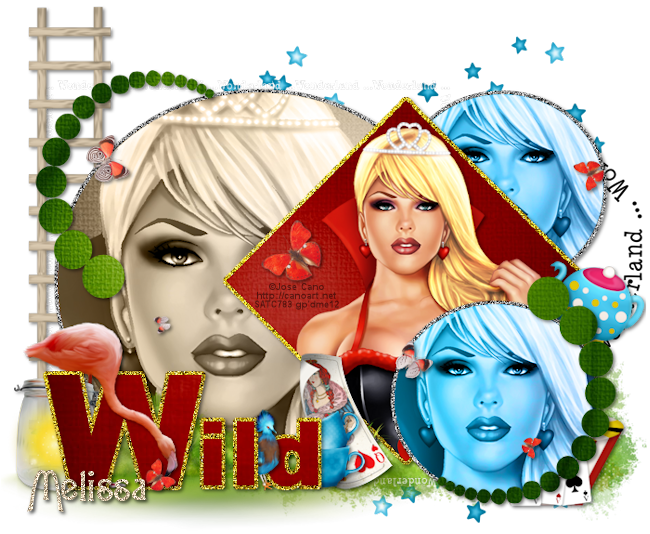
Supplies:
Template Tag 17 by Rosa Tags.
PTU kit Wonderland by WDDesignz available at Whisprd Designz.
Tube of choice. I used Jose Cano available at Scraps & the City.
Font of choice. I used Agatha.
Let's Get Started:
Open the template in psp.
Shift + D.
Close original.
Delete Rosa Tags Templates and Background layers.
Paste cu53_paper(1). Drag to top layer. Duplicate. Hide 1 layer. Select the Capa12 layer. Selections> Select All. Selections> Float. Selections> Defloat. Selections> Invert. Select the paper layer and hit the delete key. Selections> Select None.
Delete Capa12.
Unhide duplicate. Drag above Capa7. Image> Resize to 75%. Select Capa7. Selections> Select All. Selections> Float. Selections> Defloat. Selections> Invert. Select the paper layer and hit the delete key. Selections> Select None.
Delete Capa7.
Paste CommercialUse54_paper(5). Drag above Capa2. Image>Resize to 75%. Select the Capa2 layer. Selections> Select All. Selections> Float. Selections> Defloat. Selections> Invert. Select the paper layer and hit the delete key. Selections> Select None.
Delete Capa2.
Paste CommercialUse54_paper(1). Drag above Capa4. Image>Resize to 80%. Duplicate. Select the Capa4 layer. Selections> Select All. Selections> Float. Selections> Defloat. Selections> Invert. Select the paper layer and hit the delete key. Selections> Select None.
Delete Capa4.
Drag duplicate above Capa9. Select Capa9. Selections> Select All. Selections> Float. Selections> Defloat. Selections> Invert. Select the paper layer and hit the delete key. Selections> Select None.
Delete Capa9.
Paste cu53_paper(5). Image> Resize to 80%. Drag above Capa10. Duplicate. Select the Capa10 layer. Selections> Select All. Selections> Float. Selections> Defloat. Selections> Invert. Select the paper layer and hit the delete key. Selections> Select None.
Delete Capa10.
Drag duplicate above Capa5. Select Capa 5. Selections> Select All. Selections> Float. Selections> Defloat. Selections> Invert. Select the paper layer and hit the delete key. Selections> Select None.
Delete Capa5.
Paste cu53_paper(9). Image> Resize to 80%. Drag above Capa6. Duplicate. Select the Capa6 layer. Selections> Select All. Selections> Float. Selections> Defloat. Selections> Invert. Select the paper layer and hit the delete key. Selections> Select None.
Adjust> Add/Remove Noise> Add Noise: Gaussian 100 monochrome checked.
Delete Capa6.
Drag duplicate above Capa11. Select Capa11. Selections> Select All. Selections> Float. Selections> Defloat. Selections> Invert. Select the paper layer and hit the delete key. Selections> Select None.
Add Noise same settings.
Delete Capa11.
Select Capa1.
Add Noise same settings.
Select Capa3.
Add Noise same settings.
Select Capa8.
Add Noise same settings.
Paste tube close-up. Drag above the large circle. Position in the large circle. Select the large circle layer. Selections> Select All. Selections> Float. Selections> Defloat. Selections> Invert. Select the tube layer and hit the delete key. Selections> Select None.
Change blend mode to Luminance (L).
Merge down.
Paste tube half body. Drag above the bottom blue circle layer. Duplicate. Position in the top blue circle. Select the top blue circle layer. Selections> Select All. Selections> Float. Selections> Defloat. Selections> Invert. Select the tube layer and hit the delete key. Selections> Select None.
Change blend mode to Luminance (L).
Merge down.
Select duplicate layer. Drag above top circle layer. Position in the bottom blue circle. Select the bottom blue circle layer. Selections> Select All. Selections> Float. Selections> Defloat. Selections> Invert. Select the tube layer and hit the delete key. Selections> Select None.
Change blend mode to Luminance (L).
Merge down.
Paste full body tube.
Effects> 3D Effects> Drop Shadow: vertical 2, horizontal 2, opacity 50, blur 5, color black.
Drag above the diamond layer. Position in the diamond. Select the diamond layer. Selections> Select All. Selections> Float. Selections> Defloat. Selections> Invert. Select the tube layer and hit the delete key. Selections> Select None.
Merge down.
Paste 06_6(13). Image> Resize 70%. Drag to bottom. Position around the big circle.
Paste 06_6(14). Position to right.
Paste 08_8(7). Image> Resize to 70%. Drag under bottom wordart layer. Position behind wordart.
Drop shadow same settings.
Paste 07_7(5). Image> Resize to 75%. Drag to bottom. Image> Mirror. Position to the bottom right.
Paste 09_9(15). Image> Resize to 25%. Drag below the bottom wordart layer. Position to the left of the "W".
Drop shadow same settings.
Paste04_4(6). Image> Resize to 85%. Drag below the bottom big circle layer. Position to the left.
Drop shadow same settings.
Paste 09_9(14). Image> Resize to 15%. Drag behind the jar layer. Position to the right of the "d".
Drop shadow same settings.
Paste 05_5(1). Image> Resize to 50%. Drag above diamond layer. Position to the right.
Drop shadow same settings.
Paste 05_5(2). Drag to the bottom layer. Erase stars on the left and any other stars you would like to remove.
Paste 06_6(18). Image> Resize to 50%. Drag below the blue tea cups layer. Position to the right of the tea cups.
Drop shadow same settings.
Paste 05_5(19). Image> Resize to 35%. Drag to the top layer. Position over the "W". Drop shadow same settings. Duplicate. Drag above the grass layer. Select the top flamingo. Erase the flamingo legs over the "W".
Paste08_8(8). Drag to top. Position as desired.
Drop shadow same settings.
Paste 09_9(2). Image> Resize to 25%. Drag behind top falmingo layer. Position over the "l" and "d" layer. Drop shadow same settings. Duplicate. Drag under the bottom wordart layer. Select the top bird layer. Erase the part of the bird over the "l".
Select the bottom wordart layer.
Drop shadow same settings.
Drop shadow the glitter layers same settings.
Drop shadow dot swirl layers same settings.
Merge Visible.
Image> Canvas Size: 700 width by 575 height.
Recenter with pick tool.
Image> Resize to 650 width by 534 height.
Add copyright.
Add name with font of choice. I used Agatha size 48 Bold color #d2c0a6.
Adjust> Add/Remove Noise> Add Noise: Gaussian 60 monochrome checked.
Drop shadow changing opacity to 75.
Merge visible.
Save as PNG.
Sunday, August 26, 2012
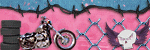
Wicked Hot Babe PTU
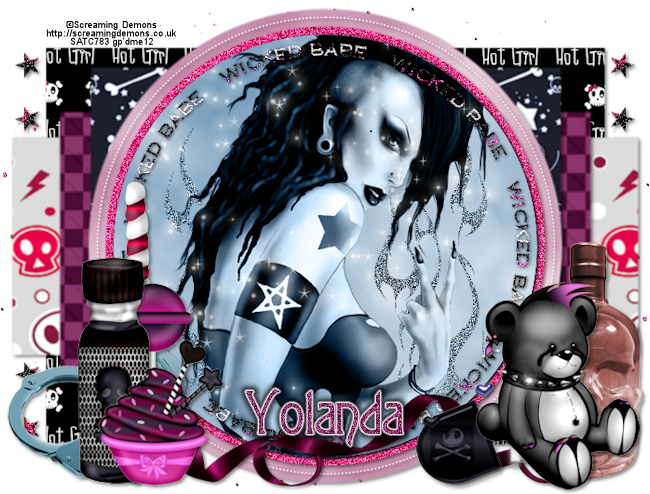
Supplies:
Tag Template 72 by Rosey at her blog Rose's Place.
PTU kit Hot Girl by Eclipse Creations available at Scraps & the City.
Tube by Screaming Demons available at Scraps & the City.
PlugIns: Eye Candy 5 (optional).
Font of choice. I used Agatha.
Let's Get Started:
Open the template in psp.
Shift + D.
Close original.
Delete credits, Raster 1, and Pink Circles layers.
Paste P8. Image> Resize to 65%. Drag above whitecircle. Select whitecircle. Selections> Select All. Selections> Float. Selections> Defloat. Selections. Invert. Select the paper layer and hit the delete key on your keyboard. Selections> Select None.
Delete the whitecircle layer.
Paste P9. Image> Resize to 70%. Drag above blackcircle. Select blackcircle. Selections> Select All. Selections> Float. Selections> Defloat. Selections. Invert. Select the paper layer and hit the delete key on your keyboard. Selections> Select None.
Delete the blackcircle layer.
Merge left stars layer down to right stars layer.
Merge Right white down to Left white layer.
Paste P10. Image> Resize to 85%. Drag above Right Stars. Select Right Stars. Selections> Select All. Selections> Float. Selections> Defloat. Selections. Invert. Select the paper layer and hit the delete key on your keyboard. Selections> Select None.
Delete the Right Stars layer.
Select Stars layer. Adjust> Add/Remove Noise> Add Noise: Gaussian 100 monochrome checked.
Paste P1. Image> Resize to 85%. Drag above left white. Select left white. Selections> Select All. Selections> Float. Selections> Defloat. Selections. Invert. Select the paper layer and hit the delete key on your keyboard. Selections> Select None.
Delete the left white layer.
Paste P4. Image> Resize to 80%. Drag above pink rectangle. Select pink rectangle. Selections> Select All. Selections> Float. Selections> Defloat. Selections. Invert. Select the paper layer and hit the delete key on your keyboard. Selections> Select None.
Delete the pink rectangle layer.
Paste P2. Image> Resize to 85%. Select black rectangle. Selections> Select All. Selections> Float. Selections> Defloat. Selections. Invert. Select the paper layer and hit the delete key on your keyboard. Selections> Select None.
Delete the black rectangle layer.
Paste P6. Image> Resize to 80%. Select Lrg Pink Rectangle. Selections> Select All. Selections> Float. Selections> Defloat. Selections. Invert. Select the paper layer and hit the delete key on your keyboard. Selections> Select None.
Delete the Lrg Pink Rectangle layer.
Paste P7. Drag above wordart. Select wordart. Selections> Select All. Selections> Float. Selections> Defloat. Selections. Invert. Select the paper layer and hit the delete key on your keyboard. Selections> Select None.
Delete the wordart layer.
Select the new wordart layer. Add Noise same settings.
Select flames layer. Add noise same settings.
Change the blend mode to Luminance (L).
Paste tube. Position in the top circle. Select the top circle. Selections> Select All. Selections> Float. Selections> Defloat. Selections. Invert. Select the tube layer and hit the delete key on your keyboard. Selections> Select None.
Change blend mode to Luminance (L).
Select the wordart layer.
Effects> 3D Effects> Drop Shadow: vertical 1, horizontal 1, opacity 75, blur 5, color black.
Select the top circle layer and drop shadow.
Select the Glitter Circle layer.
Effects> 3D Effects> Drop Shadow: vertical 2, horizontal 2, opacity 50, blur 5, color black.
Select the dotted circle layer.
Drop shadow same settings.
Select the bottom circle layer.
Adjust> Softness> Soften More.
Drop shadow same settings.
Select the stars layer.
Drop shadow same settings.
Select the 2 rectangles layer.
Adjust> Softness> Soften.
Drop shadow same settings.
Select the top rectangle layer.
Adjust> Softness> Soften More.
Drop shadow same settings.
Select the middle rectangle layer.
Adjust> Softness> Soften.
Drop shadow same settings.
Select the bottom rectangle layer.
Drop shadow same settings.
Paste Cake1. Image> Resize to 65%. Drag to the top layer. Position at the bottom left of the top circle.
Drop shadow same settings.
Paste Splatter 2. Drag to bottom layer. Position at the top left. Duplicate. Image> Mirror. Image> Flip.
Paste Splatter. Position at the top right. Duplicate. Image> Mirror. Image> Flip.
Paste Skullpolish. Image> Resize to 85%. Drag behind the cupcake layer. Position to the left of the cupcake.
Drop shadow same settings.
Paste Punkbear. Image> Resize to 85%. Position at the bottom right corner.
Drop shadow same settings.
Paste Pill2. Image> Resize to 85%. Drag behind the bear layer. Position to the left of the bear.
Drop shadow same settings.
Paste Swirlstick. Drag behind the polish layer. Position to the right of the polish.
Drop shadow same settings.
Paste sparkle1. Image> Resize 85%. Drag above the tube layer. Select the top circle layer. Selections> Select All. Selections> Float. Selections> Defloat. Selections. Invert. Select the sparkle layer and hit the delete key on your keyboard. Selections> Select None.
Paste Lollipop. Image> Resize to 75%. Drag above swirl stick. Position to the right of the nailpolish.
Drop shadow same settings.
Paste Ribbon. Image> Resize 85%. Image> Free Rotate: Left 90 degrees.
Drop shadow same settings.
Paste Cuffs. Drag behind swirlstick. Position to the left of the polish.
Drop shadow same settings.
Paste Bottle. Image> Resize to 85%. Position to the right of the bear.
Drop shadow same settings.
Merge visible.
Image> Resize to 650 width by 494 height.
Add copyright information.
Add name with font of choice. I used Agatha size 72 color #8c346c.
Add Noise Gaussian 50 monochrome checked.
Effects> PlugIns> Alien Skin Eye Candy 5: Impact: Gradient Glow:

Drop shadow same settings.
Merge Visible.
Save as PNG.
Saturday, August 25, 2012
Love Ricocheted PTU

Supplies:
PTU kit Love Eternal by Lexi Creationz.
El Template 45 by Pooker available on her blog.
Tube of choice. I used Tiffany Toland-Scott from Creative Design Outlet.
Font of choice. I used Birmingham.
Let's Get Started:
Open the template in psp.
Shift + D.
Close original.
Delete Raster 1 and CR Info layer.
Paste Paper9. Image> Resize to 85%. Drag above pinkcircle layer. Select the pinkcircle layer. Selections> All. Selections> Float. Selections> Defloat. Selections> Invert. Select the paper layer. Hit the delete key on your keyboard. Selections> Select None.
Delete the pinkcircle layer.
Paste Paper10. Image> Resize to 80%. Drag above rectangle layer. Select the rectangle layer. Selections> All. Selections> Float. Selections> Defloat. Selections> Invert. Select the paper layer. Hit the delete key on your keyboard. Selections> Select None.
Delete the rectangle layer.
Paste Paper1. Image> Resize to 75%. Drag above dottedcircle layer. Select the dottedcircle layer. Selections> All. Selections> Float. Selections> Defloat. Selections> Invert. Select the paper layer. Hit the delete key on your keyboard. Selections> Select None.
Delete the dottedcircle layer.
Select dottedcircle layer. Adjust> Add/Remove Noise> Add Noise: Gaussian 60 monochrome checked.
Paste Paper2. Image> Resize to 70%. Drag above dottedsquare layer. Position over the dottedsquare layer. Select the dottedsquare layer. Selections> All. Selections> Float. Selections> Defloat. Selections> Invert. Select the paper layer. Hit the delete key on your keyboard. Selections> Select None.
Delete the dottedsquare layer.
Select dottedsquare layer. Add Noise same settings.
Paste Paper7. Image> Resize to 70%. Drag above square layer. Select the square layer. Selections> All. Selections> Float. Selections> Defloat. Selections> Invert. Select the paper layer. Hit the delete key on your keyboard. Selections> Select None.
Delete the square layer.
Paste Paper8. Image> Resize to 70%. Drag above blackcircle layer. Position over the blackcircle layer. Select the blackcircle layer. Selections> All. Selections> Float. Selections> Defloat. Selections> Invert. Select the paper layer. Hit the delete key on your keyboard. Selections> Select None.
Delete the blackcircle layer.
Paste Paper6. Drag above redcircle layer. Select the redcircle layer. Selections> All. Selections> Float. Selections> Defloat. Selections> Invert. Select the paper layer. Hit the delete key on your keyboard. Selections> Select None.
Delete the redcircle layer.
Paste Paper4. Image> Resize to 70%. Drag above Love layer. Select the Love layer. Selections> All. Selections> Float. Selections> Defloat. Selections> Invert. Select the paper layer. Hit the delete key on your keyboard. Selections> Select None.
Delete the Love layer.
Paste Paper3. Image> Resize to 70%. Select the icocheted layer. Selections> All. Selections> Float. Selections> Defloat. Selections> Invert. Select the paper layer. Hit the delete key on your keyboard. Selections> Select None.
Delete the icocheted layer.
Paste Paper5. Image> Resize to 70%. Select the R layer. Selections> All. Selections> Float. Selections> Defloat. Selections> Invert. Select the paper layer. Hit the delete key on your keyboard. Selections> Select None.
Delete the R layer.
Paste tube. Drag above the top circle layer. Position in the left circle. Select the circle. Selections> All. Selections> Float. Selections> Defloat. Selections> Invert. Select the tube layer. Hit the delete key on your keyboard. Selections> Select None.
Change the tube blend mode to Luminance.
Merge down.
Adjust> Softness> Soften More.
Effects> 3D Effects> Drop Shadow: vertical 2, horizontal 2, opacity 50, blur 5, color black.
Paste tube again. Image> Mirror. Drag above the square layer. Position in the square. Select the square. Selections> All. Selections> Float. Selections> Defloat. Selections> Invert. Select the tube layer. Hit the delete key on your keyboard. Selections> Select None.
Effects> Photo Effects> Sepia Toning> Amount to age: 25.
Merge down.
Adjust> Softness> Soften More.
Drop shadow same settings.
Paste tube again. Drag above the rectangle layer. Position in the rectangle. Select the rectangle. Selections> All. Selections> Float. Selections> Defloat. Selections> Invert. Select the tube layer. Hit the delete key on your keyboard. Selections> Select None.
Change the tube blend mode to Luminance (L).
Merge down.
Adjust> Softness> Soften.
Drop shadow same settings.
Paste tube again. Image> Mirror. Drag above the biggest circle layer. Position in the biggest circle. Select the biggest circle. Selections> All. Selections> Float. Selections> Defloat. Selections> Invert. Select the tube layer. Hit the delete key on your keyboard. Selections> Select None.
Effects> Photo Effects> Sepia Toning> Amount to age: 25.
Merge down.
Adjust> Softness> Soften.
Drop shadow same settings.
Paste tube again. Image> Mirror. Drag above the bottom circle layer. Position in the bottom circle. Select the bottom circle. Selections> All. Selections> Float. Selections> Defloat. Selections> Invert. Select the tube layer. Hit the delete key on your keyboard. Selections> Select None.
Effects> Photo Effects> Sepia Toning> Amount to age: 25.
Merge down.
Adjust> Softness> Soften More.
Drop shadow same settings.
Paste full body tube. Image> Resize to 65%. Drag below the R layer. Position in the bottom left corner.
Drop shadow same settings.
Drop shadow dotted circle and dotted square same settings.
Paste GlitterSplatter. Image> Resize to 80%. Drag to the bottom layer.
Paste Clock. Drag behind the top tube layer. Position to the right of the tube.
Drop shadow same settings.
Paste Ribbon 1. Image> Resize to 85%. Drag above the rectangle layer. Position at the bottom right.
Drop shadow same settings.
Paste Hearts 1. Image> Resize to 35%. Drag above the dotted square. Position at the bottom right.
Drop shadow same settings.
Paste Hearts 2. Image> Resize to 65%. Drag above the bottom layer. Position at the bottom right.
Drop shadow same settings.
Paste Key. Image> Resize to 35%. Drag above hearts 1 layer. Position over hearts 1 layer.
Drop shadow same settings.
Paste Privacy Screen. Image> Resize to 90%. Drag above the heart scatter layer. Position to the left.
Drop shadow same settings.
Select the top layer. Effects> 3D Effects> Inner Bevel: Bevel 2, Width 5, Smoothness 15, Depth 1, Ambience -6, Shininess 35, Color white, Angle 135, Intensity 25, Elevation 60.
Drop shadow same settings.
Repeat Inner Bevel and Drop shadow with second and third layer.
Merge visible.
Image> Resize 650x 601.
Add copyright.
Add name. I used Birmingham size 48 bold #9f9f9f.
Drop shadow same settings.
Merge visible.
Save as PNG.
Wednesday, August 22, 2012
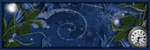
Timeless Love PTU
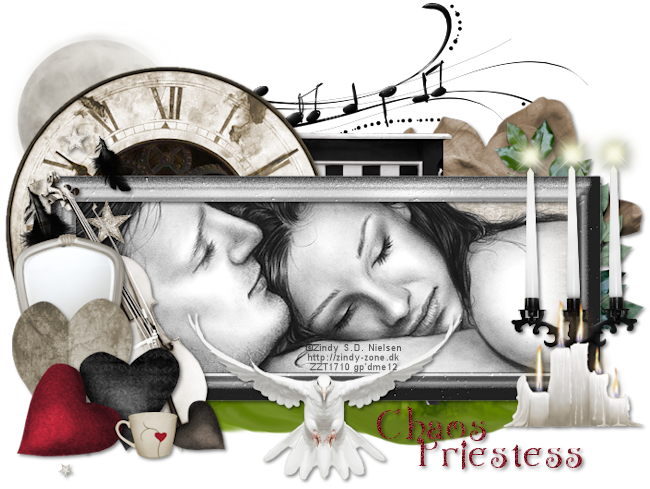
Supplies:
PTU kit Ophelia by Chaos Priestess available at Whisprd Designz.
Tube of choice. I used Zindy S. D. Neilsen available in her store.
Font of choice. I used Wretched.
Let's Get Started:
Open a new 700 x 700 image.
Paste OEl71. Position off center towards the bottom.
Paste OPaper04. Image> Resize to 75%. Drag under the frame layer. Select the frame layer. Click inside of the frame with your wand tool. Selections> Modify> Expand by 10. Selections> Invert. Select the paper layer and hit the delete key. Selections> Select None.
Paste tube of choice. Position as desired in the frame. Select the paper layer. Selections> Select All. Selections> Float. Selections> Defloat. Selections> Invert. Select the tube layer and hit the delete key. Selections> Select None.
Effects> 3D Effects> Drop Shadow: vertical 2, horizontal 2, opacity 50, blur 5, color black.
Drop shadow frame same settings.
Paste OEl70. Position to the right of the frame.
Drop shadow same settings.
Paste OEl32. Image> Resize to 75%. Drag to the bottom layer. Position at the top left of the frame.
Drop shadow same settings.
Paste OEl60. Drag above frame layer. Position on the left side of the frame.
Drop shadow same settings.
Paste OEl59. Drag under feather layer. Position behind the feathers.
Drop shadow same settings.
Paste OEl54. Drag to the top layer. Position at the bottom center of the frame.
Drop shadow same settings.
Paste OEl50. Drag below clock layer. Position behind the frame.
Paste OEl47. Image> Resize to 75%. Drag to the top layer. Position at the bottom of the first candle.
Drop shadow same settings.
Paste OEl46. Image> Resize to 75%. Drag behind the clock layer. Position above and to the left of the clock.
Paste OEl69. Image> Resize to 60%. Drag behind the dove layer. Image> Mirror. Position at the bottom left.
Drop shadow same settings.
Paste OEl09. Image> Resize to 50%. Drag above feathers layer. Position behind the hearts.
Drop shadow same settings.
Paste OEl39. Image> Resize to 50%. Drag to the bottom layer. Position to the right.
Drop shadow same settings.
Paste OEl17. Image> Resize to 75%. Drag above feathers layer. Position behind hearts.
Drop shadow same settings.
Paste OEl27. Image> Resize to 50%. Drag behind mirror. Position to the right of the mirror.
Drop shadow same settings.
Paste OEl23. Image> Resize to 90%. Drag to bottom layer. Position to the right above the frame.
Drop shadow same settings.
Paste OEl53. Image> Resize to 50%. Drag behind the dove layer. Position at the bottom of hearts.
Drop shadow same settings.
Paste OEl75. Drag to the bottom layer. Position above the frame. Erase part viewable above and behind the moon.
Merge visible.
Image> Canvas Size: 705 width by 530 height.
Recenter with pick tool.
Image> Resize to 650 width by 489 height.
Add copyright.
Add name with font of choice. I used Wretched size 48 Bold color #821d2a.
Adjust> Add/Remove Noise> Add Noise: Gaussian 35 monochrome checked.
Drop shadow same settings.
Merge visible.
Save as PNG.
Subscribe to:
Posts (Atom)
TWI

Sunshine Daze Topsite
Vote Please

Fan Of


About Me

- SuthrnPrincess
- I am a mom of 5 rambunctious and audacious kids. 1 girl and 4 boys. I started out tagging and fell in love with my PSP. I am with the most wonderful man in my world, George. If you make something with a mask or template I would love to see it. Please feel free to email me at georges_princess@yahoo.com. If you make a tutorial please link back to my blog for supplies do not include my materials nor link to my file share site. I would love to put your tutorial link on my blog so please feel free to email me :).
My Blinkies


CT For