Monday, July 30, 2012
 Emotional PTU

Supplies:
Temp 94 by Horse Play's Pasture available on her blog.
PTU kit Emotional by Imperfect Angel Scraps available at Whisprd Designz.
Tube of choice. I used a gorgeous tube by Tiffany Tolland-Scott available at Creative Design Outlet.
Font of choice. I used Yataghan.
Let's Get Started:
Open template in psp.
Shift + D.
Close original.
Delete credit and background layer.
Image> Canvas size 700 x 700.
Paste (1) jpg. Image> Resize to 85%. Drag above stitches. Duplicate. Select stitches layer. Selections> Select All. Selections> Float. Selections> Defloat. Selections> Invert. Select the paper layer and hit the delete key on your keyboard. Selections> Select None.
Delete the stitches layer.
Drag duplicate above left lines. Duplicate. Select the left lines layer. Selections> Select All. Selections> Float. Selections> Defloat. Selections> Invert. Select the paper layer and hit the delete key on your keyboard. Selections> Select None.
Delete the left lines layer.
Drag duplicate above right lines. Select the right lines layer. Selections> Select All. Selections> Float. Selections> Defloat. Selections> Invert. Select the paper layer and hit the delete key on your keyboard. Selections> Select None.
Delete the right lines layer.
Paste (10) jpg. Image> Resize to 85%. Drag above large rectangle layer. Select large rectangle layer. Selections> Select All. Selections> Float. Selections> Defloat. Selections> Invert. Select the paper layer and hit the delete key on your keyboard. Selections> Select None.
Delete the large rectangle layer.
Paste (4) jpg. Image> Resize to 85%. Drag above vertical rectangle layer. Select vertical rectangle layer. Selections> Select All. Selections> Float. Selections> Defloat. Selections> Invert. Select the paper layer and hit the delete key on your keyboard. Selections> Select None.
Delete the vertical rectangle layer.
Paste (3) jpg. Image> Resize to 85%. Drag above large rectangle back layer. Select large rectangle back layer. Selections> Select All. Selections> Float. Selections> Defloat. Selections> Invert. Select the paper layer and hit the delete key on your keyboard. Selections> Select None.
Delete the large rectangle back layer.
Paste (6) jpg. Image> Resize to 85%. Drag above vertical rectangle frame layer. Select vertical rectangle frame layer. Selections> Select All. Selections> Float. Selections> Defloat. Selections> Invert. Select the paper layer and hit the delete key on your keyboard. Selections> Select None.
Delete the vertical rectangle frame layer.
Paste close-up of tube you chose. Drag above small rectangle and position in the frame. Select the small rectangle frame. Selections> Select All. Selections> Float. Selections> Defloat. Selections> Invert. Select the paper layer and hit the delete key on your keyboard. Selections> Select None.
Paste full body tube. Drag above large rectangle frame and position in the large rectangle. Select the large rectangle frame. Selections> Select All. Selections> Float. Selections> Defloat. Selections> Invert. Select the paper layer and hit the delete key on your keyboard. Selections> Select None.
Select the close-up and change the blend mode to Luminance (L).
Paste (59). Image> Resize to 25%. Drag to top layer. Position over bottom left where the rectangles meet. Duplicate. Image> Flip.
Paste (14). Image> Resize to 85%. Drag to bottom and position at the right.
Paste (24). Image> Resize to 85%. Drag above the bottom tube layer and position with the red stitches at the bottom of the paper in the center. Duplicate. Image> Flip. Merge the layers together.
Select the top big rectangle paper layer. Selections> Select All. Selections> Float. Selections> Defloat. Selections> Invert. Select the paper layer and hit the delete key on your keyboard. Selections> Select None.
Paste (60). Image> Resize to 20%. Drag to top layer and position at the bottom right cotner of the large rectangle paper.
Paste (58). Image> Resize to 15%. Position over the bottom left flower. Duplicate. Image> Flip.
Paste (4). Image> Resize to 85%. Image> Free Rotate to left 90 degrees. Drag behind smaller rectangle paper. Position to the left of the small rectangle. Erase top and bottom of swirl.
Paste (19). Image> Resize to 50%. Position at the bottom right of the small rectangle.
Paste (12). Drag to bottom layer.
Paste (26). Image> Resize to 30%. Drag to top layer and position over the button.
Effects> 3D Effects> Drop Shadow: Vertical 2, Horizontal 2, Opacity 50, blur 5, color black. Shadow all layers except: top tube, small rectangle paper, bottom tube, and the bottom layer.
Merge Visible.
Image> Canvas Size: 635 width by 610 height.
Recenter with pick tool.
Add copyright.
Add name with font od choice. I used Yataghan size 36 color #6a0706.
Adjust> Add/Remove Noise> Add Noise: Gaussian 30 Monochrome checked.
Drop shadow: vertical 1, horizontal 1, opacity 40, blur 3, color white.
Merge visible.
Save as PNG.

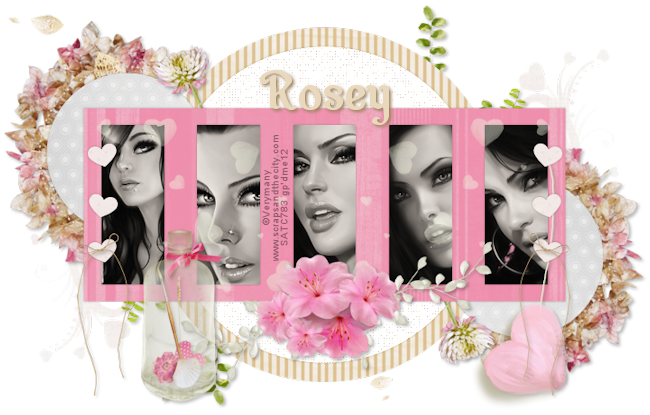
Captured Memories PTU

Supplies:
CMHeartTemp2 by Rosey available on the Creative Misfits Blog. (Posted 5-28-12)
PTU Kit Captured Memories by Scraps With Attitude available at the Scraps With Attitude store!
Tubes of choice. I used 5 tubes by Vermany available at Scraps & The City.
Font of choice. I used Wellsley.
Let's Get Started:
Open the template in PSP.
Shift + D.
Close the original.
Delete the credits and the background layer.
Paste the 1st tube of choice. Drag above layer 2 and position over the left rectangle as desired. Click on the left rectangle with the wand tool. Selections> Invert. Select the tube layer and hit the delete key on your keyboard. Selections> Select None.
Repeat with the other 4 rectangle and the other 4 tubes that you chose.
Merge all 5 tube layers together.
Effects> Photo Effects> Sepia Toning: Amount to age 15.
Delete layer 2.
Paste Paper 4. Image> Resize 75. Drag above layer 3. Select layer 3. Selections> Select All. Selections> Float. Selections> Defloat. Selections> Invert. Select the paper layer and hit the delete key. Selections> Select None.
Delete layer 3.
Paste Paper 1. Image> Resize to 85%. Drag above layer 8. Select layer 8. Selections> Select All. Selections> Float. Selections> Defloat. Selections> Invert. Select the paper layer and hit the delete key. Selections> Select None.
Delete layer 8.
Paste Paper 11. Image> Resize to 80%. Drag above layer 9. Select layer 9. Selections> Select All. Selections> Float. Selections> Defloat. Selections> Invert. Select the paper layer and hit the delete key. Selections> Select None.
Delete layer 9.
Paste Paper 7. Image> Resize to 50%. Drag above layer 7. Select layer 7. Selections> Select All. Selections> Float. Selections> Defloat. Selections> Invert. Select the paper layer and hit the delete key. Selections> Select None.
Delete layer 7.
Paste Paper 5. Drag to top layer. Select layer 1. Selections> Select All. Selections> Float. Selections> Defloat. Selections> Invert. Select the paper layer and hit the delete key. Selections> Select None.
Delete layer 1.
Merge layer 4 & 5.
Paste Paper 1. Image> Resize to 85%. Drag above layer 8. Select layer 8. Selections> Select All. Selections> Float. Selections> Defloat. Selections> Invert. Select the paper layer and hit the delete key. Selections> Select None.
Delete layer 8.
Paste Paper 13. Image> Resize to 80%. Drag above layer 5. Select layer 5. Selections> Select All. Selections> Float. Selections> Defloat. Selections> Invert. Select the paper layer and hit the delete key. Selections> Select None.
Delete layer 5.
Select layer 6 change blend mode to Luminance (L). Duplicate twice. Select original layer 6. Effects> 3D Effects> Drop Shadow: Vertical 0, Horizontal 0, Opacity 30, blur 3, color black.
Drop shadow all layers except the layer 6 duplicates, and the next to the last layer.
Paste 33. Image> Resize to 50%. Drag above the double small circle layer. Position at the top. Duplicate. Image> Mirror. Image> Flip. Merge together. Use the erase tool to remove stems.
Paste 29. Image> Resize to 50%. Drag below big circle layer and position to the right. Image> Mirror.
Paste 25. Image> Resize 50%. Position at the bottom left. Duplicate. Image> Mirror. Image> Flip.
Paste 43. Image> Resize to 30%. Drag to the top layer. Position over the bottom right heart. Duplicate. Image> Mirror.
Select the bottom layer and drag it one layer up to where it is now the next to the last layer.
Select the new bottom layer.
Paste 10. Image> Resize to 85%. Position to the right of the bottom right circle. Duplicate. Image> Mirror. Image> Flip.
Select the tube layer.
Paste 7. Image> Resize to 25%. Position towards the bottom between the left two tubes.
Paste 5. Image> Resize to 50%. Drag behind jar. Position at the bottom of the middle tube.
Paste 2. Position string behind the 3 right hearts. Erase the remaining visible element leaving the string and heart hanging from the 3 hearts.
Paste 1. Image> Resize to 35%. Drag above tube layer. Position towards the left. Duplicate. Image> Mirror. Merge together. Lower opacity to 50%.
Drop shadow elements Vertical 2, Horizontal 2, Opacity 30, blur 5, color black. Except the last one you added, and the layer above the dotted circles.
Merge Visible.
Image> Resize to 650 width by 415 height.
Add copyright.
Add name with font of choice. I used Wellsley size 55 Bold color #ead8bc.
Drop shadow changing the opacity to 100 and the color to #967c54.
Merge Visible.
Save as PNG.
Friday, July 27, 2012
Twilight Lullaby PTU
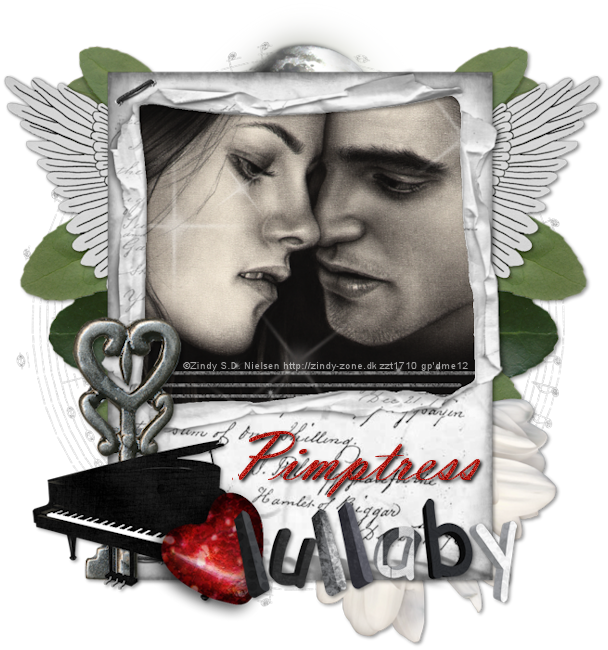
Supplies:
Ptu Kit Midnight Lullaby by Pimp'd Designz available at Pimp My Tags W/Scraps.
Tube of choice. I used the breathtaking work of Zindy Nielsen.
Font of choice. I used Vladimir Script.
Let's Get Started:
Open a new 700 x 700 image.
Paste frame-08.
Paste tube of choice. Drag behind the frame layer and position inside of the frame. Select the frame layer. Click inside of the frame with the wand tool. Selections> Modify> Expand by 5. Selections> Invert. Select the tube layer and hit the delete key on your keyboard. Selections> Select None.
Paste flower 04. Image> Resize to 65%. Drag to bottom and position at the bottom right.
Paste circle-glitter-note. Image> Resize to 75%. Drag to bottom.
Paste sparkle. Image> Resize to 65%. Drag above the tube layer. Select the tube layer. Selections> Select All. Selections> Float. Selections> Defloat. Selections> Invert. Select the sparkle layer. Hit the delete key on your keyboard. Selections> Select None.
Change the blend mode to Soft Light.
Paste piano. Image> Resize to 35%. Drag to top and position at the bottom left of the frame.
Paste paper-heart. Drag behind tube layer. Position to right. Duplicate. Image> Mirror.
Paste lullaby-wa. Image> Resize to 50%. Drag to top and position to the right of the piano.
Paste glitter-strips. Image> Resize to 47%. Drag behind the frame layer. Image> Free Rotate to the right 90 degrees. Position at the bottom of the inside of the frame centered.
Lower opacity to 50%.
Paste greens-02. Drag below the rose. Position to the left. Duplicate. Image> Mirror. Erase the stems.
Paste moon. Image> Resize to 50%. Position at the top of the frame.
Paste key. Image> Resize to 95%. Drag behind the piano later and position behind the piano.
Paste heart. Image> Resize to 50%. Drag above the piano layer. Position between the piano and the wa.
Effects> 3D Effects> Drop Shadow: Vertical 2, Horizontal 2, Opacity 40, blur 5, color black. Except heart, sparkle, tube, glitter notes, and moon.
Merge visible.
Image> Canvas Size 655 width by 700 height.
Recenter with pick tool.
Image> Resize to 608 width by 650 height.
Add copyright.
Add name with font of choice. I used Vladimir Script size 72 bold color #b01b13.
Adjust> Add/Remove Noise> Add Noise: Gaussian 30 monochrome checked.
Drop shadow changing opacity to 100.
Merge visible.
Save as PNG.
Thank you to Pimptress for sharing your scraps and to Zindy for sharing your amazing artwork.
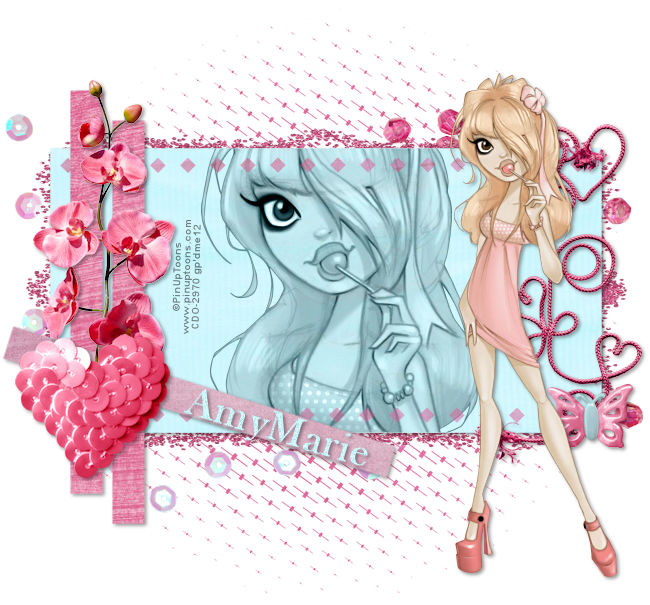
Shabby Abby PTU

Supplies:
Template 4 by AmyMarie available on her blog.
PTU kit Shabby Abby by Pimp'd Designz available at Pimp My Tags W/Scraps.
Tube of choice. I used PinUpToons available at Creative Design Outlet.
Let's Get Started:
Open template in psp.
Shift + D.
Close original.
Delete the top 4 layers.
Merge Vector 1 and Copy of Vector 1.
Paste pp02. Drag above layer 1. Select layer 1. Selections> Select All. Selections> Float. Selections> Defloat. Selections> Invert. Select the paper layer and hit the delete key. Selections> Select None.
Delete layer 1.
Paste pp0. Duplicate. Drag one above Raster 1. Select Raster 1. Selections> Select All. Selections> Float. Selections> Defloat. Selections> Invert. Select the paper layer and hit the delete key. Selections> Select None.
Delete Raster 1.
Drag the duplicate over Vector 1. Select Vector 1. Selections> Select All. Selections> Float. Selections> Defloat. Selections> Invert. Select the paper layer and hit the delete key. Selections> Select None.
Delete Vector 1.
Merge layer 2 & 3.
Paste pp09. Drag above layer 2. Select layer 2. Selections> Select All. Selections> Float. Selections> Defloat. Selections> Invert. Select the paper layer and hit the delete key. Selections> Select None.
Delete layer 2.
Paste pp04. Drag above layer 4. Select layer 4. Selections> Select All. Selections> Float. Selections> Defloat. Selections> Invert. Select the paper layer and hit the delete key. Selections> Select None.
Delete layer 4.
Paste sequins. Image> Resize to 50%. Drag above mask layer. Image> Mirror.
Paste sequin-heart. Image> Resize to 65%. Drag to top layer. Position over the bottom left.
Paste rope-heart. Image> Resize to 45%. Image> Mirror. Position to right.
Paste glitter bracket. Image> Resize to 75%. Use pick tool to shrink to fit around the large rectangle. Drag below the rectangle.
Paste plastic butterfly. Image> Resize to 35%. Drag to top layer and position at bottom right.
Paste beads. Image> Resize to 50%. Drag below glitter layer. Position at the top right.
Paste flower-06. Image> Resize to 50%. Drag behind the sequin heart layer and position behind the sequin heart. Erase the stem from below the heart.
Paste tube close-up. Drag above the big rectangle layer. Select the big rectangle layer. Selections> Select All. Selections> Float. Selections> Defloat. Selections> Invert. Select the tube layer and hit the delete key. Selections> Select None.
Change blend mode to Luminance (L).
Paste full tube. Drag to top and position on the right.
Effects> 3D Effects> Drop Shadow: Vertical 2, Horizontal 2, Opacity 40, blur 5, color black. Except diamonds layer, close-up, and the bottom 4 layers.
Select the diamonds layer and lower the opacity to 50%.
Merge Visible.
Add copyright.
Add name with font of choice. I used Baskerville Old Face size 42 bold color #c9f6fb.
Image> Free Rotate Right 17 degrees.
Adjust> Add/Remove Noise> Add Noise: Gaussian 15 monochrome checked.
Drop shadow same as above.
Merge visible.
Save as PNG.
Thank you to Pimptress and AmyMarie for making such awesome scraps and template. Thank you to Amy Matthews for sharing your amazing artwork with the psp community.
Escape To Paradise PTU
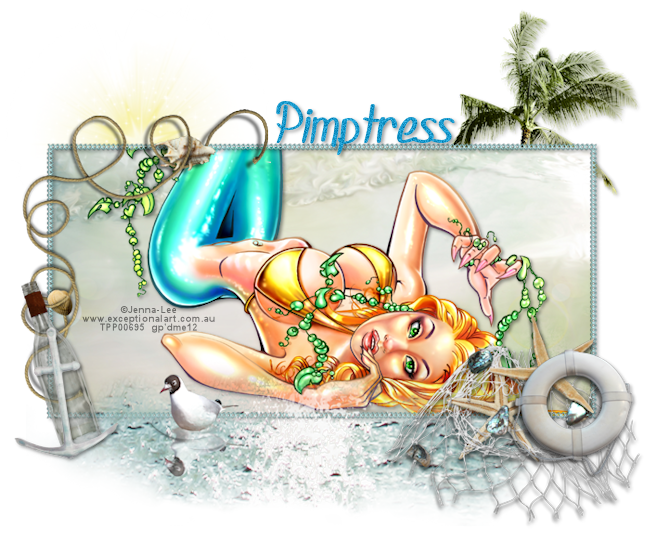
Supplies:
PTU kit Escape by Pimp'd Designz available at Pimp My Tags W/Scraps.
Tube of choice. I used the awesome work of Jenna-Lee available at The Psp Project.
Font of choice. I used FX Foxboro Script.
Let's Get Started:
Open a new 700 x 700 image.
Paste frame 05. Image> Resize to 85%. Use the pick tool to move it towards the bottom of the image.
Paste pp-02. Image> Resize to 75%. Drag behind the frame. Position as desired. Select the frame layer. Use the wand tool to click inside of the frame. Selections> Modify> Expand by 3. Selections> Invert. Select the paper layer and hit the delete key on your keyboard. Selections> Select None.
Paste life-preserver. Image> Resize to 35%. Drag to top and position at the bottom right of the frame.
Paste palm-tree. Image> Resize to 50%. Drag to bottom and position at the top right of the frame.
Paste cluster-01. Image> Resize to 50%. Drag behind the life-preserver layer. Position behind the life-preserver.
Paste bottle. Image> Resize to 35%. Position at the bottom left of the frame.
Paste anchor. Image> Resize to 30%. Position over the bottle.
Paste water-bird. Image> Resize to 90%. Drag above the frame layer and position at the bottom of the frame.
Paste sun. Image> Resize to 50%. Drag behind paper layer. Position at the top left.
Paste string-01. Image> Resize to 50%. Drag above the frame layer and position on the left of the frame.
Paste tube of choice. Drag behind the frame layer. Effects> 3D Effects> Drop Shadow: Vertical 2, Horizontal 2, Opacity 40, Blur 5, color black. Select the paper layer. Selections> All. Selections> Float. Selections> Defloat. Selections> Invert. Select the tube layer and hit the delete key on your keybaord. Selections> Select None.
Shadow layers except the water-bird, string, tube, paper, and sun.
Merge Visible.
Image> Canvas Size 700 width by 575 height.
Image> Resize to 650 width by 534 height.
Reenter with pick tool.
Add copyright.
Add name with font of choice. I used SF Foxboro Script size 65 bold color #1899cc.
Adjust> Add/Remove Noise> Add Noise: Gaussian 20 monochrome checked.
Drop shadow same settings as before.
Merge visible.
Save as PNG.
Ocean Goddess PTU

Supplies:
PTU kit Ocean Goddess by Designs by Sarah available at Pimp My Tags W/Scraps.
Tube of choice. I used the amazing work of Ismael Rac available at his store.
PlugIns: Xero- Porcelain.
Font of choice. I used Waters Gothic.
Let's Get Started:
Open a new 700x700 image.
Paste frame 2. Image> Free Rotate to the right 90 degrees. Position off center towards the bottom of the tag.
Paste pp9. Drag under the frame layer. Select the frame layer. Use the wand tool to click inside both frames. Selections> Modify> Expand by 5. Selections> Invert. Select the paper layer. Hit the delete key on your keybaord. Selections> Select None.
Paste bottle. Drag to top. Image> Resize to 75%. Position at the center of the frames.
Paste flower 2. Image> Resize to 50%. Drag behind the bottle layer and position at the left of the bottle. Duplicate. Image> Mirror.
Paste flower 5. Image> Resize to 75%. Drag to bottom. Position at the bottom left. Duplicate. Image> Mirror.
Paste cattail. Image> Resize to 65%. Drag to bottom layer. Position on left. Duplicate. Image> Mirror.
Paste gemstones. Image> Resize to 50%. Drag to top layer and position at the bottom of the bottles.
Paste net 2. Drag to bottom. Position to the left. Duplicate. Image> Mirror.
Paste leaves 1. Position behind the frame.
Paste seaweed 4. Image> Resize to 75%. Drag behind bottle and position.
Paste smear 2. Drag to bottom. Lower opacity to 60%. Place at the top of the frame.
Paste ribbon 3. Position just above the frame.
Paste ribbon 6. Drag above the frame layer and position behind the flowers at the bottom of the frame.
Paste sand 1. Drag below the bottom net layer and position at the bottom.
Paste tube close-up Drag behind the frame layer. Position as desired inside of the left frame. Duplicate. Image> Mirror. Reposition with pick tool in the right frame.
Merge the tube layers. Select the paper layer. Selections> All. Selections> Float. Selections> Defloat. Selections> Invert. Select the tube layer and hit the delete key on your keyboard. Selections> Select None.
Effects> PlugIns> Xero:Porcelain- Softness 50, Strength 128, Brightness 128, Red channel 0, Green channel 0, Blue Channel 255.
Duplicate the tube layers. Change the blend mode to Soft Light. Merge Down. Change the blend mode to Luminance(L).
Effects> 3D Effects> Drop Shadow: Vertical 2, Horizontal 2, Opacity 50, blur 5, color black.
Drop shadow elements and frame except sand, and smear 2 &3 layers.
Merge visible.
Image> Canvas Size: 700x600.
Recenter with pick tool.
Image> Resize to 650 width by 557 height.
Add copyright.
Add name using font of choice. I used Waters Gothic size 30 color black. Lower opacity to 75%. Rotate with pick tool as desired.
Merge Visible.
Save as PNG.
Thank you Sarah and Rac for the use of your awesome work.
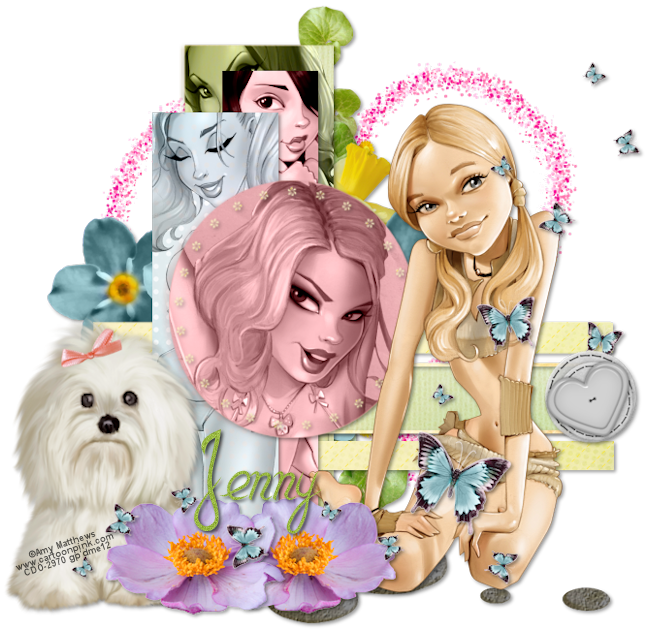
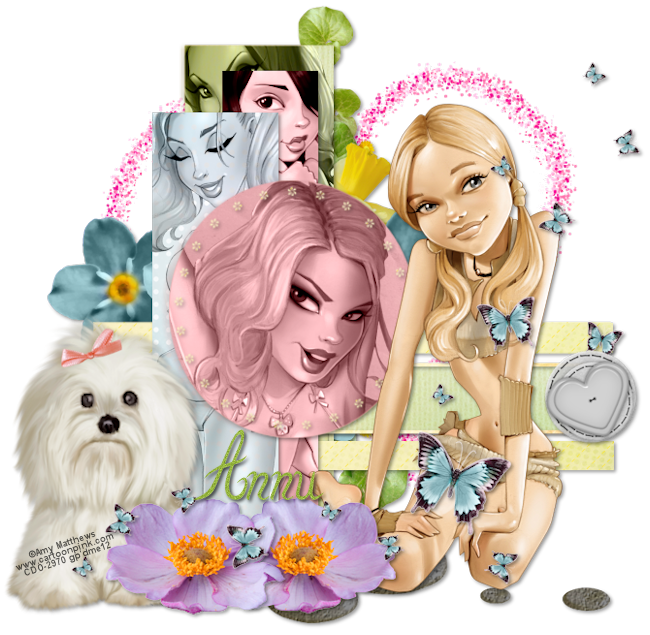
Eat, Love, & Live FTU
Supplies:
Temp 3 by Annu available on the Creative Misfits blog Posted 5-12-09.
FTU kit Eat, Love & Live by Jenny's Designz.
Tube of choice. I used the amazing work of Amy Matthews available at Creative Design Outlet.
Font of choice. I used Zou.
Let's Get Started:
Open template in psp.
Shift + D.
Close the original template.
Delete the template by layer and layer 7.
Image> Resize to 700x700.
Paste paper 2. Image> Resize to 19%. Drag above frame. Selections> Select All. Selections> Float. Selections> Defloat. Selections> Invert. Select the paper. Hit the delete key on your keyboard. Selections> Select None.
Delete the frame layer.
Merge layer 4 & 3 together.
Paste paper 1. Image> Resize to 19%. Duplicate. Select layer 3. Selections> Select All. Selections> Float. Selections> Defloat. Selections> Invert. Select the paper. Hit the delete key on your keyboard. Selections> Select None.
Delete layer 3.
Drag duplicate above circled border. Select the circled border layer. Selections> Select All. Selections> Float. Selections> Defloat. Selections> Invert. Select the paper. Hit the delete key on your keyboard. Selections> Select None.
Delete the circled border layer.
Paste paper 4. Image> Resize to 19%. Drag above layer 1. Select layer 1. Selections> Select All. Selections> Float. Selections> Defloat. Selections> Invert. Select the paper. Hit the delete key on your keyboard. Selections> Select None.
Delete layer 1.
Paste paper 5. Image> Resize to 19%. Drag above layer 6. Select layer 6. Selections> Select All. Selections> Float. Selections> Defloat. Selections> Invert. Select the paper. Hit the delete key on your keyboard. Selections> Select None.
Delete layer 6.
Paste paper 3. Image> Resize to 75%. Duplicate. Drag one layer above circle layer and one above Raster 5. Select Raster 5. Selections> Select All. Selections> Float. Selections> Defloat. Selections> Invert. Select the paper. Hit the delete key on your keyboard. Selections> Select None.
Delete Raster 5.
Select the circle layer. Selections> Select All. Selections> Float. Selections> Defloat. Selections> Invert. Select the paper. Hit the delete key on your keyboard. Selections> Select None.
Delete the circle layer.
Paste lillies. Image> Free Rotate: Right 90 degrees. Image> Resize to 25%. Drag to the bottom layer and position to the right of the biggest rectangle.
Paste flower 1. Image> resize to 10%. Drag to the top layer. Position at the bottom right of the big rectangle. Duplicate. Image> Mirror. Position to the left of the first flower.
Paste dog. Image> Resize to 65%. Drag below the flwoer layer and position to the left of the flowers.
Paste flower 3. Image> Resize to 10% Drag above lillies and position above the circle.
Paste flower 2. Image> Resize to 35%. Position to the left of the rectangle. Duplicate. Image> Mirror.
Paste heart. Image> Resize to 75%. Drag to the top layer. Position to the far right of frame rectangle.
Paste frame 3. Drag to the bottom and position to the top right.
Paste butterfly 2. Image> Resize to 25%. Drag below the heart button layer. Position to the right.
Paste stones. Image> Resize to 75%. Image> Mirror. Drag below the dog layer and position at the bottom.
Paste full body tube. Position at the right.
Paste close-up #1. Drag above the circle layer. Position over the circle as desired. Select the circle layer. Selections> Select All. Selections> Float. Selections> Defloat. Selections> Invert. Select the tube layer. Hit the delete key on your keyboard. Selections> Select None.
Change the tubes blend mode to Luminance (L). Merge down.
Paste full body #2. Drag above the top rectangle layer. Position over the top rectangle as desired. Select the top rectangle layer. Selections> Select All. Selections> Float. Selections> Defloat. Selections> Invert. Select the tube layer. Hit the delete key on your keyboard. Selections> Select None.
Change the tubes blend mode to Luminance (L). Merge down.
Paste full body #3. Drag above the second rectangle layer. Image> Mirror. Position over the second rectangle as desired. Select the second rectangle layer. Selections> Select All. Selections> Float. Selections> Defloat. Selections> Invert. Select the tube layer. Hit the delete key on your keyboard. Selections> Select None.
Change the tubes blend mode to Luminance (L). Merge down.
Paste full body #4. Drag above the bottom rectangle layer. Position over the bottom rectangle as desired. Select the bottom rectangle layer. Selections> Select All. Selections> Float. Selections> Defloat. Selections> Invert. Select the tube layer. Hit the delete key on your keyboard. Selections> Select None.
Change the tubes blend mode to Luminance (L). Merge down.
Start at the top layer and add drop shadow.
Effects> 3D Effects> Drop Shadow: Vertical 2, Horizontal 2, Opacity 40, blur 5, color black. Do not shadow the heart frame.
Merge Visible.
Image> Canvas Size 670 width by 655 height.
Image> Resize to 650 width by 635 height.
Add copyright.
Add name with font of choice. I used Zou size 90 bold color #97b640.
Adjust> Add/Remove Noise> Add Noise: Gaussian 15 monochrome checked.
Drop shadow changing opacity to 75%.
Merge visible.
Save as PNG.
Thank you Jenny and Annu for making the scraps and template used in this tutorial. Thank you to Amy Matthews for allowing the psp community to use your amazing artwork.
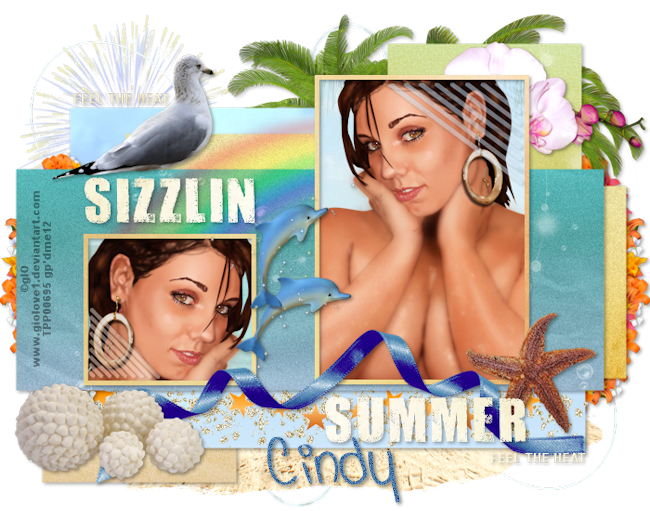
Sizzlin' Summer PTU
Supplies:
Template 3 by Kandi Kissez available on the Creative Misfits Blog (posted 5-6-12).
PTU kit Seashore by ChiChi Designz check her blog for available stores.
Tube of choice. I used a sexy tube by gIO available at The Psp Project.
Font of choice I used Viva La Vida.
Let's get started:
Open the template in Psp.
Shift + D.
Close the original.
Delete the credits and background layer.
Paste tube of choice. Drag above frame backs. Image> Mirror. Position in the right back. Select the frame back layer. Selections> Select All. Selections> Float. Selections> Defloat. Selections> Invert. Select the tube layer and hit the delete key on your keyboard. Selections> Select None.
Paste tube again. Position in the left back. Select the frame back layer. Selections> Select All. Selections> Float. Selections> Defloat. Selections> Invert. Select the tube layer and hit the delete key on your keyboard. Selections> Select None.
Merge the tube layers together.
Paste paper 17. Image> Resize to 85%. Drag above the blue rectangle layer. Select the blue rectangle layer. Selections> Select All. Selections> Float. Selections> Defloat. Selections> Invert. Select the paper layer and hit the delete key on your keyboard. Selections> Select None.
Delete the blue rectangle layer.
Paste paper 16. Image> Resize to 85%. Position over the black rectangles layer. Select the black rectangles layer. Selections> Select All. Selections> Float. Selections> Defloat. Selections> Invert. Select the paper layer and hit the delete key on your keyboard. Selections> Select None.
Delete the black rectangles layer.
Paste paper 2. Image> Resize to 75%. Drag above the frame backs layer and position. Select the frame backs layer. Selections> Select All. Selections> Float. Selections> Defloat. Selections> Invert. Select the paper layer and hit the delete key on your keyboard. Selections> Select None.
Delete the frame backs layer.
Merge top and bottom rectangles together.
Paste paper 18. Position as desired. Select the merged rectangle layer. Selections> Select All. Selections> Float. Selections> Defloat. Selections> Invert. Select the paper layer and hit the delete key on your keyboard. Selections> Select None.
Delete the merged rectangle layer.
Paste paper 14. Image> Resize to 85%. Drag above the pink rectangle stripes layer. Select the pink rectangle stripes layer. Selections> Select All. Selections> Float. Selections> Defloat. Selections> Invert. Select the paper layer and hit the delete key on your keyboard. Selections> Select None.
Delete the pink rectangle stripes layer.
Paste paper 11. Image> Resize to 75%. Drag above the white frames layer. Select the white frames layer. Selections> Select All. Selections> Float. Selections> Defloat. Selections> Invert. Select the paper layer and hit the delete key on your keyboard. Selections> Select None.
Delete the white frames layer.
Paste paper 10. Drag above the stripes layer. Select the stripes layer. Selections> Select All. Selections> Float. Selections> Defloat. Selections> Invert. Select the paper layer and hit the delete key on your keyboard. Selections> Select None. Lower stripes opacity to 50%.
Delete the stripes layer.
Merge the wordart layers together.
Paste paper 7. Drag above the wordart layer. Select the wordart layer. Selections> Select All. Selections> Float. Selections> Defloat. Selections> Invert. Select the paper layer and hit the delete key on your keyboard. Selections> Select None.
Delete the wordart layer.
Paste string. Drag to bottom layer and position to the top left. Duplicate. Image> Mirror. Image> Flip.
Paste starfish. Image> Resize 35%. Drag under wordart. Position at the bottom right of the big frame.
Paste shell balls. Image> Resize to 35%. Position at the bottom left.
Paste seagull 1. Image> Resize to 35%. Position near top left.
Paste sand. Drag above the string layer. Position at the bottom of the tag.
Paste ribbon. Drag belowstarfish and position at the bottom of the frames.
Paste rainbow. Drag below the paper behind the tube. Erase the rainbow on the left of the small frame and the right of the big frame.
Paste palms. Drag above the sand layer. Position to the top right.
Paste glitter trail. Image> Resize to 85%. Drag above 2 rectangle layer. Position at the bottom behind the word summer.
Paste flowers 1. Image> Resize to 50%. Drag behind rainbow layer and position to the right above the big rectangle frame.
Paste flower necklace. Image> Resize to 50%. Drag behind the biggest rectangle. Position to the left. Duplicate. Image> Mirror. Drag below the palm tree layer.
Paste dolphins. Drag to top layer. Image> Resize to 35%. Position in the center.
Paste firework. Drag to bottom. Image> Resize to 65%. Positon at the top left. Lower opacity to 65%.
Start at the top layer and add drop shadow.
Effects> 3D Effects> Drop shadow: Vertical 2, Horizontal 2, Opacity 35, blur 5, color black. Except: tube, tube paper layer, star glitter, sand, strings, and firework.
Merge visible.
Image> Resize to 650 width by 511 height.
Add copyright.
Add name with font of choice. I used Viva La Vida size 48 bold color #4978ab.
Adjust> Add/Remove Noise> Add Noise: Gaussian 30 monochrome checked.
Effects> 3D Effects> Drop Shadow: change opacity to 50.
Merge visible.
Save as PNG.
Thankies Cindy and Kandi for the use of your awesome creations. Thank you gIO for allowing the psp community to use your amazing artwork!

Thursday, July 26, 2012
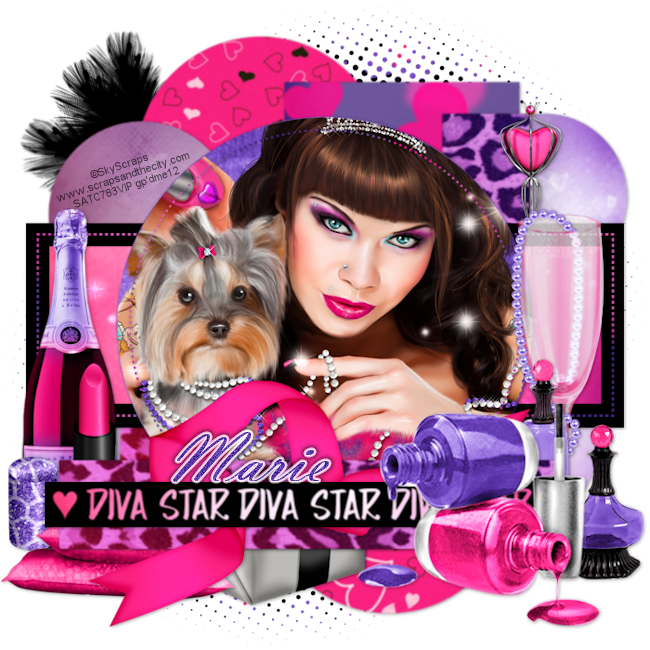
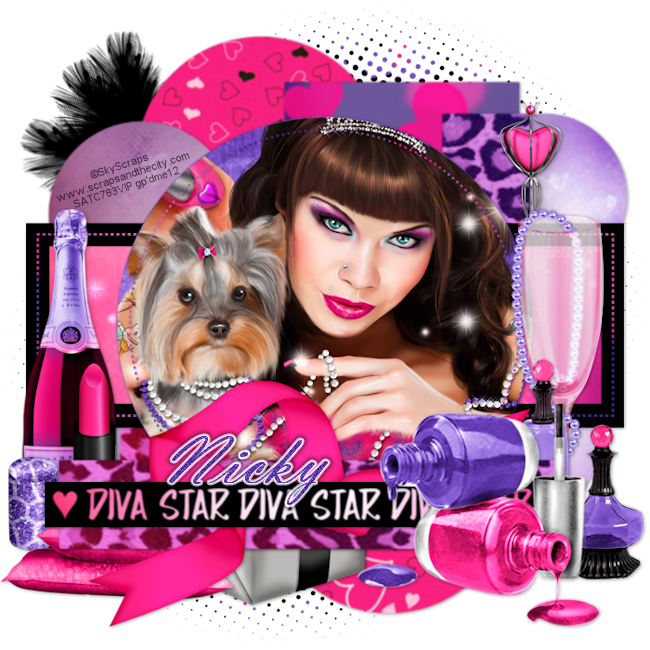
Diva Star PTU
Supplies:
Tube of choice. I used the amazing work of Sky Scraps available at Scraps & the City.
PTU kit Divalicious by Inzpired Creationz available at Scraps & the City.
Template 110 by Pooker available on her blog Elegant Inspirations.
PlugIn: EyeCandy 5:Impact- Gradient Glow
Font: Vladimir Script
Let's Get Started:
Open template 110 in Psp.
Shift + D.
Close original Template.
Image> Resize to 700x700.
Delete the CR Info layer and the background layer.
Merge arrow 1 & 2 layers.
Merge lilac circle 1 & 2 layers.
Merge black block 1 & 2 layers.
Merge purple circle 2 & 3 layers.
Merge white strip 1 & 2 layers.
Merge blue circle 2 & 3 layers.
Paste pp.15. Image> Resize to 85%. Drag above lilac strip. Duplicate and hide layer. Select the lilac strip layer. Selections> All. Selections> Float. Selections> Defloat. Selections> Invert. Select the visible paper layer and hit the delete key on your keyboard. Selections> Select None.
Delete the lilac strip layer.
Unhide the duplicate layer. Drag above white strip 2 layer. Select the white strip 2 layer. Selections> All. Selections> Float. Selections> Defloat. Selections> Invert. Select the paper layer and hit the delete key on your keyboard. Selections> Select None.
Delete the white strip 2 layer.
Paste pp.14. Image> Resize to 85%. Drag above black block 2 layer. Duplicate. Hide the duplicate layer. Select the black block 2 layer. Selections> All. Selections> Float. Selections> Defloat. Selections> Invert. Select the visible paper layer and hit the delete key on your keyboard. Selections> Select None.
Delete the black block 2 layer.
Drag duplicate layer above Dotted Rectangle layer. Duplicate and unhide one of the layers. Select the dotted rectangle layer. Selections> All. Selections> Float. Selections> Defloat. Selections> Invert. Select the visible paper layer and hit the delete key on your keyboard. Selections> Select None.
Delete the dotted rectangle layer.
Drag hidden paper above the dotted circle layer and unhide. Select the dotted circle layer. Selections> All. Selections> Float. Selections> Defloat. Selections> Invert. Select the paper layer and hit the delete key on your keyboard. Selections> Select None.
Delete the dotted circle layer.
Delete the black and blue circle layers.
Paste tube close-up. Drag above Purple circle 1 layer and position inside of the circle as desired. Select the purple circle 1 layer. Selections> All. Selections> Float. Selections> Defloat. Selections> Invert. Select the tube layer and hit the delete key on your keyboard. Selections> Select None.
Paste pp.13. Image> Resize to 85%. Drag above purple circle 1 layer. Select the purple circle 1 layer. Selections> All. Selections> Float. Selections> Defloat. Selections> Invert. Select the paper layer and hit the delete key on your keyboard. Selections> Select None.
Delete the purple circle 1 layer.
Paste pp.12. Image> Resize to 85%. Drag above lilac circle 2 layer. Select the lilac circle 2 layer. Selections> All. Selections> Float. Selections> Defloat. Selections> Invert. Select the paper layer and hit the delete key on your keyboard. Selections> Select None.
Delete the lilac circle 2 layer.
Merge heart and wordart layer.
Paste pp.11. Image> Resize to 85%. Drag visible above wordart. Duplicate and hide layer. Select the wordart layer. Selections> All. Selections> Float. Selections> Defloat. Selections> Invert. Select the visible paper layer and hit the delete key on your keyboard. Selections> Select None.
Delete the wordart layer.
Unhide the duplicate layer. Drag above white rectangle layer. Select the white rectangle layer. Selections> All. Selections> Float. Selections> Defloat. Selections> Invert. Select the paper layer and hit the delete key on your keyboard. Selections> Select None.
Delete the white rectangle layer.
Paste pp.10. Image> Resize to 85%. Drag above purple circle 3 layer. Select the purple circle 3 layer. Selections> All. Selections> Float. Selections> Defloat. Selections> Invert. Select the paper layer and hit the delete key on your keyboard. Selections> Select None.
Delete the purple circle 3 layer.
Paste pp.9. Image> Resize to 85%. Drag above blue circle 3 layer. Select the blue circle 3 layer. Selections> All. Selections> Float. Selections> Defloat. Selections> Invert. Select the paper layer and hit the delete key on your keyboard. Selections> Select None.
Delete the blue circle 3 layer.
Delete the Arrow 2 layer.
Starting with the bottom paper all the way up to the paper layer under the black rectangle. Adjust> Softness> Soften.
Effects> 3D Effects> Drop Shadow: vertical 1, horizontal 1, opacity 38, blur 5, color black. Black rectangle, dotted rectangle, smaller rectangle, and dotted circle layer.
Select the circle behind the tube. Soften like you did with the previous layers and shadow. Merge the tube down
Soften and shadow the top rectangle and word art layer.
Merge the wordart with the black strip layer.
Paste Ribbon 3. Image> Resize to 75%. Drag below black strip. Drop shadow ribbon.
Merge the black strip, ribbon and top rectangle layers together.
Use pick tool to reposition the merged layers towards the bottom of the tube circle layer.
Paste Nail Polish. Image> Resize to 65%. Position at the bottom right of the tag.
Drop shadow nail polish layer same settings as before.
Paste Sparkle 2. Drag behind tube layer. Stretch slightley to where it fits width wise in rectangle. Select the rectangle layer. Selections> All. Selections> Float. Selections> Defloat. Selections> Invert. Select the sparkle layer and hit the delete key on your keyboard. Selections> Select None.
Merge down.
Paste Sparkle 1. Drag above the tube layer. Position over the tube as desired. Change the blend mode to Luminance (L). Select the tube layer. Selections> All. Selections> Float. Selections> Defloat. Selections> Invert. Select the sparkle layer and hit the delete key on your keyboard. Selections> Select None.
Merge down.
Paste wand. Image> Resize to 65%. Drag behind the black rectangle layer. Position to the right of the tube. Drop shadow with same settings as before.
Paste tickle whip. Drag to bottom and position at the top left of the tag. Drop shadow.
Paste lipstick 1. Image> Resize to 50%. Drag above the dotted circle layer. Drop shadow.
Paste champagne. Image> Resize to 85%. Drag below the lipstick layer and position behind it. Drop shadow.
Paste jars 1. Image> Resize to 50%. Position to the right of the nail polish. Drop shadow.
Paste pillows. Image> Resize to 50%. Drag above the lipstick layer and position below the lipstick. Drop shadow.
Paste champagn glass and pearls. Image> Resize to 75%. Drag behind the jars layer and position behind the jars. Drop shadow.
Paste halftone 1. Drag to bottom and position at the top right. Duplicate. Image> Mirror. Image> Flip.
Paste present 2. Image> Resize to 50%. Drag behind the wand layer and position at the bottom to the right of the pillows. Drop shadow.
Merge Visible.
Image> resize to 650 x 650.
Add copyright.
Add name with font of choice. I used Vladimir Script size 72 bold color #5e39a9.
Adjust> Add/Remove Noise> Add Noise: Gaussian 30 monochrome checked.
Effects> PlugIns> EyeCandy5: Impact- Gradient glow.

Merge Visible.
Save as PNG.
Thank you Nicky and Pooker for the use of your wonderful creations. Thank you to Sky Scraps for the use of your amazing artwork!
Subscribe to:
Posts (Atom)
TWI

Sunshine Daze Topsite
Vote Please

Fan Of


About Me

- SuthrnPrincess
- I am a mom of 5 rambunctious and audacious kids. 1 girl and 4 boys. I started out tagging and fell in love with my PSP. I am with the most wonderful man in my world, George. If you make something with a mask or template I would love to see it. Please feel free to email me at georges_princess@yahoo.com. If you make a tutorial please link back to my blog for supplies do not include my materials nor link to my file share site. I would love to put your tutorial link on my blog so please feel free to email me :).
My Blinkies


CT For