Thursday, April 26, 2012
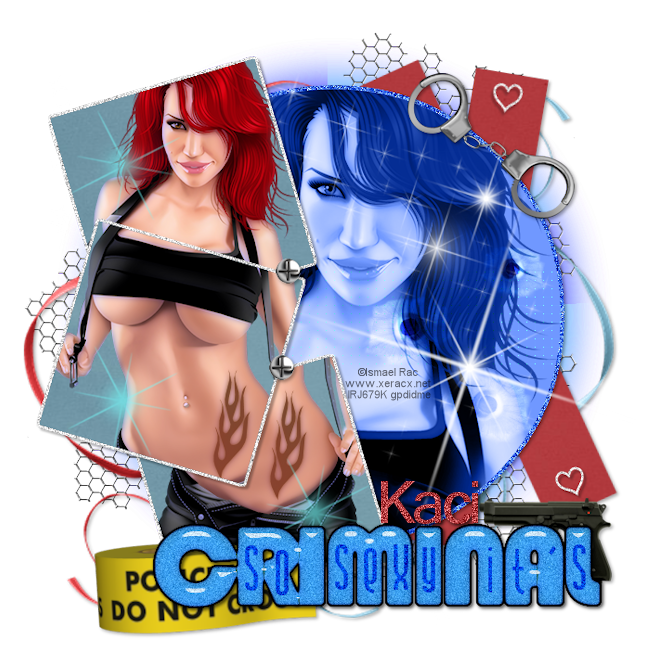
 So Sexy It's Criminal
Supplies:
Tube of choice. Preferably one with a close up. I used the sexy work of Ismael Rac available here in his personal store.
PTU Kit Dangerous by Kaci at Scrappin Krazy Designs.
Collabe Template 4 by Bru and MzDixi from the Creative Misfit Blog here.
Fonts of choice: Bauhaus 93, Andover, and Vrinda.
PlugIns: Xero, and Eye Candy 5
Let's Get Started:
Open the template in PSP.
Hold the shift key and press the D button to open a copy.
Close the original.
Delete the credit layer.
Paste full body tube of choice.
Positon the tube as desired in the top gray square.
Effects> PlugIns> Xero> Porcelain: Softness- 50, Strength- 128, Brightness- 128, Red Channel- 0, Green Channel- 0, Blue Channel- 255.
Duplicate the tube layer and hide one of them.
Select the top square layer. Selections> Float. Selections> DeFloat. Selections> Invert. Select the tube layer and then hit the delete key on your keyboard. Selections> Select None.
Drag to where the tube layer is above the square layer.
Repeat the duplicate and selections steps for each of the other 2 squares.
Paste Close-up of tube and position in the pink circle as desired.
Effects> PlugIns> Xero> Porcelain: Softness- 50, Strength- 128, Brightness- 128, Red Channel- 0, Green Channel- 0, Blue Channel- 255.
Repeat float and defloat from earlier with the pink circle and close-up tube.
Select the Pink Circle layer.
Adjust> Color> Red/Green/Blue> Red -54(negative fifty-four), Green 100, Blue 100.
Select the Blurred Pink Circle and repeate coloring.
Paste Paper 10. Duplicate 2 times and hide the duplicates. Starting with the top gray square repeat the float, defloat, invert, delete steps from earlier selecting the paper layer for that square.
Repeat for each square with different paper layer.
Drag each paper layer above its corresponding gray square.
Select the Close-up layer and change the Blend Mode to Luminance (L).
Select the Blude Circle Layer. Selections> Float, Selections> Defloat, Selections> Modify: Expand by 5. Right click on the blue circle layer. Flood fill the selected are with the color #3169fd.
Adjust> Add/Remove Noise> Add Noise: Gaussian 100 Monochrome checked.
Paste Paper 8. Drag above black rectangle layers. Duplicate.
Repeat the float, defloat steps from before with both black rectangles.
Delete the original black rectangles.
Paste Wiremesh and drag the layer below the red rectangles.
Position to the left of center blue square.
Duplicate. Image> Mirror. Image> Flip. Position as desired near top of canvas where it is visible behind the red rectangle. Duplicate. Image> Flip.
Merge the 3 mesh layers together.
Select the top heart layer and your Text Tool..
Using a font of choice add the word "Criminal". I used Bauhaus 93 size 125 bold. The color I chose was #3169fd.
Effects> PlugIns> EyeCandy5> Glass: Basic: Bevel Width- 18, Bevel Smoothness- 30, Round Selections Corners- 0. Inside Selection Glass Color- #5ef0f2, Opacity- 50, Tinting- 50, Refraction- 100, Inner Shadow Opacity 75, Drop Shadow Opacity- 0, Shadow Offset- 10.80. Shadow Glow: Lighting: Direction- 90, Inclination 50, Highlight Brightness- 75, Highlight Size 75, Color white, Refraction Map None. Bevel Profile- Button.
Adjust> Add/Remove Noise> Add Noise: Gaussian 20 Monochrome checked.
Effects> PlugIns> EyeCandy 5> Gradient Glow: Glow Type- Outise, Mask Selection selected, Glow Radius- 6, Soften Corners- 8, Overall Opacity- 100, Distortion Amount- 0, Distortion Lump Size- 7, Gradient Smoothness- 100, Color- Black.
Using a different font og choice add the letters: s, o, s, e, x, y, i, t, ', s. and position in the letters of Criminal. I used Andover size 72, color black.
Change Blend Mode to Overlay.
Paste Tape and drag behind Criminal word layer. Image> Resize to 65%. Position to the left of the letter "C".
Paste Sparkle 4 and drag layer above the close up tube layer and position as desired.
Paste Sparkle 2. Image> Resize to 25%. Drag above middle square tube layer and position. Duplicate and drag above bottom square tube layer. Position as desired. Duplicate and drag above top square tube layer and position.
Adjust> Color> Red/Green/Blue same as before to all 3 sparkle layers over the squares. Change Opacity of each one to 60%.
Paste Screw. Drag the layer above the top sparkle layer. Resize to 15% and position where the top and middle squares meet. Duplicate and position where the bottom and middle squares meet.
Paste Ribbon 1. Drag layer behind glitter circle layer and position to the left.
Paste Ribbon 2 and drag behind the two red rectangle layers. Image> Mirror. Image> Flip. Position to the Right.
Paste Gun. Image> Resize to 25%. Drag beind the criminal word layer and position above and to the right of the word.
Paste Cuffs. Image Resize to 45%. Drag to top layer and position at the top right of the blue circle.
Paste Bulletholes 1. Drag above Close-up layer and position towards the bottom right of the circle.
Change the Blend Mode to Overlay.
Drop shadow the gun, tape, cuffs, screws, ribbons, both red rectangles, and the glitter circle.
Effects> 3D Effects> Drop Shadow: Vertical 2, Horizontal 2, Opacity 35, Blur 5, Color black.
Merge Visible.
Resize to 650 x 650.
Add copyright.
Add the name that you would like on the tag. I used Vrinda size 65 bold color #b23d40.
Adjust> Add/Remove Noise> Add Noise: Gaussian 50 Monochrome checked.
Drop Shadow changing opacity to 75.
Merge Visible.
Save as PNG.
Thankies Kacie for allowing me use of your amazing kit. Thank you to anyone who tries my tutorial. I hope that you enjoy it.

Hardcore 2 piece set
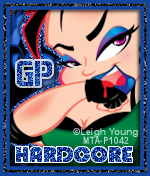
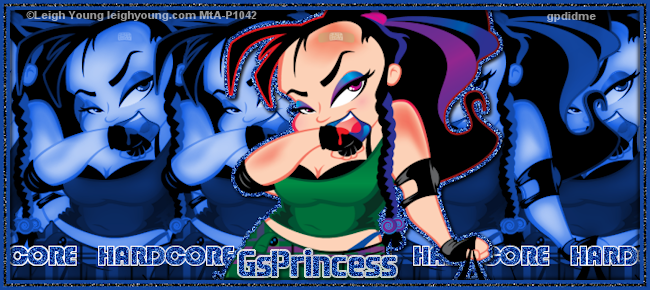
Supplies:
Tube of choice. I used the awesome work of Leigh Young available at My Tubed Art.
PlugIns: MuRa's Meister- Copies, Xero- Porcelain
Fonts of choice: I used Bauhaus 93 and Aero Matics Stencil.
Let's Get started:
Banner:
Open a new 700 width by 300 height image.
Paste tube of chice and position as desired.
Duplicate the tube and hide the top tube layer.
Select your flood fill tool and fill a separate raster layer with a color of choice from the tube. I used one of the blues in her eyeshadow (color #13479f).
Select the visible tube layer.
Effects> PlugIns> MuRa's Meister> Copies: Shift Mode- Random, Tile Mode- Wraparound, Blend Mode- Normal, Number- 150, Shift X- 100, Shift Y- 0, Angle- 0, Rotation- 0, Attenuation- 0, Scale- 100, Thru BG Range- 0, Fade Out- 0.
Effects> PlugIns> Xero> Porcelain: Softness- 128, Strength- 128, Brightness- 128, Red Channel- 0, Green Channel- 0, Blue Channel- 255.
Repeat Porcelain again.
Duplicate the layer and change the duplicates Blend Mode to Luminance.
Merge Down.
Change the Blend Mode of the two merged to Luminance. Merge Visible.
Unhide Single tube layer.
Select the tube layer. Selections> Select All. Selections> Float. Selections> Defloat. Selections> Modify> Expandy by 3.
Right click on the tube layer and select to Create a New Raster Layer.
With the New Raster Layer selected choose your flood fill tool and flood fill the selected area with the same color blue as the background layer that you created earlier.
Selections> Select None.
Adjust> Add/ Remove Noise> Add Noise: Gaussian 100 with monochrome checked.
Effects> 3D Effects> Drop Shadow: Vertical- 2, Horizontal 2, Opacity 65%, Blur 5, Color Black.
With a font of choice add the wording you would like across the bottom. I used the word "Hardcore". The font that I used is called Bauhaus 93 sized at 30 with bold selected and used the same color blue as I had been using for the other steps. I suggest using the same color as your background or a color from your tube so that it matches.
Convert the Text layer to Raster.
Effects> PlugIns> MuRa's Meister> Copies: Shift Mode- Line, Tile Mode- Wraparound, Blend Mode- Normal, Number- 4, Shift X- 100, Shift Y- 0, Angle- 0, Rotation- 0, Attenuation- 0, Scale- 100, Thru BG Range- 0, Fade Out- 0.
Select the tube layer. Selections> Select All. Selections> Float. Selections> Defloat. Selections> Modify> Expandy by 1.
Right click on the text layer and select to Create a New Raster Layer.
With the New Raster Layer selected choose your flood fill tool and flood fill the selected area with white.
Adjust> Add/Remove Noise> Add Noise same setting as before to text.
Drag the white layer under the blue text layer.
Merge the text layer and the white flood fill layer together.
Drag the text layer behind the tube layer. Merge Visible.
Image> Add Borders> Color same as the background color you have been using. Size in pixels set to 4 and check symmetric.
Repeat changing the color to black and the pixels to 3.
Repeat again changing the color back to your background color and the pixels to 4.
Using your wand tool select the black border and then Selections> Promote Selections to Layer.
Selections> Select None.
Repeat selecting both borders that are the same color as your background color.
Select the black border layer and Add Noise set to 100.
Select the Background color promoted layer and shadow.
Effects> 3D Effects> Drop Shadow: Vertical- 2, Horizontal- 2, Opacity 65%, Blur 5, Color Black.
Repeat shadow changing the vertical and horizontal to -(negative) 2.
Merge Visible.
Image> Resize to 650 width by 290 height.
Add copyright.
Add the name that you would like on it using the font you like. I used Aero Matics Stencil size 36 bold with the same color as background.
Select the tube layer. Selections> Select All. Selections> Float. Selections> Defloat. Selections> Modify> Expandy by 1.
Right click on the text layer and select to Create a New Raster Layer.
With the New Raster Layer selected choose your flood fill tool and flood fill the selected area with white.
Adjust> Add/Remove Noise> Add Noise same setting as before to text.
Drag the white layer under the name layer.
Merge the text layer and the white flood fill layer together.
Effects> 3D Effects> Drop Shadow: Vertical- 2, Horizontal- 2, Opacity 85%, Blur 5, Color Black.
Merge Visible.
Save as PNG.
Avatar:
Open a new image 150 width by 180 height.
Flood fill the layer with the background color that you used in your banner.
Paste your tube and position as desired.
Duplicate and hide top tube layer.
Select bottom tube layer.
Effects> PlugIns> MuRa's Meister> Copies: Shift Mode- Random, Tile Mode- Wraparound, Blend Mode- Normal, Number- 150, Shift X- 100, Shift Y- 0, Angle- 0, Rotation- 0, Attenuation- 0, Scale- 100, Thru BG Range- 0, Fade Out- 0.
Effects> PlugIns> Xero> Porcelain: Softness- 128, Strength- 128, Brightness- 128, Red Channel- 0, Green Channel- 0, Blue Channel- 255.
Repeat Porcelain again.
Duplicate. Change Blend Mode to Luminance.
Hide Blue background layer and then merge the visible layers.
Unhide the blue background layer.
Select the tube layer and change blend mode to Luminance.
Unhide Single tube layer.
Select the tube layer. Selections> Select All. Selections> Float. Selections> Defloat. Selections> Modify> Expandy by 3.
Right click on the tube layer and select to Create a New Raster Layer.
With the New Raster Layer selected choose your flood fill tool and flood fill the selected area with the same color blue as the background layer.
Selections> Select None.
Adjust> Add/ Remove Noise> Add Noise: Gaussian 100 with monochrome checked.
Merge Visible.
Effects> 3D Effects> Drop Shadow: Vertical- -2, Horizontal- -2, Opacity 65%, Blur 5, Color Black.
Image> Add Borders> Color same as the background color you have been using. Size in pixels set to 4 and check symmetric.
Repeat changing the color to black and the pixels to 3.
Repeat again changing the color back to your background color and the pixels to 4.
Using your wand tool select the black border and then Selections> Promote Selections to Layer.
Selections> Select None.
Repeat selecting both borders that are the same color as your background color.
Select the black border layer and Add Noise set to 100.
Select the Background color promoted layer and shadow.
Effects> 3D Effects> Drop Shadow: Vertical- 2, Horizontal- 2, Opacity 65%, Blur 5, Color Black.
Repeat shadow changing the vertical and horizontal to -(negative) 2.
Merge Visible.
Image> Resize 150 width x 176 height.
Using the font you chose for your word add it to the avatar (I used Hardcore as my word and Bauhaus 93 as my font). Change the size to 22.
Convert the Text layer to Raster.
Effects> PlugIns> MuRa's Meister> Copies: Shift Mode- Line, Tile Mode- Wraparound, Blend Mode- Normal, Number- 4, Shift X- 100, Shift Y- 0, Angle- 0, Rotation- 0, Attenuation- 0, Scale- 100, Thru BG Range- 0, Fade Out- 0.
Select the tube layer. Selections> Select All. Selections> Float. Selections> Defloat. Selections> Modify> Expandy by 1.
Right click on the text layer and select to Create a New Raster Layer.
With the New Raster Layer selected choose your flood fill tool and flood fill the selected area with white.
Adjust> Add/Remove Noise> Add Noise same setting as before to text.
Drag the white layer under the blue text layer.
Merge the text layer and the white flood fill layer together.
Add Copyright.
And name or first letter of name whichever you prefer with the same steps used on the banner.
Add Drop Shadow.
Merge Visible.
Save as PNG.
Thank you for trying my tutorial.
Monday, April 23, 2012
News....
Oh wow! Blogger sure has changed since the last time I was here. I am so sorry that it has been this long. There has literally been a ton of things happening all at once in our family. First we found out at the end of February that George's (my live-in boyfriend of 4 years and father to my littlest) oldest sister Elizabeth was losing her fight with cancer. A week later (the first week of March) we said good-bye to a beautiful woman and mother who was 32. The week following her memorial service the father of Julie, my best friend for the last 20 years, and I hope the next 20, passed away. The very next week my 11 year old had surgery. He was born with a cleft lip and palate. The surgery took over twice as long and we found out today that the results failed miserably. He now has a huge whole in his palate all the way into his sinus cavity. He has been on a liquid diet since his surgery. Today we got the go ahead for a little bit harder foods but still nothing like a real meal. He is not allowed to return to school because of this diet. They will be fitting him for a prostetic palate and doing another surgery in 6 months.
I just really wanted to update everyone and say that I have NOT abandoned my blog. I also took over a cub scout den recently. This has been taking up some of my time as I had to do training and I had to make plans as to what to work on with the kids. It really and truly is a blessing to be able to work with these boys.
I wish you all a blessed week. BB)O(
Subscribe to:
Posts (Atom)
TWI

Sunshine Daze Topsite
Vote Please

Fan Of


About Me

- SuthrnPrincess
- I am a mom of 5 rambunctious and audacious kids. 1 girl and 4 boys. I started out tagging and fell in love with my PSP. I am with the most wonderful man in my world, George. If you make something with a mask or template I would love to see it. Please feel free to email me at georges_princess@yahoo.com. If you make a tutorial please link back to my blog for supplies do not include my materials nor link to my file share site. I would love to put your tutorial link on my blog so please feel free to email me :).
My Blinkies


CT For