Thursday, April 26, 2012
 Hardcore 2 piece set
8:15 PM | Posted by
SuthrnPrincess |
Edit Post
Supplies:
Tube of choice. I used the awesome work of Leigh Young available at My Tubed Art.
PlugIns: MuRa's Meister- Copies, Xero- Porcelain
Fonts of choice: I used Bauhaus 93 and Aero Matics Stencil.
Let's Get started:
Banner:
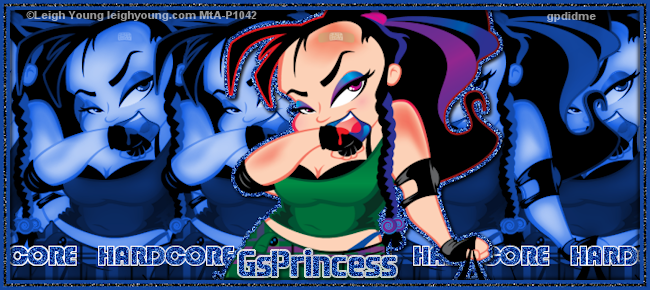
Open a new 700 width by 300 height image.
Paste tube of chice and position as desired.
Duplicate the tube and hide the top tube layer.
Select your flood fill tool and fill a separate raster layer with a color of choice from the tube. I used one of the blues in her eyeshadow (color #13479f).
Select the visible tube layer.
Effects> PlugIns> MuRa's Meister> Copies: Shift Mode- Random, Tile Mode- Wraparound, Blend Mode- Normal, Number- 150, Shift X- 100, Shift Y- 0, Angle- 0, Rotation- 0, Attenuation- 0, Scale- 100, Thru BG Range- 0, Fade Out- 0.
Effects> PlugIns> Xero> Porcelain: Softness- 128, Strength- 128, Brightness- 128, Red Channel- 0, Green Channel- 0, Blue Channel- 255.
Repeat Porcelain again.
Duplicate the layer and change the duplicates Blend Mode to Luminance.
Merge Down.
Change the Blend Mode of the two merged to Luminance. Merge Visible.
Unhide Single tube layer.
Select the tube layer. Selections> Select All. Selections> Float. Selections> Defloat. Selections> Modify> Expandy by 3.
Right click on the tube layer and select to Create a New Raster Layer.
With the New Raster Layer selected choose your flood fill tool and flood fill the selected area with the same color blue as the background layer that you created earlier.
Selections> Select None.
Adjust> Add/ Remove Noise> Add Noise: Gaussian 100 with monochrome checked.
Effects> 3D Effects> Drop Shadow: Vertical- 2, Horizontal 2, Opacity 65%, Blur 5, Color Black.
With a font of choice add the wording you would like across the bottom. I used the word "Hardcore". The font that I used is called Bauhaus 93 sized at 30 with bold selected and used the same color blue as I had been using for the other steps. I suggest using the same color as your background or a color from your tube so that it matches.
Convert the Text layer to Raster.
Effects> PlugIns> MuRa's Meister> Copies: Shift Mode- Line, Tile Mode- Wraparound, Blend Mode- Normal, Number- 4, Shift X- 100, Shift Y- 0, Angle- 0, Rotation- 0, Attenuation- 0, Scale- 100, Thru BG Range- 0, Fade Out- 0.
Select the tube layer. Selections> Select All. Selections> Float. Selections> Defloat. Selections> Modify> Expandy by 1.
Right click on the text layer and select to Create a New Raster Layer.
With the New Raster Layer selected choose your flood fill tool and flood fill the selected area with white.
Adjust> Add/Remove Noise> Add Noise same setting as before to text.
Drag the white layer under the blue text layer.
Merge the text layer and the white flood fill layer together.
Drag the text layer behind the tube layer. Merge Visible.
Image> Add Borders> Color same as the background color you have been using. Size in pixels set to 4 and check symmetric.
Repeat changing the color to black and the pixels to 3.
Repeat again changing the color back to your background color and the pixels to 4.
Using your wand tool select the black border and then Selections> Promote Selections to Layer.
Selections> Select None.
Repeat selecting both borders that are the same color as your background color.
Select the black border layer and Add Noise set to 100.
Select the Background color promoted layer and shadow.
Effects> 3D Effects> Drop Shadow: Vertical- 2, Horizontal- 2, Opacity 65%, Blur 5, Color Black.
Repeat shadow changing the vertical and horizontal to -(negative) 2.
Merge Visible.
Image> Resize to 650 width by 290 height.
Add copyright.
Add the name that you would like on it using the font you like. I used Aero Matics Stencil size 36 bold with the same color as background.
Select the tube layer. Selections> Select All. Selections> Float. Selections> Defloat. Selections> Modify> Expandy by 1.
Right click on the text layer and select to Create a New Raster Layer.
With the New Raster Layer selected choose your flood fill tool and flood fill the selected area with white.
Adjust> Add/Remove Noise> Add Noise same setting as before to text.
Drag the white layer under the name layer.
Merge the text layer and the white flood fill layer together.
Effects> 3D Effects> Drop Shadow: Vertical- 2, Horizontal- 2, Opacity 85%, Blur 5, Color Black.
Merge Visible.
Save as PNG.
Avatar:
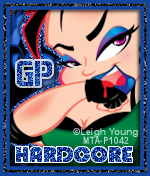
Open a new image 150 width by 180 height.
Flood fill the layer with the background color that you used in your banner.
Paste your tube and position as desired.
Duplicate and hide top tube layer.
Select bottom tube layer.
Effects> PlugIns> MuRa's Meister> Copies: Shift Mode- Random, Tile Mode- Wraparound, Blend Mode- Normal, Number- 150, Shift X- 100, Shift Y- 0, Angle- 0, Rotation- 0, Attenuation- 0, Scale- 100, Thru BG Range- 0, Fade Out- 0.
Effects> PlugIns> Xero> Porcelain: Softness- 128, Strength- 128, Brightness- 128, Red Channel- 0, Green Channel- 0, Blue Channel- 255.
Repeat Porcelain again.
Duplicate. Change Blend Mode to Luminance.
Hide Blue background layer and then merge the visible layers.
Unhide the blue background layer.
Select the tube layer and change blend mode to Luminance.
Unhide Single tube layer.
Select the tube layer. Selections> Select All. Selections> Float. Selections> Defloat. Selections> Modify> Expandy by 3.
Right click on the tube layer and select to Create a New Raster Layer.
With the New Raster Layer selected choose your flood fill tool and flood fill the selected area with the same color blue as the background layer.
Selections> Select None.
Adjust> Add/ Remove Noise> Add Noise: Gaussian 100 with monochrome checked.
Merge Visible.
Effects> 3D Effects> Drop Shadow: Vertical- -2, Horizontal- -2, Opacity 65%, Blur 5, Color Black.
Image> Add Borders> Color same as the background color you have been using. Size in pixels set to 4 and check symmetric.
Repeat changing the color to black and the pixels to 3.
Repeat again changing the color back to your background color and the pixels to 4.
Using your wand tool select the black border and then Selections> Promote Selections to Layer.
Selections> Select None.
Repeat selecting both borders that are the same color as your background color.
Select the black border layer and Add Noise set to 100.
Select the Background color promoted layer and shadow.
Effects> 3D Effects> Drop Shadow: Vertical- 2, Horizontal- 2, Opacity 65%, Blur 5, Color Black.
Repeat shadow changing the vertical and horizontal to -(negative) 2.
Merge Visible.
Image> Resize 150 width x 176 height.
Using the font you chose for your word add it to the avatar (I used Hardcore as my word and Bauhaus 93 as my font). Change the size to 22.
Convert the Text layer to Raster.
Effects> PlugIns> MuRa's Meister> Copies: Shift Mode- Line, Tile Mode- Wraparound, Blend Mode- Normal, Number- 4, Shift X- 100, Shift Y- 0, Angle- 0, Rotation- 0, Attenuation- 0, Scale- 100, Thru BG Range- 0, Fade Out- 0.
Select the tube layer. Selections> Select All. Selections> Float. Selections> Defloat. Selections> Modify> Expandy by 1.
Right click on the text layer and select to Create a New Raster Layer.
With the New Raster Layer selected choose your flood fill tool and flood fill the selected area with white.
Adjust> Add/Remove Noise> Add Noise same setting as before to text.
Drag the white layer under the blue text layer.
Merge the text layer and the white flood fill layer together.
Add Copyright.
And name or first letter of name whichever you prefer with the same steps used on the banner.
Add Drop Shadow.
Merge Visible.
Save as PNG.
Thank you for trying my tutorial.
Labels:
2 pc set,
No Scrap Tut
Subscribe to:
Post Comments (Atom)
Chat box
About Me

- SuthrnPrincess
- I am a mom of 5 rambunctious and audacious kids. 1 girl and 4 boys. I started out tagging and fell in love with my PSP. I am with the most wonderful man in my world, George. If you make something with a mask or template I would love to see it. Please feel free to email me at georges_princess@yahoo.com. If you make a tutorial please link back to my blog for supplies do not include my materials nor link to my file share site. I would love to put your tutorial link on my blog so please feel free to email me :).
Followers
Labels
- 2 pc set (2)
- 3 pc set (5)
- animated (1)
- Announcement (4)
- Awards (1)
- FTU Kit Tut (41)
- No Scrap Tut (5)
- No tube (1)
- Previews (2)
- PTU kit tut (239)
- Snags (1)


0 comments:
Post a Comment