Tuesday, September 13, 2011
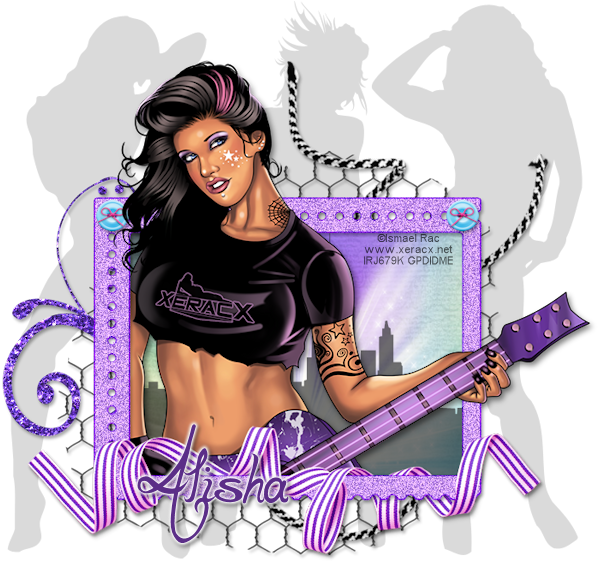
 Rocker
9:55 AM | Posted by
SuthrnPrincess |
Edit Post
Tube of choice. I used the beautiful work of Ismael Rac. You can get it in his store.
FTU Kit My Attitude by BelVidotti
Font of choice I used LaPointe's Road 1/4
Font of choice I used LaPointe's Road 1/4
PlugIns: EyeCandy 5 (Glass & Gradient Glow)
Let's get started:
Open a new image 700x700 (from time to time I might refer to it as your canvas).
Paste E82, Image> Resize to 85%.
Adjust> Color> Red/Green/Blue: Red -47, Green -100, Blue 100
Effects> PlugIns> EyeCandy5: Impact> Glass: Bevel Width 3, Bevel Smoothness 0, Round Selection Corners 1, Bevel Placement Inside, Glass Color #8000ff, Opacity 100, Tinting 0, Refraction 50, Inner Shadow Opacity 75, Drop Shadow Opacity 0, Shadow Offset 17.37, Shadow Glow 20
Adjust> Add/Remove Noise> Add Noise: Uniform, 50, Monochrome checked
Paste your tube of choice and position. Duplicate and drag layer under frame (you should have one layer above and one layer below now).
Select top tube layer and use your erase tool to remove the portion at the bottom that is over the frame.
Select bottom tube layer.
Effects>3D Effects> Drop Shadow: Vertical 4, Horizontal 3, Opacity 50, Blur 10, Color Black
Paste P09, select frame layer. Click inside frame layer using your wand tool.
Selections> Modify> Expand by 6, Selections> Invert, select paper layer again and then hit the delete key on your keyboard.
Selections> None
Paste E104 and place over bottom of frame. Make sure this is your top layer. Duplicate and drag under frame. Select the top ribbon layer and use your eraser tool to remove portions of the ribbon to give it a wrapped around look. Look at the example if need be to see where to erase.
Paste E84 and drag behind bottom tube. Position at the bottom of the frame. Select paper layer.
Selections> Float, Selections> Defloat, Selections> Invert, Select E84 layer and hit the delete key on your keyboard. Selections> None
Use your pick tool to stretch it to where it reaches the bottom of the frame inside and change the Blend Mode to Screen (drop down area above palatte layer).
Paste E111 Image> Flip, Image> Free Rotate: Right 25 degrees
Drag layer behind paper and position.
Paste E81 and drag under layer for E111. Position to the left of the frame.
Paste E71 and position to the right side of the frame.
Paste E70 and position to the left side of the frame.
Paste E69 and position in the middle of the frame.
Merge the 3 layers together (E71, E70 and E69).
Drag them to the bottom layer and change the layer opacity to 17.
Paste E90 and Resize to 70%, Place layer in front of merged E69-71 layer.
Paste E88 and Resize to 25%. Drag to top layer. Position at far right corner of frame. Duplicate. Image> Mirror. Move over slightly to where it covers far corner hole in frame.
Paste E68 and drag layer above light layer and position at bottom of frame.
Select Paper layer. Selections> Float, Selections> Defloat, Selections> Invert. Select E68 layer and hit delete. Change layer opacity to 65. Selections> None.
Drop shadow bottom ribbon, black/white rope, doodle, fence, frame and buttons Vertical 2, Horizontal 2, Opacity 50, Blur 5, Color Black.
Merge Visible.
Image> Canvas Size: 700w by 655h.
Use pick tool to center
Image> Resize (make sure to change it to pixels and resize all layers) 600w by 561h
Add copyright.
Add name with font of choice. I used LaPointe's Road1/4 set at size 48, color #5b2e88
Effects> PlugIns> EyeCandy5: Impact> Gradient Glow: Glow Radius 5, Soften Corners 61, Overall Opacity 100, Distortion Amount 0, Distortion Lump Size 7, Gradient Smoothness 100, Color white.
Drop Shadow same as elements.
Merge Visible
Save as PNG
Thank you for trying my tutorial. I hope that you enjoyed it and got great results!
Labels:
FTU Kit Tut
Subscribe to:
Post Comments (Atom)
About Me

- SuthrnPrincess
- I am a mom of 5 rambunctious and audacious kids. 1 girl and 4 boys. I started out tagging and fell in love with my PSP. I am with the most wonderful man in my world, George. If you make something with a mask or template I would love to see it. Please feel free to email me at georges_princess@yahoo.com. If you make a tutorial please link back to my blog for supplies do not include my materials nor link to my file share site. I would love to put your tutorial link on my blog so please feel free to email me :).
Followers
Labels
- 2 pc set (2)
- 3 pc set (5)
- animated (1)
- Announcement (4)
- Awards (1)
- FTU Kit Tut (41)
- No Scrap Tut (5)
- No tube (1)
- Previews (2)
- PTU kit tut (239)
- Snags (1)


0 comments:
Post a Comment