Monday, September 05, 2011
 Flutterby Love
3:06 PM | Posted by
SuthrnPrincess |
Edit Post
Supplies:
Tube of choice. I used the amazing work of Keith Garvey you can find him at his store
FTU Kit FlutterbyLove by Tantrum Scraps
PlugIns: Xero-Procelain and EyeCandy5-Impact
Font: Aspire
Let's Get Started:
Open a new 700x700 image (will refer to it as your canvas from time to time)
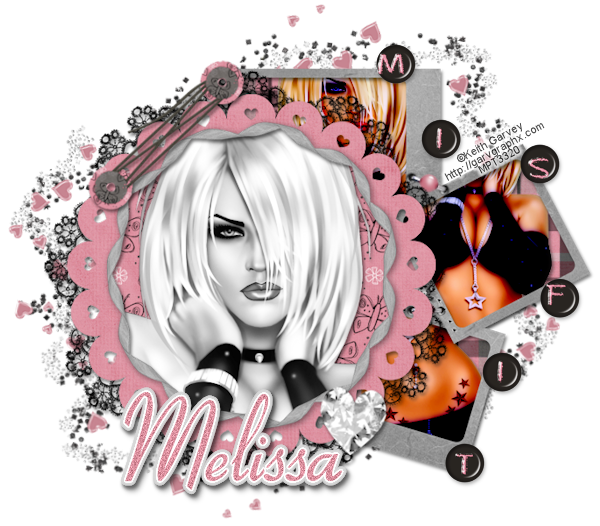
Paste Frame 4 as new layer
Paste Frame 5 as new layer and drag the layer under Frame 4 layer. Use Pick Tool to position the frames like in the example.
Paste Paper 13 then Image> Resize to 65%
Select Frame 4 layer. With Wand click inside Frame 4. Selections> Modify> Expand by 5. Selections> Invert. Select the paper layer and then hit the delete key on your keyboard. This makes the paper outside of the selected area vanish ;). Selections> None.
Paste Paper 10 and position behind frame 5. Use the same steps as before with this paper and frame.
Selections> None.
Paste Fastener. Image> Mirrow, Image> Resize to 75%.
With your pick tool rotate the fastener slightly and place it over the top left of the triple frame and across the other frame like in example.
Paste the Diamonf. Image> Resize to 50%. Position at bottom where both frames meet.
Paste Glitter Trail. Drag layer to bottoms and position where viewable at the top. Duplicate, Image> Flip and move the duplicate to where it is viewable at the bottom.
Add shadow to all layers except the Glitter Trail that we have added so far. Effects> 3D Effects> Vertical 2, Horizontal 1, Opacity 30, Blend 5, Color black
Paste tube close-up if you are using a tube that offers it and resize to 75%, if not just paste the tube. Drag the layer behind the top frame and position.
Select frame layer and use wand to click inside. Selections> modify> Expand by 11. Selections> Invert. Select the tube layer and then hit the delete key on your keyboard.
Selections> none
Effects> PlugIns> Xero> Porcelain: Softness 50, Strength 128, Brightness 128, Red Channel 0, Green Channel 0, Blue Channel 255.
Effects> Photo Effects> Black & White Film
Duplicate tube and change the blend mode of the top one to Screen and then merge the two tube layers together.
Shadow using same settings as before.
Paste the full body tube of choice and drag behind triple frame layer. Position the tube as desired in the top frame. Duplicate and hide one of the layers. Select the frame layer and use your wand to select inside the top frame. Selections> Modify> Expand by 10 Selections> Invert, select the visible tube layer and hit your delete key on the keyboard.
Repeat with the other two frames positioning the tube as desired each time.
Duplicate each tube layer separately and change the blend mode of the top tube layer of each one to Burn
Merge the duplicates back to the original layers.
Shadow each tube.
Merge Visible
Image> Canvas Size and change to 600h x 685w
Image> Resize (make sure to change the settings to pixels and select resize all layers) 600w x 526h.
Open Alpha Beads. One at a time use the freehand tool to draw a circle around the letters that you want to use. I used M, I, S, F, Tbut you can use whatever you like. Copy and paste to your canvas and then position as you like.
Hide the tag layer and then merge visible. The only thing that should have been viewable at the time was the layers of beads.
Add drop shadow same settings as before.
Add copyright
Add Name. I used Aspire size 125 color #dc919f
Adjust> Add/Remove Noise> Add Noise Gaussian 23 Monochrome checked.
Effects> 3D Effects> Drop Shadow: vertical 3, horizontal 2, opacity 50, blur 5, color black
Merge visible
Save as PNG
Thank you for trying my tutorial!!
Labels:
FTU Kit Tut
Subscribe to:
Post Comments (Atom)
About Me

- SuthrnPrincess
- I am a mom of 5 rambunctious and audacious kids. 1 girl and 4 boys. I started out tagging and fell in love with my PSP. I am with the most wonderful man in my world, George. If you make something with a mask or template I would love to see it. Please feel free to email me at georges_princess@yahoo.com. If you make a tutorial please link back to my blog for supplies do not include my materials nor link to my file share site. I would love to put your tutorial link on my blog so please feel free to email me :).
Followers
Labels
- 2 pc set (2)
- 3 pc set (5)
- animated (1)
- Announcement (4)
- Awards (1)
- FTU Kit Tut (41)
- No Scrap Tut (5)
- No tube (1)
- Previews (2)
- PTU kit tut (239)
- Snags (1)


0 comments:
Post a Comment