Tuesday, September 20, 2011
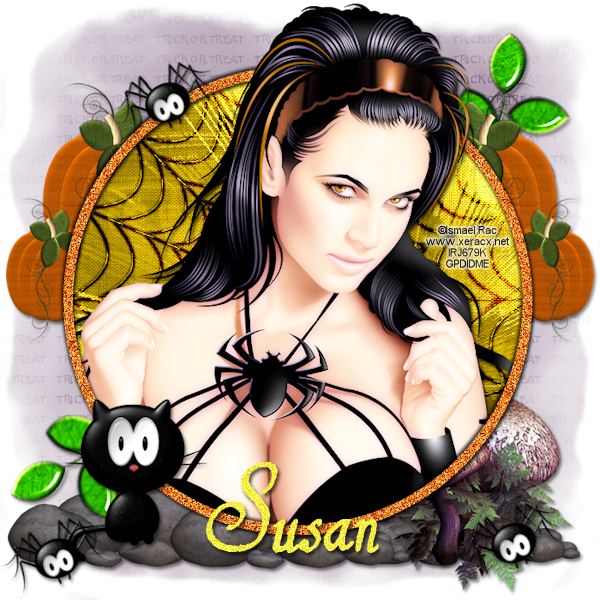
 Spooky Girl
Supplies:
Tube of choice. I used the gorgeous work of Ismael Rac available in his store.
PTU Kit Mischievious Spooks by TootyPup
Mask of choice. I used a mask available at Creative Misfits Creations made by Jenny (posted 10/14/10).
PlugIns: Xero, EyeCandy5
Font: 1610_Cancellaresca
Let's get started:
Open a new 700x700 image. (Sometimes I refer to this as your canvas.)
Select the EllipseTool under the Preset Tools. Hide the background and fill properties. Put the Foreground and stroke properties to color #f57005 and draw a circle. I drew mine with the settings Radius X 268, Radius Y 268, Center X 347.50, Center Y 350.50, and width 12. I also checked antialias. Once you are happy with your circle (this will be your frame) Convert the layer to raster.
Image> Add/Remove Noise> Add Noise Gaussian 100 Monochrome checked.
Paste Paper 11 and drag layer behind circle. Adjust> Brightness/Contrast> Brightness 50, Contrast 50.
Select the frame layer and magic wand. Click inside of frame. Selections> Modify> Expand by 5. Selections> Invert. Choose the paper layer in the layer palette and then hit the delete key on your keyboard.
Selections> Select None.
Paste your tube to canvas and position. Effects> Plug Ins> Xero> Porcelain: 50, 128, 128, 110, 0, 255. Duplicate the tube layer and change the blend mode to Screen. Merge the two together and then duplicate again.
Effects> 3D Effects> Drop Shadow Vertical 3, Horizontal 2, Opacity 50, Blur 5, Color black. Add shadow to both tube layers.
Hide the top tube layer.
Select the paper layer in the layer palette. Selections> Float, Selections> Defloat, Selections> Invert. Select the bottom tube layer (the one visible) and hit the delete key.
Selections> Select None.
Drag the top tube layer above the frame and make visible again. Use the erase tool to remove bottom of the top tube that is over the frame. This makes the tube look like it is coming out of the frame.
Select the frame layer. Effects> 3D Effects> Drop Shadow: Vertical 3, Horizontal 2, Opacity 75, Blur 5, Color black. Then drop shadow again using Vertical -3, Horizontal -2 and the same settings for Opacity, blur and color as before.
Paste Black Cat 1. Image> Resize to 35% and place at the bottom left of the frame.
Paste Leaves 1 Use pick tool to free rotate to right. Drag the leaves behind the paper layer.
Adjust Brightness and Contrast to the same settings as before. Repeat again.
Paste Mushroom 4, Image> Mirror, Image> Resize to 50%. Drag to the bottom layer and place off to the right.
Paste Pumpkin 4 and resize to 35%. Drag behind paper layer and place to the left. Duplicate, Image> Mirror.
Paste Rocks 1 and drag to bottom layer. Place at bottom.
Paste Spider 1 and resize to 25%. Place at the top left of the frame. Using Pick Tool rotate slightly left. Duplicate and place at the bottom left on rocks. Duplicate again and place on the other side of the rocks.
Paste Web 1 and place over paper layer. Select the paper layer in the layer palette. Selections> Float, Selections> Defloat, Selections> Invert, Select the web layer and hit the delete key.
Selections> Select None.
Change the blend mode on the web to Soft Light and duplicate 4 times. Merge each web to the paper separately.
Shadow all of the elements that you added to the tag. Vertical 3, Horizontal 2, Opacity 50, Blur 5, Color black.
Merge Visible.
Create New Raster layer and flood fill with color #563058.
Open Mask- HalloweenMask2byJenny in your psp.
Layers> New Mask Layer> From Image. Select Mask in the drop down menu. Select Source Luminance and deselect (if it is selected) Invert Mask Data.
Merge Group.
Merge Visible.
Resize to 600x600
Add Copyright
Add Name. I used 1610_Cancellaresca size 100 Bold stroke 2 color #fbf148.
Noise Uniform, 27, Monochrome checked.
Shadow name to Vertical 3, Horizontal 2, Opacity 70, Blur 5, Color Black.
Merge Visible.
Save as PNG.
Thank you for allowing me the use of your wonderful kit Susan.

Subscribe to:
Post Comments (Atom)
TWI

Sunshine Daze Topsite
Vote Please

Fan Of


About Me

- SuthrnPrincess
- I am a mom of 5 rambunctious and audacious kids. 1 girl and 4 boys. I started out tagging and fell in love with my PSP. I am with the most wonderful man in my world, George. If you make something with a mask or template I would love to see it. Please feel free to email me at georges_princess@yahoo.com. If you make a tutorial please link back to my blog for supplies do not include my materials nor link to my file share site. I would love to put your tutorial link on my blog so please feel free to email me :).
My Blinkies


CT For


0 comments:
Post a Comment