Tuesday, October 25, 2011
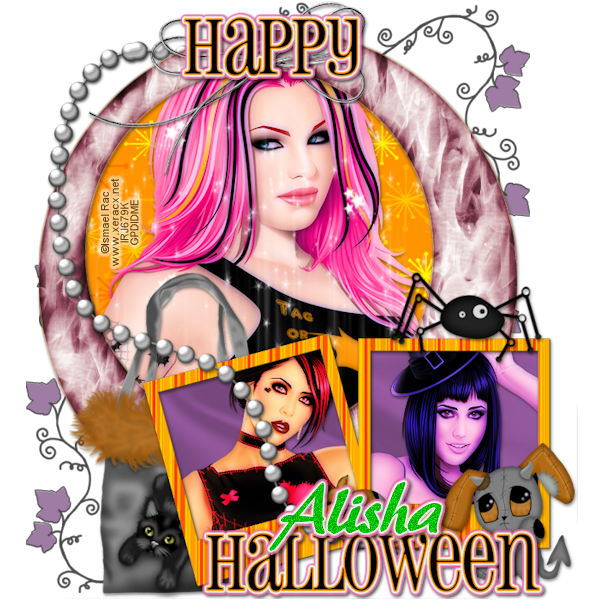
 Happy Halloween
11:15 PM | Posted by
SuthrnPrincess |
Edit Post
Supplies:
Tube of choice. I used the awesome work of Ismael Rac available at his store.
PTU Kit Happy Halloween by Lost's PSP Mania
Font of choice. I used Brush Flash
PlugIns: Xero-Porcelain, EyeCandy5- Gradient Glow & Backlight (all optional)
Let's Get Started:
Open a new 700 x 700 image.
Paste Frame 5.
Paste Frame 3. Image> Resize to 75% and position at the bottom of the frame slightly off centered.
Paste Paper 13. Image> Resize to 75%. Drag under the double frame layer and position. Select your wand tool and the double frame layer. Click inside of both frames in the double frame. Selections> Modify> Expand by 10. Selections> Invert. Select paper layer and hit the delete key on your keyboard.
Selections> Select None.
Paste Paper 24. Image> Resize to 75% drag under circle frame and position as desired. Select your wand tool and the circle frame layer. Click inside of both frames in the circle frame. Selections> Modify> Expand by 10. Selections> Invert. Select paper layer and hit the delete key on your keyboard.
Selections> Select None.
Select Double frame layer and duplicate. Change the blend mode of the top double frame layer to Multiply and then merge together.
Paste Wordart "Happy Halloween". Image> Resize to 65%. Use the Selection Tool to draw a square around the word "Happy". Edit> Cut. Edit> Paste as new layer.
Position "Happy" at the top of the frame and "Halloween" at the bottom right of the frames.
Paste Bags1. Image> Resize to 85%. Drag the layer behind the paper frame for the double frame and position to the left.
Paste Bow5. Image> Resize to 85% and position behind "Happy".
Paste Vines1. Drag layer to bottom and position off to bottom left. Duplicate. Image> Mirror. Image> Flip. Change the opacity on both to 71%.
Paste Candy1. Image> Resize to 40%. Drag above double frame and position to the bottom middle where the two frames meet.
Paste Chain. Image> Resize to 75%. Drag layer behind the candy layer. Duplicate and drag layer behind the paper layer for the round frame.
Select the top chain and use your eraser tool to the right portion of the chain that hangs over the large frame.
Paste Cute Spider. Image> Resize to 35%. Position above right double frame.
Paste BunnyDevil. Image> Resize to 30%. Position at the bottom right of the double frame.
Paste Sparkles1. Drag layer above bottom paper and use pick tool to stretch to fit height wise.
Select the paper layer for the round frame. Selections> Float. Selections> DeFloat. Selections> Invert. Select the sparkle layer and hit the delete key on your keyboard.
Paste your first tube of choice. Position in the bottom right frame. Select the double frame layer and your wand. Click inside the right frame only. Selections> Modify expand by 5. Selections> Invert. Select tube layer and hit the delete key on your keyboard.
Selections> Select None.
Effects> PlugIns> Xero: Porcelain- Softness 50, Strength 128, Brightness 128, Red Channel 0, Green Channel 0, Blue Channel 255.
Duplicate the tube.
Adjust> Color> Red/Green/Blue> Red -22, Green -100, Blue 100. Change the opacity to 50% and the blend mode to Overlay. Merge the two layers together.
Paste your second tube of choice. Select the double frame layer and your wand. Click inside the left frame only. Selections> Modify expand by 5. Selections> Invert. Select tube layer and hit the delete key on your keyboard.
Selections> Select None.
Use Xero-Porcelain with the same settings.
Duplicate.
Adjust> Color> Red/Green/Blue> Red 100, Green -28, Blue -88. Change the opacity to 75% and the blend mode to Overlay. Merge the two layers together.
Paste your third tube of choice. Position in large frame. Use Xero-Porcelain with the same settings on the tube. Duplicate tube. Change the blend mode to luminance. Merge the two together.
Select the paper layer for the big frame. Selections> Float. Selections> Defloat. Selections> Invert. Select the tube layer again and hit the delete key on your keyboard.
Drop Shadow all 3 tubes. Effects> 3D Effects> Drop Shadow: Vertical 2, Horizontal 1, Opacity 50, Blur 5, Color Black.
Select the word art layers and add gradient glow to your liking and then shadow to the same settings.
Merge Visible.
Image> Resize 600 x 600.
Add copyright.
Add name using font of choice. I used Brush Flash size 72. Color #00c000.
Add Gradient Glow and/or Backlight to name with settings of choice if desired.
Effects> 3D Effects> Drop Shadow: Vertical 2, Horizontal 2, Opacity 75, Blur 5, Color Black.
Merge Visible.
Save as PNG.
Thank you Alisha for allowing me the use of your wonderful kit!
Labels:
PTU kit tut
Subscribe to:
Post Comments (Atom)
About Me

- SuthrnPrincess
- I am a mom of 5 rambunctious and audacious kids. 1 girl and 4 boys. I started out tagging and fell in love with my PSP. I am with the most wonderful man in my world, George. If you make something with a mask or template I would love to see it. Please feel free to email me at georges_princess@yahoo.com. If you make a tutorial please link back to my blog for supplies do not include my materials nor link to my file share site. I would love to put your tutorial link on my blog so please feel free to email me :).
Followers
Labels
- 2 pc set (2)
- 3 pc set (5)
- animated (1)
- Announcement (4)
- Awards (1)
- FTU Kit Tut (41)
- No Scrap Tut (5)
- No tube (1)
- Previews (2)
- PTU kit tut (239)
- Snags (1)


0 comments:
Post a Comment