Monday, October 31, 2011
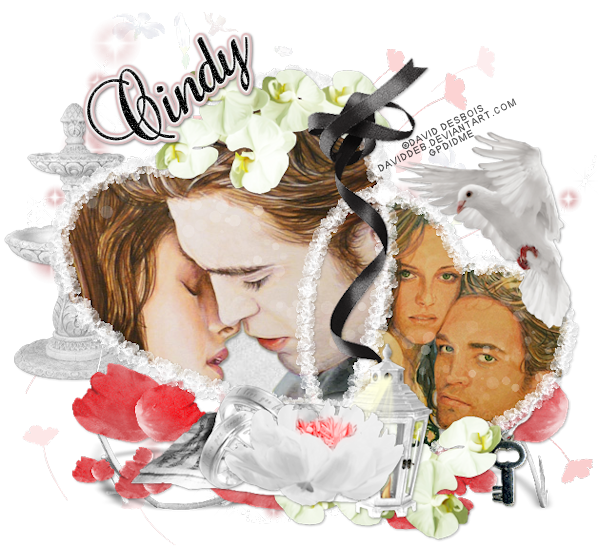
 Twilight Love
11:29 AM | Posted by
SuthrnPrincess |
Edit Post
Supplies:
Tubes of choice. I used David Desbois. He is a free to use artist that I have permission to use through a group. Please obtain his permission before using.
PTU Kit Twilight Wedding by Cindy at ChiChi Designz.
Plug Ins (optional): Gradient Glow & Backlight
Fonts: Baroque Script
Let's Get Started:
Open a new 700 x 700 image.
Paste Heart Frame.
Paste your first tube of choice. Position in the top heart. Select your wand tool and the frame layer. Click inside of the top heart. Selections> Modify> Expand by 7. Selections> Invert. Select the tube layer again and hit the delete key on your keyboard. Selections> Select None.
Paste your second tube of choice. Position in the bottom heart. Select your wand tool and the frame layer. Click inside of the bottom heart. Selections> Modify> Expand by 7. Selections> Invert. Select the tube layer again and hit the delete key on your keyboard. Selections> Select None.
Paste Paper 5. Drag behind bottom heart frame tube. Select your wand tool and the frame layer. Click inside of the bottom heart. Selections> Modify> Expand by 7. Selections> Invert. Select the paper layer again and hit the delete key on your keyboard. Selections> Select None.
Paste Paper 18. Drag behind top heart tube layer. Select your wand tool and the frame layer. Click inside of the top heart. Selections> Modify> Expand by 7. Selections> Invert. Select the paper layer again and hit the delete key on your keyboard. Selections> Select None.
Paste BlackRibbon. Image> Resize to 70%. Drag to the top layer and position on the right of the larger heart frame (like in my tag).
Paste BubbleTrail. Drag the layer under the heart frame layer. Select your wand tool and the frame layer. Click inside of both hearts. Selections> Modify> Expand by 7. Selections> Invert. Select the bubble trail layer again and hit the delete key on your keyboard. Selections> Select None.
Change the Opacity of the Bubble Trail to 50% (located above the blend mode drop down and layer list on the right in PSP).
Paste Dove. Image> Resize to 50% and then resize again to 85%. Drag to the top layer and position to the top right of the frame.
Paste Flower. Image> Resize to 50% and then to 85%. Position at the bottom of the heart frame.
Paste FlowerTrail and drag to bottom layer. Position centered behind the frame.
Paste Fountain. Image> Resize to 50%. Drag behind bottom paper layer and position to the left of the top heart.
Paste Glitters. Drag to bottom layer.
Paste KeyString. Drag layer below bottom paper layer. Image> Resize to 85% and position at the bottom right where key is visible.
Paste Lanterne. Image> Resize to 50% and then 85%. Drag layer behind the Flower layer and position off to the right of the flower. Use erase tool to remove handle so that it is not over the tube.
Paste MusicSheets. Image> Resize to 85% and then 85% again. Drag behind the lanterne layer and position to left of flower. Use erase tool to remove the portion of the sheets that stick out behind the lanterne.
Paste Orchids. Image> Resize to 50%. Drag layer above frame layer and position at the top of the top heart. Duplicate. Image> Flip. Image> Mirror. Position with Pick tool to bottom right.
Paste Petals. Drag under key layer and position.
Paste Rings. Image> Resize to 50% twice and then 85%. Drag layer above black ribbon layer. Position to the left of the flower.
Paste ScatteredFlowers. Drag above Glitters layer (that will make it the next to the bottom layer).
Paste String Shaded. Image> Resize to 85%. Drag below the flower petal layer and position as desired.
Effects> 3D Effects> Drop Shadow: Vertical 1, Horizontal 1, Opacity 30, Blur 3, Color black. Do this on the top 9 layers (layer 9 should be the heart frame).
Drop shadow tube layers: Vertical 2, Horizontal 1, Opacity 40, Blur 3, Color Black.
Drop shadow key, petals, and fountain layer the same as the top 9 layers.
Merge visible.
Image> Canvas Size> 630 width by 580 height.
Use Pick tool to reposition tag if it shifts off of the canvas when you resize the canvas.
Image> Resize: 600 width by 552 height.
Add copright.
Add name with font of choice. I used Baroque Script size 48 Bold color black.
Adjust> Add/Remove Noise> Add Noise: Gaussian 55 Monochrome checked.
Effects> PlugIns> EyeCandy5> Gradient Glow: Outside, 5, 8, 100, 0, 7, white.
Effects> PlugIns> EyeCandy5> Backlight: 270, 6, 3, outline, 2, 0.50, 0, 6; 3, #e4b8ba and white, 27.
Effects> 3D Effects> Drop Shadow: Vertical 1, Horizontal 1, Opacity 56, Blur 3, Color Black.
Merge Visible.
Save as PNG.
Thank you Cindy for allowing me the use of this wonderful kit.
Labels:
PTU kit tut
Subscribe to:
Post Comments (Atom)
About Me

- SuthrnPrincess
- I am a mom of 5 rambunctious and audacious kids. 1 girl and 4 boys. I started out tagging and fell in love with my PSP. I am with the most wonderful man in my world, George. If you make something with a mask or template I would love to see it. Please feel free to email me at georges_princess@yahoo.com. If you make a tutorial please link back to my blog for supplies do not include my materials nor link to my file share site. I would love to put your tutorial link on my blog so please feel free to email me :).
Followers
Labels
- 2 pc set (2)
- 3 pc set (5)
- animated (1)
- Announcement (4)
- Awards (1)
- FTU Kit Tut (41)
- No Scrap Tut (5)
- No tube (1)
- Previews (2)
- PTU kit tut (239)
- Snags (1)


0 comments:
Post a Comment