Saturday, June 09, 2012
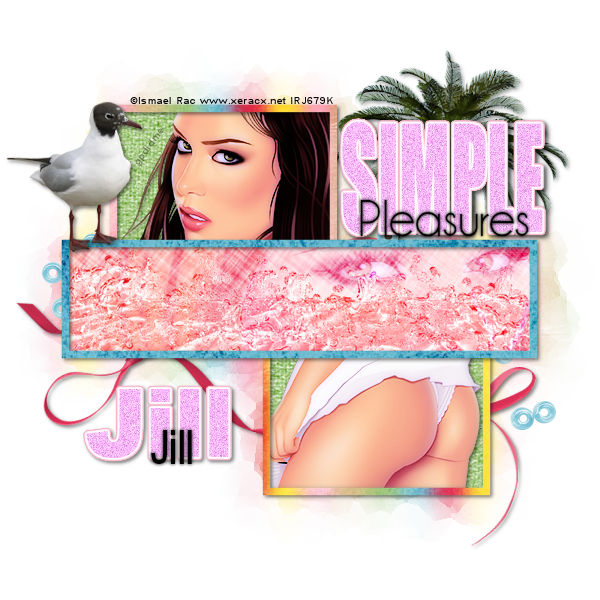
 Simple Pleasures FTU
1:08 AM | Posted by
SuthrnPrincess |
Edit Post
Supplies:
Vix's Template 9
FTU Kit Summer Lovin' Mini by Created by Jill
Tubes of choice. I used the awesome work of Ismael Rac available in his store. Do not use unless you have purchased the tube and have a license.
PlugIns: Xero & EyeCandy 5
Font Arial Narrow and Arial Black.
Let's Get Started:
Open Vix's Template 9
Hold Shift and press D.
Close original template.
Delete TOU layer.
Paste Paper06. Drag above Optional Tag Back Layer. Select the Optional Tag Back layer. Selections> Select All. Selections> Float. Selections> Defloat. Selections> Invert. Select the paper06 layer and hit the delete key on your keyboard. Selections> None.
Delete the original Optional Tag Back layer.
Paste Paper06 again and drag above the Square Frame layer. Select the Square Frame layer. Selections> Select All. Selections> Float. Selections> Defloat. Selections> Invert. Select the paper06 layer and hit the delete key on your keyboard. Selections> None.
Delete the original Square Frame Layer.
Paste Paper05. Drag above the Rectangle Frame layer. Select the Rectangle Frame layer. Selections> Select All. Selections> Float. Selections> Defloat. Selections> Invert. Select the paper05 layer and hit the delete key on your keyboard. Selections> None.
Delete the Rectangle Frame layer.
Paste Paper03. Drag above the Copy of Rectangle layer. Image> Resize to 65%. Select the Copy of Rectangle layer. Selections> Select All. Selections> Float. Selections> Defloat. Selections> Invert. Select the paper03 layer and hit the delete key on your keyboard. Selections> None.
Delete the Copy of Rectangle layer.
Paste Paper02. Drag above the Square Fills layer. Image> Resize to 65%. Select the Square Fills layer. Selections> Select All. Selections> Float. Selections> Defloat. Selections> Invert. Select the paper02 layer and hit the delete key on your keyboard. Selections> None.
Delete the Square Fills layer.
Paste Beads. Drag under Simple layer.
Paste Palm tree. Image> Resize to 50%. Drag behind the beads. Position at the top behind the wordart.
Paste Ribbon. Image> Resize to 50%. Drag above the Palm tree layer. Position below the rectangle.
Paste Seagull. Image> Resize by 50%. Drag to top layer. Position above the Rectangle Frame and to the left of the top Square.
Paste WaterSplash. Image> Resize to 75%. Drag above the Rectangle paper. Select the WaterSplash layer. Selections> Select All. Selections> Float. Selections> Defloat. Selections> Invert. Select the WaterSplash layer and hit the delete key on your keyboard. Selections> None.
Change the Blend Mode to Luminance.
Select the Simple wordart layer. Adjust> Color> Channel Mixer: Red 200, Green 200, Blue 200, Constant 200. Monochrome checked.
Adjust> Color> Red/Green/Blue: Red 100, Green -28, Blue 100.
Adjust> Add/Remove Noise> Add Noise: Gaussian 25 Monochrome checked.
Effects> PlugIns> EyeCandy5: Impact- Gradient Glow Oustide Glow, Masked Selections Selected, Glow Radius 5, Soften Corners 4, Overall Opacity 100, Distortion Amount 0, Distortion Lump Size 0, Gradient Smoothness 100, Color white and #f5b6cc.
Effects> 3D Effects> Drop Shadow: Vertical 2, Horizontal 2, Opacity 50, Blur 5, Color Black.
Select the Pleasures layer.
Effects> 3D Effects> Drop Shadow; Vertical 0, Horizontal 0, Opacity 100, Blur 5, Color black.
Use Pick Tool to position Simple and Pleasure just above the rectangle on the right side.
Paste close up of the tube that you chose. Drag behind the WaterSplash layer. Select the Rectangle paper layer. Selections> Select All. Selections> Float. Selections> Defloat. Selections> Invert. Select the rectangle paper layer and hit the delete key on your keyboard. Selections> None.
Change the tubes blend mode to Overlay.
Paste the 2nd tube of choice. Drag above the Square paper layer. Position in top frame. Select the Square paper layer. Using your wand to click inside. Selections> Modify> Expand by 5. Selections> Invert. Select the tube layer and hit delete.
Effects> PlugIns> Xero> Porcelain: Softness 50, Strength 128, Brightness 128, Red 0, Green 0, Blue 255.
Duplicate the tube. Change the blend mode of the top tube to Softlight. Merge down.
Paste 3rd tube and repeat the steps taken with the second tube in the bottom frame.
Drop Shadow all layers except the watersplash, pleasures, tag back and beads.
Delete the background layer.
Merge Visible.
Add Copyright.
Add name with font of choice. I used Arial Black size 95 Bold color #ffb8ff.
Adjust> Add/Remove Noise> Add Noise Gaussian 25 Mono checked.
Drop Shadow 2, 2, 50, 5, black.
With second font type name again. I used Arial narrow. Size 48 black. Center over the bottom of the larger name.
Drop shadow 0, 0, 100, 5, black.
Merge Visible.
Save as PNG.
Thankies Jill and Vix for allowing use of your awesome creations. And a thankies to Ismael Rac as well for allowing use of his amazing artwork!!
Labels:
FTU Kit Tut
Subscribe to:
Post Comments (Atom)
Chat box
About Me

- SuthrnPrincess
- I am a mom of 5 rambunctious and audacious kids. 1 girl and 4 boys. I started out tagging and fell in love with my PSP. I am with the most wonderful man in my world, George. If you make something with a mask or template I would love to see it. Please feel free to email me at georges_princess@yahoo.com. If you make a tutorial please link back to my blog for supplies do not include my materials nor link to my file share site. I would love to put your tutorial link on my blog so please feel free to email me :).
Followers
Labels
- 2 pc set (2)
- 3 pc set (5)
- animated (1)
- Announcement (4)
- Awards (1)
- FTU Kit Tut (41)
- No Scrap Tut (5)
- No tube (1)
- Previews (2)
- PTU kit tut (239)
- Snags (1)


0 comments:
Post a Comment