Thursday, June 21, 2012
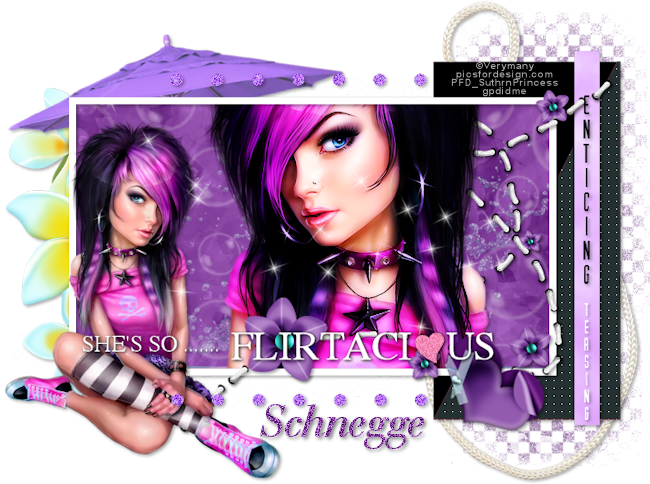
 So Flirtacious PTU
10:05 PM | Posted by
SuthrnPrincess |
Edit Post
Supplies:
PTU Summer Lovin' by Schnegges Scraps available at Pimp My Tags w/Scraps
Template by Rachel available on her blog.
Tube of choice. I used the awesome work of Verymany available at Pics For Design.
PlugIns: Xero: Porcelain (optional)
Font: BauerBodniBT
Let's Get Started:
Open Temp106 by Rachel
Shift + D
Close original template
Delete ©Info layer
Paste Paper05. Drag above Gradient Background layer. Select the Gradient Background layer. Selections> All. Selections> Float. Selections> Defloat. Selections> Invert. Select the paper layer. Hit the delete key on your keyboard. Selections> Select None.
Delete Gradient Background layer.
Paste Paper11. Image> Resize to 65%. Drag over Pink Strip layer and position. Select the Pink Strip layer. Selections> Select All. Selections> Float. Selections> Defloat. Selections> Invert. Select the paper layer. Hit the delete key on your keyboard. Selections> Select None.
Delete Pink Strip layer.
Select the Glitter Dots layer. Adjust> Color> Red/Green/Blue> Red -19, Green -19, Blue 100.
Paste Paper06. Drag above Brush layer. Select Brush layer. Selections> All. Selections> Float. Selections> Defloat. Selections> Invert. Select the paper layer. Hit the delete key on your keyboard. Selections> Select None.
Delete original Brush layer.
Paste tube (close-up preferably). Drag above the paper layer that is in the frame. Position as desired.
Effects> PlugIns> Xero: Porcelain
Duplicate the tube. Change the top tube layer Blend Mode to Hardlight. Merge Down.
Select the paper layer inside of the frame. Selections> All. Selections> Float. Selections> Defloat. Selections> Invert. Select the tube layer. Hit the delete key on your keyboard. Selections> Select None.
Paste tube again. Image> Resize to 45%. Drag above Frame layer. Image> Mirror. Position to the left.
Select the SSFText layer. Drag above the top tube layer.
Paste Water. Drag behind tube close up layer. Position inside of the frame at the bottom. Select the paper layer. Selections> All. Selections> Float. Selections> Defloat. Selections> Invert. Select the paper layer. Hit the delete key on your keyboard. Selections> Select None.
Change the water opacity to 65%.
Paste String. Image> Mirror. Drag above Brush layer. Position to the right.
Paste Stitches02. Position with the Pick tool to where the small top flower is right on the top right corner of the frame
. Duplicate. Drag below the tube layer. Select the top stitch layer and use your erase tool to remove the stitches over the face of your tube.
Paste Parasol. Image> Resize to 85%. Drag to bottom. Position at the top left. Use pick tool to rotate to your liking.
Paste heart02. Image> Resize to 50%. Drag behind SSFText layer. Rotate with Pick tool to your liking and place at the bottom of the right corner of the frame.
Paste flower07. Image> Free Rotate to the right 90 degrees. Drag above brush layer and position to left.
Paste Bubbles. Drag above the frame paper layer. Position to the left of the close up. Change Blend mode to Screen. Duplicate. Image> Mirror.
Select the frame paper layer. Selections> All. Selections> Float. Selections> Defloat. Selections> Invert. Select the papereach bubble layer seperately. Hit the delete key on your keyboard. Selections> Select None.
Change the opacity of both bubble layers to 36%.
Merge the bottom bubble layer to the paper. Merge the other bubble layer to the merged layer.
Paste deco. Drag to bottom layer and position at the bottom of the frame.
Duplicate. Image> Flip. Image> Mirror. Change opacity to 60% for both.
Effects> 3D Effects> Drop Shadow: Vertical 2, Horizontal 2, Opacity 35, blur 5, color black.
Shadow all of the layers except the brush stars, SSFText, water, merged (brush). Raster 4 and copy of Raster 4.
Use Selection Tool to Draw a square around "She's So...."
Adjust> Color> Channel Mixer
Selections> Select None
Drop Shadow vertical 1, horizontal 1, opacity 100, blur 5, color black.
Merge Visible.
Image> Resize to 650 width by 484 height.
Add copyright.
Add name with font of choice. I used BauerBodniBT size 48 bold color #874401
Drop Shadow 2, 2, 50, 5, black.
Merge Visible.
Save as PNG.
Thank you to Schnegge for use of her awesome kit and to Rachel for use of her wonderful template. As always a big thank you to Verymany for creating such a beautiful tube to work with!!
Labels:
PTU kit tut
Subscribe to:
Post Comments (Atom)
Chat box
About Me

- SuthrnPrincess
- I am a mom of 5 rambunctious and audacious kids. 1 girl and 4 boys. I started out tagging and fell in love with my PSP. I am with the most wonderful man in my world, George. If you make something with a mask or template I would love to see it. Please feel free to email me at georges_princess@yahoo.com. If you make a tutorial please link back to my blog for supplies do not include my materials nor link to my file share site. I would love to put your tutorial link on my blog so please feel free to email me :).
Followers
Labels
- 2 pc set (2)
- 3 pc set (5)
- animated (1)
- Announcement (4)
- Awards (1)
- FTU Kit Tut (41)
- No Scrap Tut (5)
- No tube (1)
- Previews (2)
- PTU kit tut (239)
- Snags (1)


0 comments:
Post a Comment