Monday, May 21, 2012
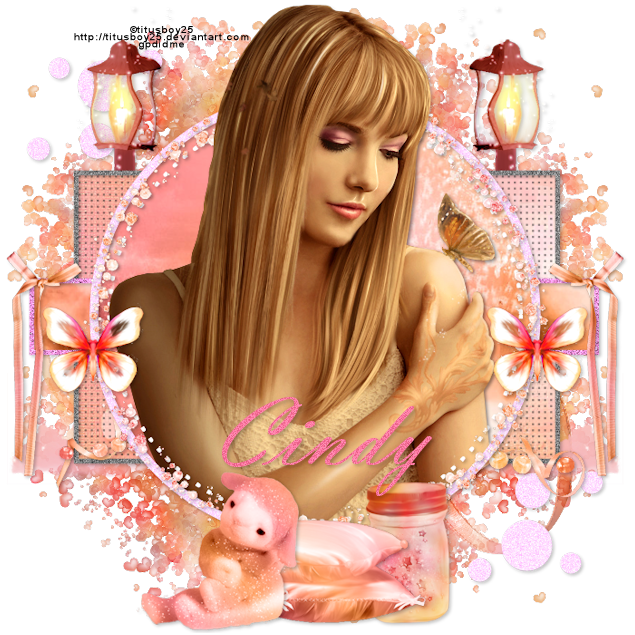
 Soft Dreams PTU
Supplies:
PTU Kit Soft Dreams by Cindy (ChiChi Designz)
Tube of choice. I used a wonderful FTU artist named
Titusboy25. Do not use his work without asking permission prior.
Template by Sue available on the Creative Misfit Blog
Font of choice. I used Vladimir Script
Lets Get Started:
Open Template 1 by Sue.
Shift+D to make a copy and close the original.
Delete the creator layer.
Drag the large rectangle layer along with the dots and frame
for it under the bottom long rectangle layer.
Paste Rose Frame. Drag the layer above the circle dots
layer. Image> Resize by 90%.
Paste Paper 21. Image> Resize to 80%. Drag above circle
layer.
Select the circle layer. Selections> Float.
Selections> Defloat. Selections> Invert. Select the paper layer and hit
the delete key on your keyboard. Selections> Select None.
Paste Paper 18. Image> Resize to 68%. Drag above large
rectangle layer.
Select the large rectangle layer. Selections> Float.
Selections> Defloat. Selections> Invert. Select the paper layer and hit
the delete key on your keyboard. Selections> Select None.
Duplicate the paper layer and change the blend mode to
Multiply. Duplicate the paper twice more so that you have 3 layers and then
merge them back into the original one layer at a time.
Paste paper 14. Image Resize to 80%. Drag behind horizontal
rectangle frame layer. Position the paper as desired behind the frame.
Select the horizontal rectangle layer. Selections> Float.
Selections> Defloat. Selections> Invert. Select the paper layer and hit
the delete key on your keyboard. Selections> Select None.
Paste Paper 13. Image> Resize to 85%. Drag behind
vertical rectangle frame layer.
Select the vertical rectangle layer. Selections> Float.
Selections> Defloat. Selections> Invert. Select the paper layer and hit
the delete key on your keyboard. Selections> Select None.
Select the Circle Frame layer. Adjust> Color>
Red/Green/Blue> Red 100, Green 100, Blue 100. Repeat R/G/B changing Green to
16 and Blue to 77.
Select the Dot Circle Layer.
Adjust> Color> Red/Green/Blue> Red 100, Green 100, Blue 100.
Repeat not changing the numbers on any of the three. And then repeat R/G/B
changing Green to 16 and Blue to 77.
Repeat what you did with the Dot Circle with both the
horizontal and vertical rectangle frames.
Select the Large Rectangle Frame and Adjust the color once
with all three (red/green/blue) set to 100.
Select Circle 1 layer and Adjust> Color>
Red/Green/Blue> Red 100, Green 100, Blue 100. Repeat R/G/B changing Green to
16 and Blue to 77.
Do the same with Circle 2.
Paste Beads. Image> Resize to 95%.Drag above the large
rectangle frame layer and position at the bottom of the rectangle.
Paste Clouds. Image> Resize to 85%. Drag above the Mask
layer and position off to the left. Duplicate and mirror.
Paste Bow. Image> Resize to 45%. Drag above horizontal
frame and position to the right corner. Duplicate and mirror.
Paste Ribbon. Drag behind clouds. Change Opacity of the
Ribbon layer to 57%. Erase the bottom end of the ribbon.
Paste Tree. Drag layer to the bottom and position at the
top. Duplicate. Image> Flip. Duplicate. Image> Free Rotate> 90 degrees
left. Duplicate. Image> mirror.
Delete the Mask Layer.
Paste Pearl Ribbon. Image> Resize to 90%. Drag behind
beads layer. Position behind the beads.
Paste Lantern. Image> Resize to 65%. Drag behind the
large rectangle layer and position. Duplicate and Mirror.
Drag the 2 circle glitter layers behind the lantern layers.
Paste Pillows. Image> Resize to 55%. Position over the
bottom of the vertical rectangle and drag above frame for the rectangle.
Paste Lamb. Image> Resize to 45%. Position next to the
pillow to the left.
Paste Jar. Image> Resize to 35%. Drag behind pillow layer
and position to the right.
Paste Butterfly. Image> Resize to 25%. Drag to top layer.
Position to the left of the circle Frame. Duplicate. Image> Mirror.
Paste tube of choice. Drag layer above circle layer.
Effects> 3D Effects> Drop Shadow: Horizontal 2, Vertical
2, Opacity 25, Blur 5, Color Black.
Duplicate. Drag above Rose frame layer.
Select the circle layer. Selections> Select All.
Selections> Float. Selections> Defloat. Selections> Invert. Select the
bottom tube layer and hit the enter key on your keyboard. Selections> Select
None.
Select the top tube layer and remove with your erase tool
the bottom part that is over the frames bottom portion.
Shadow the layers you would like with the same setting as
the tube layer.
Merge Visible.
Image> Resize to 635x635.
Add Copyright.
Add name using font of choice. I used Vladimir Script size
100 Bold color # ff78a0
Adjust> Add/Remove Noise> Add Noise> Uniform 20
Monochrome checked.
Shadow the name.
Merge Visible.
Save as PNG.
Thank you Cindy for allowing me to use your awesome kit and
also a huge thank you to Titusboy25 for allowing use of his artwork.

Subscribe to:
Post Comments (Atom)
TWI

Sunshine Daze Topsite
Vote Please

Fan Of


About Me

- SuthrnPrincess
- I am a mom of 5 rambunctious and audacious kids. 1 girl and 4 boys. I started out tagging and fell in love with my PSP. I am with the most wonderful man in my world, George. If you make something with a mask or template I would love to see it. Please feel free to email me at georges_princess@yahoo.com. If you make a tutorial please link back to my blog for supplies do not include my materials nor link to my file share site. I would love to put your tutorial link on my blog so please feel free to email me :).
My Blinkies


CT For


0 comments:
Post a Comment