Monday, November 19, 2012
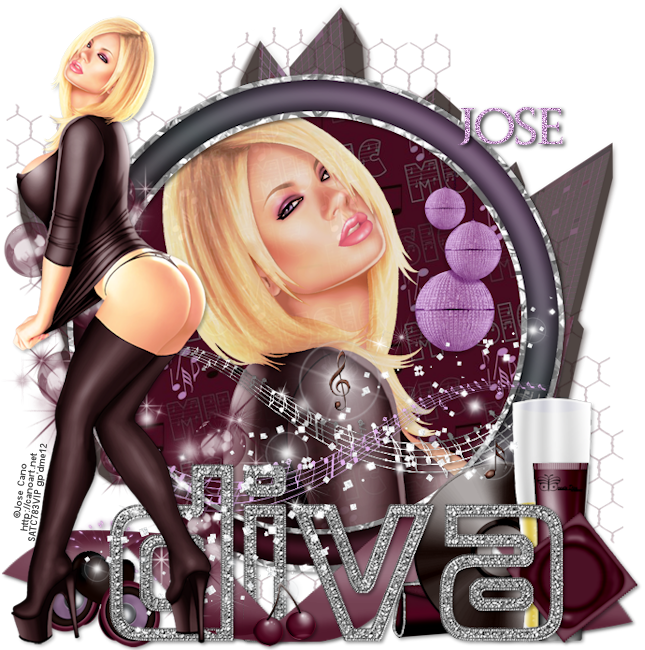
 Diva PTU
5:07 PM | Posted by
SuthrnPrincess |
Edit Post
Supplies:
PTU Kit KellyLynn by AmyMarie available at Scraps & the City.
Tube of choice. I used Jose Cano available at Scraps & the City.
Font of choice. I used Augustus.
Let's Get Started:
Open a new image 700 by 700.
Paste frame 2. Image> Resize to 85%.
Paste pp2. Image>Resize to 85%. Drag behind the frame. Select the frame. Click inside of the frame with the wand tool. Selections> Modify> Expand by 30. Selections> Invert. Select the paper layer and hit the delete key on the keyboard. Selections> Select None.
Select the frame layer.
Effects> 3D Effects> Drop Shadow: vertical 2, horizontal 2, opacity 50, blur 5, color black.
Paste close up. Srag behind the frame. Position as desired.
Drop shadow same settings.
Select the paper layer. Selections> All. Selections> Float. Selections> Defloat. Selections> Invert. Select the tube layer and hit the delete key on the keyboard. Selections> Select None.
Lower the tube layer opacity to 89%.
Merge the tube down.
Paste full body tube. Image> Mirror. Image>Resize to 85%. Drag above the frame layer. Position to the left.
Drop shadow changing the opacity to 30%.
Paste diva1. Image>Resize to 85%. Drag behind the tube. Position at the bottom.
Drop shadow changing the opacity to 45%.
Paste divamake. Image>Resize to 50%. Drag behind the diva layer. Position at the end of diva.
Drop shadow changing the opacity to 30%.
Paste disc2. Image>Resize to 65%. Drag behind divamake. Position behind the "a".
Drop shadow same settings.
Paste ball2. Image> Resize to 65%. Drag behind the frame. Image> Mirror. Position to the right.
Paste beer. Image>Resize to 65%. Drag above the disc. Position to the right.
Drop shadow same settings.
Paste cherries. Image>Resize to 35%. Drag above diva. Position at the bottom of "i".
Drop shadow changing the opacity to 45%.
Paste b2. Drag behind diva. Position to the left.
Paste city2. Drag to the bottom layer. Position at the top. Lower the opacity to 75%.
Paste cond1. Image> Resize to 35%. Drag behind diva. Position at the bottom right.
Drop shadow same settings.
Paste 2. Drag above the frame. Image> Free Rotate> Right 90%. Position at the bottom. Use pick tool to stretch the ribbon width wise to fit the tag. Duplicate. Drag one layer above diva. Erase portions of the ribbon as desired so that the ribbon looks like it loops in and out of diva. (See my tag as an example).
Select the bottom ribbon.
Drop shadow changing the opacity to 60%.
Paste sparkle2. Drag behind cherries and position at the bottom.
Paste wire2. Drag to the bottom layer. Lower opacity to 30.
Paste speaker. Image> Resize to 35%. Drag behind diva. Position at bottom left.
Drop shadow changing the opacity to 40%.
Paste purse. Image>Resize to 35%. Drag below the cd layer. Position to the left of the cd.
Drop shadow same settings.
Merge visible.
Image. Canvas Size: 690 width by 650 height.
Recenter with pick tool.
Image> Resize to 645 width by 650 height.
Add copyright.
Add name with font of choice. I used Augustus size 48 Bold color #cca0d1.
Adjust> Add/Remove Noise> Add Noise: Gaussian 50 monochrome checked.
Drop shadow changing opacity to 85 and blur to 6.
Merge visible.
Save as PNG.
Labels:
PTU kit tut
Subscribe to:
Post Comments (Atom)
Chat box
About Me

- SuthrnPrincess
- I am a mom of 5 rambunctious and audacious kids. 1 girl and 4 boys. I started out tagging and fell in love with my PSP. I am with the most wonderful man in my world, George. If you make something with a mask or template I would love to see it. Please feel free to email me at georges_princess@yahoo.com. If you make a tutorial please link back to my blog for supplies do not include my materials nor link to my file share site. I would love to put your tutorial link on my blog so please feel free to email me :).
Followers
Labels
- 2 pc set (2)
- 3 pc set (5)
- animated (1)
- Announcement (4)
- Awards (1)
- FTU Kit Tut (41)
- No Scrap Tut (5)
- No tube (1)
- Previews (2)
- PTU kit tut (239)
- Snags (1)


0 comments:
Post a Comment